Some desserts just have a way of making people smile, and these Mini Cheesecake Tarts are one of them. I still remember my grandma making them every year for our family gatherings—they were the first to disappear from the dessert table! These little treats are the perfect combination of creamy cheesecake, a vanilla wafer crust, and a bright, fruity cherry topping. They’re simple, elegant, and guaranteed to be a hit wherever you serve them.

What I love most is how easy they are to make. You don't need any fancy equipment or springform pans, just a muffin tin and some paper liners. In under an hour, you'll have a dozen individual cheesecakes that are perfect for sharing (or not—no judgment here!).
Why You’ll Love Mini Cheesecake Tarts
- Quick and Easy: Minimal prep and bake time.
- No Fuss Crust: A single vanilla wafer does the trick!
- Perfect Portions: Individual servings make them great for parties.
- Creamy and Sweet: Rich cheesecake topped with fruity cherry pie filling.
- Make-Ahead Friendly: Chill them ahead for stress-free entertaining.
- Kid-Approved: Fun to make and even more fun to eat.
Ingredients You’ll Need
- 2 (8 oz) packages cream cheese, softened – The creamy base of your cheesecake.
- 1 cup white sugar – Adds the perfect sweetness.
- 2 large eggs – Help set the cheesecake.
- 1 teaspoon vanilla extract – Adds warm, sweet depth.
- 12 vanilla wafers – Nabisco Nilla Wafers are classic.
- 12 paper baking cups – Line your muffin tin for easy removal.
- 1 (21 oz) can cherry pie filling – The perfect tart-sweet topping.
Step-by-Step Instructions
Step 1: Prep Your Tools
- Preheat your oven to 350°F (175°C).
- Line a standard 12-cup muffin tin with paper baking cups.
- Place one vanilla wafer at the bottom of each cup to form the crust.
Step 2: Make the Cheesecake Batter
- In a large mixing bowl, beat the softened cream cheese until smooth and creamy.
- Gradually add in the sugar, mixing until well combined.
- Beat in the eggs, one at a time, followed by the vanilla extract.
- Scrape down the sides of the bowl and mix until smooth.
Step 3: Assemble and Bake
- Divide the cheesecake batter evenly among the 12 baking cups, filling each about ¾ full.
- Tap the muffin tin gently on the counter to release any air bubbles.
- Bake for 18-22 minutes, or until the centers are set and the tops look slightly puffed.
- Remove from the oven and let cool in the pan for 10 minutes.
- Transfer to a wire rack to cool completely.
Step 4: Add the Cherry Topping
- Once the cheesecakes are completely cooled, top each with a spoonful of cherry pie filling.
- Cover and refrigerate for at least 2 hours before serving (overnight is even better).
Serving and Storage Tips
Serve these mini cheesecake tarts chilled for the best texture and flavor. They make a beautiful addition to dessert trays, tea parties, or baby showers. You can also customize them with different pie fillings like blueberry, strawberry, or even lemon curd.
Store leftovers in an airtight container in the refrigerator for up to 5 days. For longer storage, you can freeze them (without topping) for up to 2 months. Thaw in the fridge overnight, then add the cherry topping before serving.
Helpful Notes
- Room Temp Cream Cheese: Make sure it’s softened for a smooth batter.
- Avoid Overbaking: They should still jiggle slightly in the center when you pull them out.
- Creative Toppings: Try whipped cream, chocolate ganache, or fresh berries.
- Mini Muffin Version: Use mini muffin tins and smaller wafers for bite-sized treats.
- Make Ahead: Great for preparing a day in advance—they get even better with time.
Frequently Asked Questions
1. Can I use low-fat cream cheese?
Yes, but the texture will be slightly less rich. Still delicious!
2. What if I don’t have vanilla wafers?
You can use graham cracker squares, gingersnaps, or make a simple crust with crushed cookies and butter.
3. Can I use a different pie filling?
Absolutely! Blueberry, raspberry, or peach all work wonderfully.
4. How do I know when they’re done baking?
They should be set around the edges and slightly jiggly in the center.
5. Can I freeze them with the cherry topping?
It’s better to freeze without the topping, then add it fresh after thawing.
Final Thoughts
These Mini Cheesecake Tarts are the kind of dessert that never goes out of style. They're easy to make, endlessly adaptable, and totally irresistible. Whether you're baking for a special occasion or just want to treat yourself, this recipe delivers all the flavor and charm of a full-size cheesecake—in a bite-sized package.
Go ahead and give them a try! I’d love to see your creations, so don’t forget to tag me if you share them online. Happy baking!
Print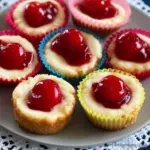
Mini Cheesecake Tarts
- Total Time: 2 hours 35 minutes
- Yield: 12 tarts 1x
Ingredients
- 2 8 oz packages cream cheese, softened
- 1 cup white sugar
- 2 large eggs
- 1 teaspoon vanilla extract
- 12 vanilla wafers (Nabisco Nilla Wafers recommended)
- 12 paper baking cups
- 1 21 oz can cherry pie filling
Instructions
Step 1: Prep Your Tools
- Preheat your oven to 350°F (175°C).
- Line a standard 12-cup muffin tin with paper baking cups.
- Place one vanilla wafer at the bottom of each cup to form the crust.
Step 2: Make the Cheesecake Batter
- In a large mixing bowl, beat the softened cream cheese until smooth and creamy.
- Gradually add in the sugar, mixing until well combined.
- Beat in the eggs, one at a time, followed by the vanilla extract.
- Scrape down the sides of the bowl and mix until smooth.
Step 3: Assemble and Bake
- Divide the cheesecake batter evenly among the 12 baking cups, filling each about ¾ full.
- Tap the muffin tin gently on the counter to release any air bubbles.
- Bake for 18-22 minutes, or until the centers are set and the tops look slightly puffed.
- Remove from the oven and let cool in the pan for 10 minutes.
- Transfer to a wire rack to cool completely.
Step 4: Add the Cherry Topping
- Once the cheesecakes are completely cooled, top each with a spoonful of cherry pie filling.
- Cover and refrigerate for at least 2 hours before serving (overnight is even better).
Notes
-
Room Temp Cream Cheese: Make sure it’s softened for a smooth batter.
-
Avoid Overbaking: They should still jiggle slightly in the center when you pull them out.
-
Creative Toppings: Try whipped cream, chocolate ganache, or fresh berries.
-
Mini Muffin Version: Use mini muffin tins and smaller wafers for bite-sized treats.
-
Make Ahead: Great for preparing a day in advance—they get even better with time.
- Prep Time: 15 minutes
- Cook Time: 20 minutes
Nutrition
- Calories: 240


Leave a Reply