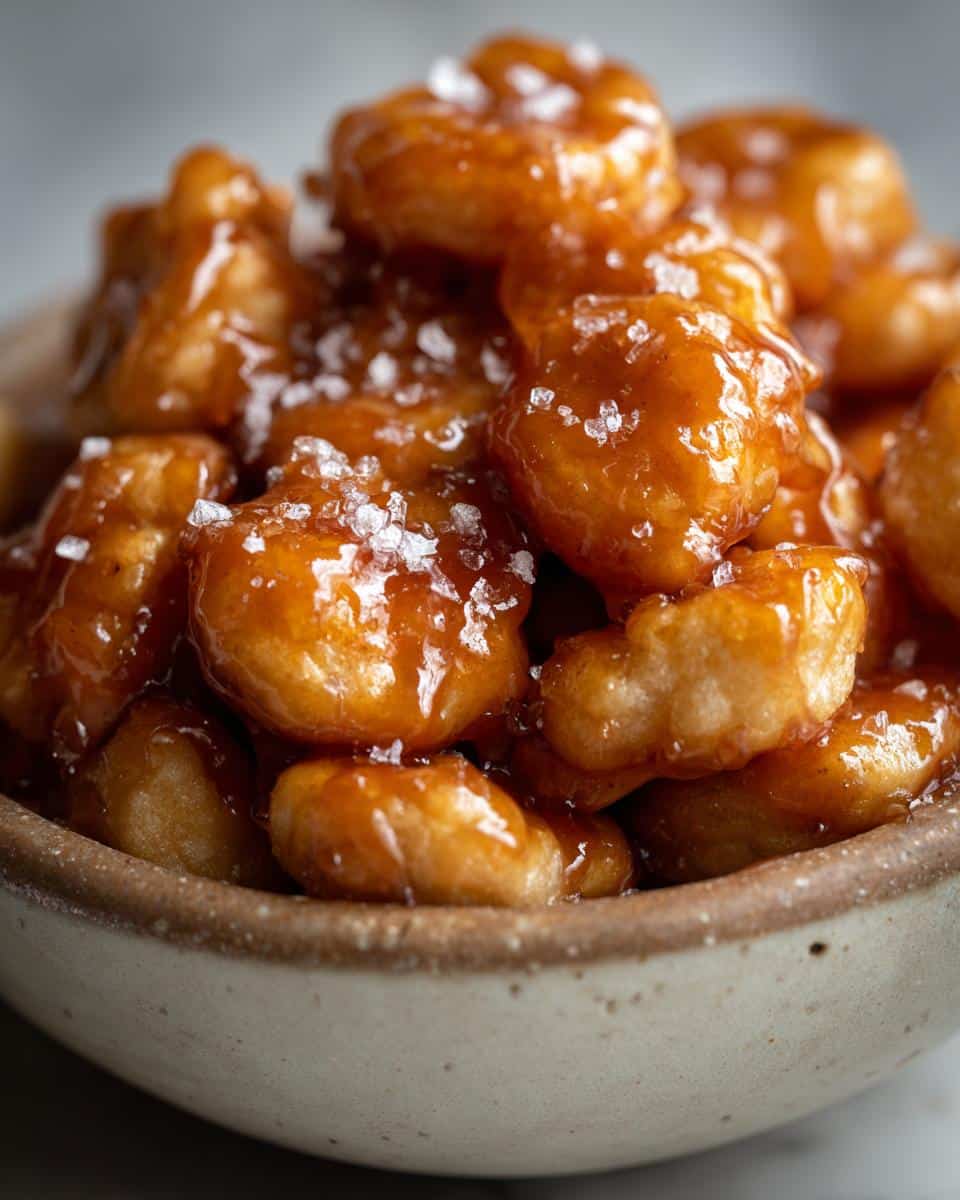
Oh my goodness, you HAVE to try these Salted Caramel Cracker Bites! They’re my go-to snack when I need something totally addictive—the perfect mix of sweet, buttery caramel and that salty crunch you just can’t resist. I’ve been making these for years, ever since my aunt slipped me the recipe on a stained index card at a family picnic. Now they’re the first thing to disappear at every potluck or movie night.

What makes them so special? That caramel glaze—rich, glossy, and just salted enough to keep you coming back for another handful. Trust me, once you make a batch, you’ll understand why I always double the recipe (and hide a container in the back of the pantry for myself!).
Ingredients for Salted Caramel Cracker Bites
Here's what you'll need to make these irresistible bites - and yes, every single ingredient matters! I've learned through trial and error (mostly error) that skimping or substituting just won't give you that perfect crunch-to-caramel ratio we're after.
- 1 package (9 ounces) oyster crackers - Don't even think about substitutes here! The tiny size and perfect crunch of oyster crackers are what makes this recipe work.
- 2 sticks (1 cup) butter - Real, salted butter please! It gives that rich base flavor you just can't get with margarine.
- 1 cup packed brown sugar - Pack it in there good - I press it down with my fingers until there's absolutely no air pockets left in the measuring cup.
- 2 teaspoons vanilla extract - The good stuff! I splurge on pure vanilla because you can really taste the difference.
- ½ teaspoon cinnamon - My secret weapon! It adds the most subtle warmth that makes people go "Hmm, what's that delicious flavor?"
- 1 teaspoon salt - I use coarse sea salt for that perfect salty bite against all that sweet caramel.
See? Nothing fancy or hard to find. I bet you've got most of this in your pantry right now. Just make sure your crackers are fresh - stale ones will give you sad, soggy results (learned that the hard way during my college dorm kitchen experiments!).
How to Make Salted Caramel Cracker Bites
Alright, let's get to the fun part - making these addictive little bites! I promise it's easier than you think, and the smell alone will have your whole family hovering around the kitchen. Just follow these simple steps and you'll have perfection in under an hour.
Step 1: Preheat and Prep
First things first - turn that oven to 250°F (120°C). I know it seems low, but trust me, slow baking is the secret to getting that perfect crispness without burning. While it's heating up, grab your largest baking sheet and line it with parchment paper. No cheating with foil here - parchment is your best friend for easy cleanup and no sticking!
Step 2: Make the Caramel Glaze
Now for the magic! Melt your butter in a heavy-bottomed saucepan over medium heat. Watch it carefully - you want it just melted, not browned. Then stir in that packed brown sugar until it's completely dissolved and the mixture starts to bubble gently. This takes about 2-3 minutes of constant stirring - don't rush it! Remove from heat and whisk in the vanilla, cinnamon, and salt. The smell at this point? Absolute heaven.
Step 3: Coat and Bake
Dump your oyster crackers into a big mixing bowl and pour that glorious caramel over them. Use a rubber spatula to gently toss until every last cracker is coated (I sometimes use my hands - just be careful, it's hot!). Spread them on your prepared baking sheet in a single layer. Pop them in the oven and set your timer for 15 minutes. When it goes off, give them a good stir - this prevents clumping and ensures even baking. Repeat this two more times for a total of 45 minutes.
Step 4: Cool and Serve
Here's where patience is key! Let those beauties cool completely on the baking sheet - at least 30 minutes. I know it's tempting to dive in, but waiting lets the caramel set and gives you that perfect crunch. Once cooled, break apart any large clusters (or don't - big chunks are my guilty pleasure). Store what's left (ha!) in an airtight container, but between you and me, they never last more than a day in my house!
Why You’ll Love These Salted Caramel Cracker Bites
Listen, if you're anything like me, you've got about a million reasons to keep this recipe on heavy rotation. But just in case you need convincing, here's why these little bites will become your new obsession:
- They're ridiculously easy - Seriously, no fancy equipment or baking skills needed. If you can stir and set a timer, you're golden.
- Perfect sweet-salty balance - That first bite hits you with buttery caramel sweetness, then BAM - that sea salt finishes it off beautifully.
- Always a crowd-pleaser - I've brought these to everything from book club to kids' soccer games, and they disappear faster than I can say "more please!"
- Weeknight-friendly - Got 10 minutes and a pantry? You're halfway to snack heaven. No special trips to the store required.
- Better than store-bought - Those fancy caramel snack mixes cost a fortune! This homemade version tastes better and costs pennies per batch.
- Customizable - Feeling fancy? Add a pinch of cayenne for heat or swap in maple sugar for a fall twist. The base recipe loves to play dress-up!
My favorite thing? Watching people's faces when they take that first bite. There's always this moment of surprise, then that "oh wow" expression as they reach for another handful. That's when I know I've got 'em hooked - just like my aunt hooked me all those years ago!
Tips for Perfect Salted Caramel Cracker Bites
After burning more batches than I'd care to admit (and eating them anyway because, well, caramel), I've picked up some foolproof tricks to make sure your Salted Caramel Cracker Bites turn out perfect every single time. These aren't just suggestions - they're the difference between "pretty good" and "oh-my-gosh-give-me-the-recipe-right-now" amazing.
The crackers matter more than you think
First rule: always check your cracker package date! Stale oyster crackers absorb moisture differently and you'll end up with chewy bites instead of that delightful crunch. I keep an unopened backup bag in my pantry just for emergencies (aka sudden caramel cravings). And no, saltines or other crackers won't give you the same result - oyster crackers have that perfect bite-sized crunch that holds up to the caramel coating.
Don't rush the bake time
That low 250°F oven temp isn't a mistake - it's magic. Cranking up the heat will burn your caramel before the crackers crisp properly. Set timers religiously for those 15-minute stirs too! I've learned the hard way that skipping even one stirring session leads to sad, unevenly coated clusters. Use this time to inhale that incredible cinnamon-vanilla aroma filling your kitchen.
Salt is your secret weapon
Here's my confession: I often sprinkle extra flaky sea salt on top right after baking while the caramel's still tacky. The contrast makes people go wild! But start with the recipe's teaspoon and adjust next time - you can always add more salt but can't take it out. For parties, I'll do half with extra salt and half without to please all palates.
Storage smarts
These keep beautifully in an airtight container for up to a week... if they last that long! The key is making sure they're completely cooled first - any residual warmth creates condensation that steals the crunch. For gifting, I use cute mason jars with little tags that say "Break glass in case of caramel emergency."
The best tip of all? Always make a double batch. No exceptions. You'll thank me when you catch yourself sneaking handfuls straight from the baking sheet!
Storage and Serving Suggestions
Okay, let's talk about the best ways to keep these Salted Caramel Cracker Bites at their peak - though let's be real, they rarely last long enough to worry about storage in my house! But on the off chance you have leftovers (you disciplined soul, you), here's how to keep that perfect crunch and caramel goodness.
Keeping them fresh
An airtight container is your best friend here. I use my big glass cookie jar with the rubber seal - it keeps the bites crisp for up to a week. Pro tip: layer them between sheets of parchment paper if you're stacking them high. And whatever you do, don't refrigerate! The moisture will make them lose that addictive crunch faster than you can say "caramel catastrophe."
My favorite ways to serve
These little bites are ridiculously versatile. For breakfast (don't judge), I sprinkle them over Greek yogurt with fresh berries - instant gourmet parfait! They're magical with afternoon coffee, cutting through the bitterness perfectly. At parties, I'll set out small bowls everywhere so no one has to wander far for their fix.
My guilty pleasure? Crushing them over vanilla ice cream while still slightly warm - the contrast of cold cream and crispy caramel is next-level amazing. Last Thanksgiving, I even used them as a pie crust for a chocolate tart, and my cousins still beg me to make it again!
Gift idea: Fill cellophane bags tied with ribbon for teacher presents or hostess gifts. I always include the recipe card because people inevitably ask for it after one taste. Just warning you - you might start getting requests to bring these to every gathering once word gets out!
Salted Caramel Cracker Bites FAQs
I get asked these questions ALL the time when people try these addictive little bites for the first time. Here are the answers that'll save you from making the same mistakes I did when I was just starting out!
Q1. Can I use saltine crackers instead of oyster crackers?
Oh honey, I know it's tempting when that's what's in your pantry, but trust me - oyster crackers are the way to go! Their small size means more caramel coating per bite, and they hold up better in the oven without getting soggy. Saltines tend to break down and lose their crunch. It's worth the extra trip to the cracker aisle, I promise!
Q2. My caramel seems too thin - did I do something wrong?
Don't panic! This usually means you need to let the butter-sugar mixture simmer just a smidge longer before adding the vanilla. Give it an extra minute of stirring until it thickens slightly (it should coat the back of your spoon). The mixture will thicken more as it bakes and cools, so resist the urge to add more sugar!
Q3. Can I make these ahead for a party?
Absolutely! They actually taste even better the next day as the flavors meld. Just store them in that airtight container I mentioned. If they lose a tiny bit of crunch (though they shouldn't), you can pop them back in a 250°F oven for 5 minutes to crisp up again. I've made them three days before an event with perfect results!
Q4. Help! My bites are sticking together in one big clump!
Been there! This usually means you didn't stir them enough during baking. Next time, make sure to break up any big clusters when you stir every 15 minutes. If it's already happened, just let them cool completely, then gently break them apart - the imperfect chunks are part of the charm! Some people (me) actually fight over the big clusters.
Q5. Is there a way to make these gluten-free?
You bet! I've had great results using gluten-free oyster-style crackers (look for the Schar brand). Just double-check that your other ingredients are GF too - some vanilla extracts and brown sugars can have sneaky additives. The baking time might need a few extra minutes since GF crackers can be more absorbent.
Nutritional Information
Okay, let's be real - we're not eating these Salted Caramel Cracker Bites for their health benefits! But since I know some folks like to keep track (or need to for dietary reasons), here's the scoop on what's in each delicious serving. Just remember - these numbers are estimates based on my specific ingredients, so your batch might vary slightly depending on brands and exact measurements.
- Serving Size: About ⅙ of the batch (because let's face it, who stops at just one handful?)
- Calories: 280 (worth every single one if you ask me)
- Sugar: 18g (it's caramel, what did you expect?)
- Sodium: 380mg (that perfect salty balance!)
- Fat: 16g (real butter makes all the difference)
- Saturated Fat: 10g (no skimping here - it's part of what makes them so good)
- Carbohydrates: 32g (mostly from those amazing crackers and brown sugar)
- Fiber: 1g (every little bit counts, right?)
- Protein: 2g (consider it a bonus!)
- Cholesterol: 40mg
A quick disclaimer from my kitchen to yours: These numbers can change based on the exact brands you use and how big your "servings" actually are (no judgment here!). I calculate using generic supermarket ingredients, but if you use organic brown sugar or European-style butter, your numbers might be slightly different. The important thing? They're delicious, they're addictive, and everything in moderation, right?
Print
Salted Caramel Cracker Bites
- Total Time: 55 minutes
- Yield: 6 servings
- Diet: Vegetarian
Description
Salted Caramel Cracker Bites are a sweet and salty snack made with crunchy oyster crackers coated in a rich caramel glaze.
Ingredients
- Oyster crackers (1 package/9 ounces)
- Butter (2 sticks/1 cup)
- Brown sugar (1 cup)
- Vanilla extract (2 teaspoons)
- Cinnamon (½ teaspoon)
- Salt (1 teaspoon)
Instructions
- Preheat oven to 250°F (120°C).
- Line a baking sheet with parchment paper.
- Spread oyster crackers evenly on the baking sheet.
- In a saucepan, melt butter over medium heat.
- Add brown sugar and stir until fully dissolved.
- Remove from heat and stir in vanilla extract, cinnamon, and salt.
- Pour the caramel mixture over the crackers, tossing to coat evenly.
- Bake for 45 minutes, stirring every 15 minutes.
- Remove from oven and let cool before serving.
Notes
- Store in an airtight container for up to a week.
- For extra crunch, let the bites cool completely before breaking apart.
- Prep Time: 10 minutes
- Cook Time: 45 minutes
- Category: Snack
- Method: Baking
- Cuisine: American
Nutrition
- Serving Size: ⅙ of recipe
- Calories: 280
- Sugar: 18g
- Sodium: 380mg
- Fat: 16g
- Saturated Fat: 10g
- Unsaturated Fat: 5g
- Trans Fat: 0g
- Carbohydrates: 32g
- Fiber: 1g
- Protein: 2g
- Cholesterol: 40mg
Keywords: salted caramel, cracker bites, sweet snack, easy recipe

Leave a Reply