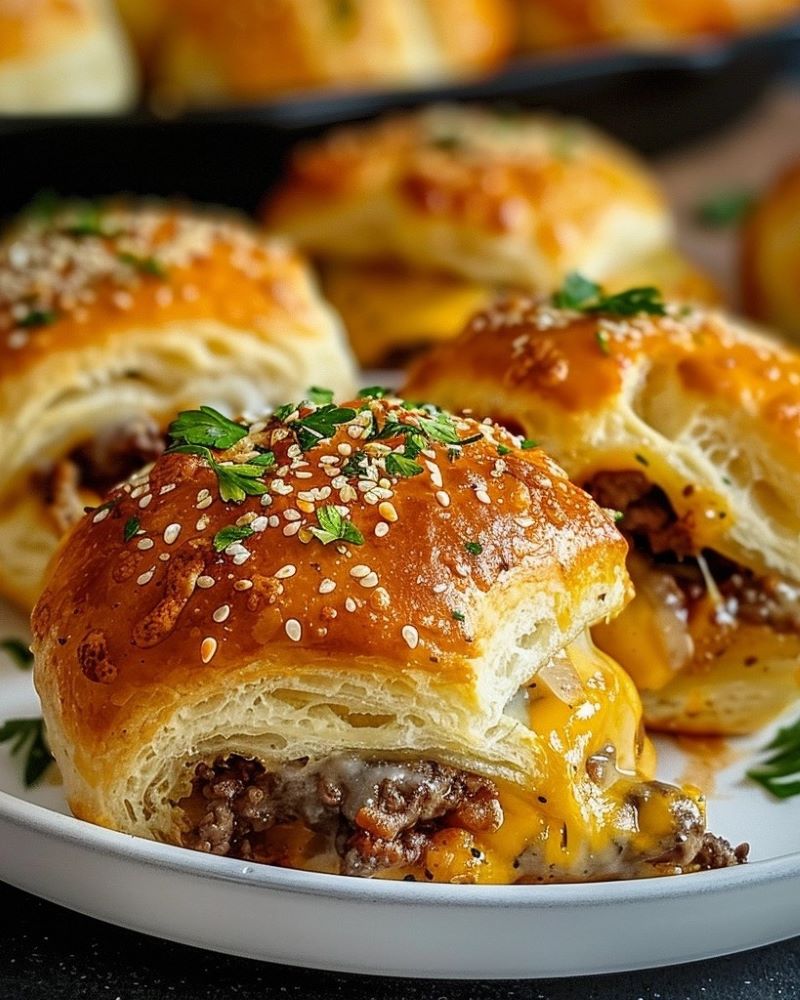
Few things bring a smile to the dinner table like warm, cheesy, handheld delights straight from the oven. These Garlic Parmesan Cheeseburger Bombs are a beloved twist on classic burgers — packed with juicy beef, melty cheddar, and wrapped in soft, golden biscuit dough, then brushed with a garlic-Parmesan butter that smells absolutely heavenly.

Whether you're planning game-day snacks, weeknight dinner with a twist, or prepping ahead for a fun family movie night, this recipe has you covered. Each bite-sized bomb is bursting with flavor and charm, and trust me, no one can stop at just one!
Why You’ll Love Garlic Parmesan Cheeseburger Bombs
- Fun and portable: Perfect for kids, parties, or meals on the go.
- Easy to make: Uses store-bought biscuit dough to save time.
- Ultra cheesy: Loaded with melty cheddar and a savory beef filling.
- Freezer-friendly: Make ahead and reheat beautifully.
- Crowd-pleaser: Everyone from toddlers to teens to adults loves them!
- Versatile: Switch up the fillings or toppings to your taste.
Ingredients You’ll Need
- 1 lb ground beef – Or substitute with ground turkey or plant-based meat.
- 1 small onion, finely diced – Adds great flavor and moisture.
- 1 teaspoon garlic powder – Enhances the savory depth.
- ½ teaspoon salt – Season to taste.
- ½ teaspoon black pepper – Fresh cracked is best.
- 1 cup shredded cheddar cheese – Sharp cheddar melts wonderfully.
- 1 can (16 oz) refrigerated biscuit dough – Like Pillsbury Grands, 8-count.
- 4 tablespoon butter, melted – For brushing on top.
- 2 cloves garlic, minced – For that irresistible garlic butter topping.
- ¼ cup grated Parmesan cheese – Adds a crispy, salty finish.
- 1 tablespoon chopped fresh parsley (or 1 teaspoon dried parsley) – Optional, for color.

Step-by-Step Instructions
- Prepare the beef filling:
- Heat a skillet over medium heat.
- Add ground beef and finely diced onion.
- Cook until beef is browned and onion is soft, about 8–10 minutes.
- Drain excess fat, then season with garlic powder, salt, and pepper.
- Stir in shredded cheddar cheese while still warm so it starts to melt.
- Remove from heat and set aside to cool slightly.
- Preheat the oven:
- Set your oven to 375°F (190°C).
- Line a baking sheet with parchment paper or lightly grease it.
- Prepare the biscuits:
- Open the biscuit can and separate the dough.
- Flatten each biscuit into a 4–5 inch round using your fingers or a rolling pin.
- Fill and seal the bombs:
- Place 1–2 tablespoons of the beef-cheese mixture in the center of each biscuit round.
- Carefully fold the edges up and around the filling.
- Pinch tightly to seal and form into a ball.
- Place seam-side down on the prepared baking sheet.
- Make the garlic butter topping:
- In a small bowl, mix melted butter, minced garlic, and chopped parsley.
- Brush the tops of the biscuit bombs generously with the mixture.
- Sprinkle each with grated Parmesan cheese.
- Bake until golden:
- Bake in the preheated oven for 15–18 minutes, or until the tops are golden brown and the biscuits are cooked through.
- You’ll know they’re done when the tops are bubbly and slightly crisp.
- Cool and serve:
- Let the cheeseburger bombs cool for 5 minutes before serving.
- Serve warm with ketchup, mustard, or dipping sauces like ranch or aioli.
Serving and Storage Tips
- Serve with: A fresh green salad, fries, or veggie sticks for a complete meal.
- To store: Refrigerate leftovers in an airtight container for up to 3 days.
- To freeze: Freeze cooled bombs in a single layer, then transfer to a freezer bag. Store up to 2 months.
- To reheat: Bake at 350°F for 10–12 minutes or microwave in 30-second bursts until warm.
Helpful Notes
- Cheese options: Swap cheddar for mozzarella, pepper jack, or a cheese blend.
- Add-ins: Try chopped pickles, jalapeños, or a smear of mustard inside.
- Make mini bombs: Use smaller biscuit pieces and less filling for bite-sized party snacks.
- Vegetarian twist: Use plant-based meat and cheese for a meatless version.
- Crispier top: Broil for 1–2 minutes at the end of baking — keep a close eye!
Frequently Asked Questions
- Can I make these ahead of time?
Yes! You can assemble the bombs and refrigerate them up to 24 hours in advance before baking. - Can I use crescent dough instead of biscuits?
Absolutely — just be sure to pinch the seams tightly so they hold the filling. - What dipping sauces go well with these?
Classic ketchup and mustard are always great, but try ranch, spicy mayo, or even BBQ sauce. - Can I bake these in an air fryer?
Yes! Air fry at 350°F for about 10–12 minutes, checking for doneness around 9 minutes. - Can I double the recipe?
Definitely — this recipe scales up easily for feeding a crowd!
Final Thoughts
Garlic Parmesan Cheeseburger Bombs are proof that comfort food can be fun, flavorful, and incredibly easy to make. Whether you're entertaining guests or just making a weeknight dinner a little more exciting, these golden bites are sure to please.
I especially love how customizable this recipe is — you can play around with the fillings, spice level, and toppings depending on what your family loves. Plus, they're just as good as leftovers (if there are any!). They’re also a wonderful choice for lunchboxes, potlucks, or even holiday appetizers.
So go ahead and give them a try. I promise they’ll disappear in no time. Don’t forget to take a photo and tag me — I’d love to see your delicious creations and hear how you made them your own. Happy baking and bon appétit!

Leave a Reply