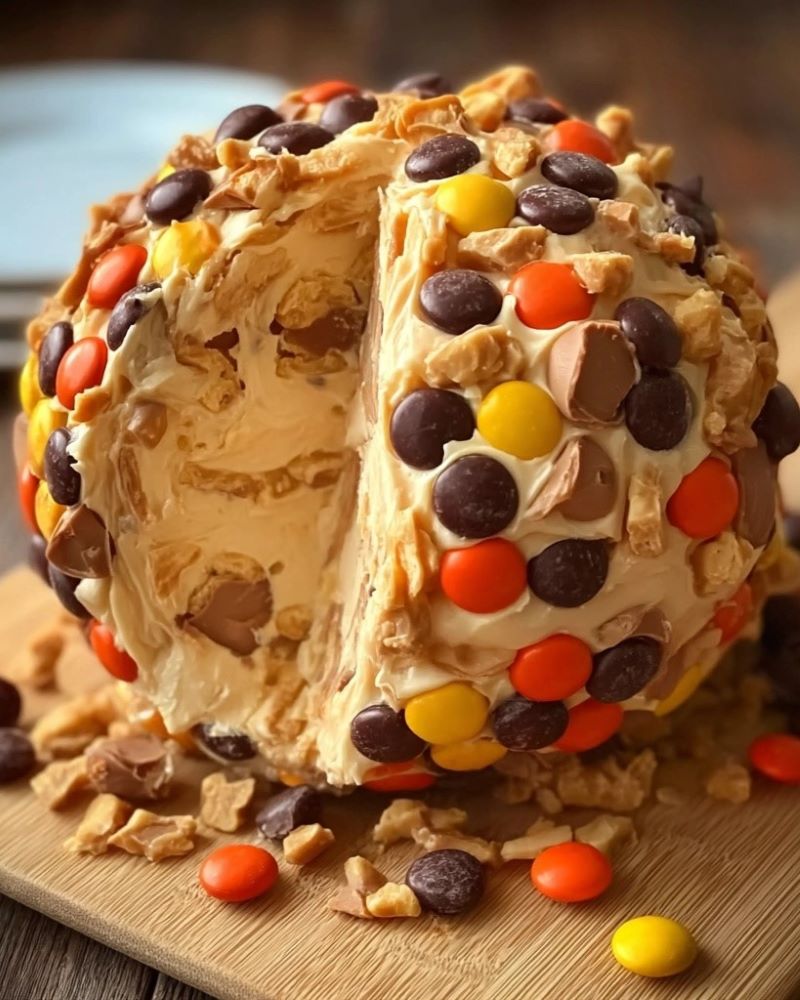
The first time I made this Reese’s Cheese Ball was for a Halloween party, and let me tell you—it stole the show. Imagine a creamy, dreamy blend of peanut butter and cream cheese, studded with mini Reese’s Pieces and chocolate chips, then rolled in even more candy. It was like dessert had thrown on its party best!

Since then, it has become a beloved go-to for all kinds of gatherings. Whether it's a family game night, a festive holiday celebration, or just a casual weekend treat, this no-bake wonder always gets rave reviews. Not only is it ridiculously easy to make, but it also looks amazing on a platter surrounded by colorful dippers.
This recipe is not just a fun twist on a classic cheese ball; it’s a peanut butter lover’s dream come true. Perfect for holidays, birthdays, potlucks, or anytime you want to serve something unique and unforgettable. Trust me, once you make this Reese’s Cheese Ball, it will earn a permanent spot in your dessert rotation.
Why You’ll Love Reese’s Cheese Ball
- Quick and Easy to Make: No baking required, and everything comes together in under 20 minutes with basic pantry staples.
- Crowd-Pleaser: Everyone from kids to adults will be asking for the recipe. It's always the first to disappear at parties.
- Customizable: You can easily switch up the candy or add-ins based on what you have on hand or personal preferences.
- Make-Ahead Friendly: It actually tastes better after chilling, making it a great prep-ahead option that saves time.
- Perfect for Parties: The colorful candy coating makes it a festive centerpiece for dessert tables and potlucks.
- Rich and Creamy Texture: Balanced with just the right amount of crunch from the candies, offering a delightful texture.
- Kid-Friendly Fun: Let the kids help roll and decorate the cheese ball—they'll love getting involved.
Ingredients You’ll Need
- 8 oz cream cheese, softened – Let it sit out for 30 minutes to soften. This makes it easier to blend and results in a smoother mixture.
- ½ cup peanut butter – Creamy peanut butter works best for smooth consistency, but crunchy can add an extra texture boost.
- ½ cup powdered sugar – Adds sweetness and helps firm the mixture for shaping.
- ¼ cup brown sugar – Provides a warm, molasses-like depth that complements the peanut butter.
- 1 teaspoon vanilla extract – Enhances all the other flavors and rounds out the sweetness.
- 1 cup mini Reese’s Pieces – Mix into the ball for a pop of color, crunch, and that signature Reese’s flavor.
- ½ cup mini chocolate chips – Use semi-sweet for balance, or go for milk chocolate if you prefer a sweeter touch.
- ½ cup crushed peanut butter cups (optional) – Adds extra decadence and more of that irresistible peanut butter-chocolate combo.
For the Coating:
- ¼ cup mini Reese’s Pieces
- ¼ cup mini chocolate chips
- ¼ cup crushed peanut butter cups
You can always double the coating mix if you want to ensure full coverage or plan to serve it on a larger platter.
Step-by-Step Instructions
- Mix the Base: In a medium mixing bowl, combine the softened cream cheese and peanut butter. Use a hand mixer or sturdy spoon to blend until smooth and completely combined.
- Add Sweeteners and Flavor: Mix in the powdered sugar, brown sugar, and vanilla extract. Beat on medium speed until the mixture is light, fluffy, and slightly thickened.
- Incorporate Mix-ins: Gently fold in the mini Reese’s Pieces, chocolate chips, and crushed peanut butter cups (if using). Stir until evenly distributed for consistent flavor in every bite.
- Shape the Cheese Ball: Scoop the mixture onto a large piece of plastic wrap. Use the wrap to help mold it into a ball shape. Wrap it tightly and refrigerate for at least 2 hours, or overnight for best results.
- Prepare the Coating: In a shallow dish or plate, mix together the Reese’s Pieces, chocolate chips, and crushed peanut butter cups.
- Coat the Cheese Ball: Once the cheese ball is firm and well-chilled, unwrap it and roll it in the candy coating mixture, pressing gently to adhere all over.
- Serve: Place the coated cheese ball on a serving plate and surround with a variety of dippers such as graham crackers, pretzels, vanilla wafers, or sliced apples.
Optional: Drizzle melted chocolate over the top for an extra-special touch!
Serving and Storage Tips
This Reese’s Cheese Ball is best served chilled but slightly softened at room temperature for easier dipping. Take it out of the fridge about 15 minutes before serving.
Recommended Dippers:
- Graham crackers (classic choice)
- Vanilla wafers
- Pretzel rods or mini pretzels (salty/sweet combo)
- Apple slices (dip quickly in lemon water to prevent browning)
- Biscotti sticks
- Thin chocolate cookies
Storage:
- Store any leftovers in an airtight container in the refrigerator for up to 5 days.
- If making ahead, wait to coat until just before serving for the freshest look.
- Freezing is not recommended, as the texture of the cream cheese can become gritty.
This cheese ball travels well, too—just keep it in a chilled container with a lid and pack the dippers separately.
Helpful Notes
- Substitutions: Use almond butter, cashew butter, or sunflower seed butter for a peanut-free version that still packs flavor.
- Dairy-Free Option: Substitute dairy-free cream cheese and use dairy-free chocolate chips to accommodate lactose intolerance.
- Add-Ins: Get creative with crushed cookies (like Oreos), toffee bits, or festive sprinkles for holidays or themed events.
- Texture Tip: If your mixture is too soft to shape, refrigerate it for 30 minutes before forming into a ball. Chilling helps it hold its shape.
- Make It Mini: Divide the mixture into several smaller balls for individual servings—perfect for party trays or gifts.
Frequently Asked Questions
- Can I freeze Reese’s Cheese Ball?
It’s not recommended to freeze it, as the texture can become grainy and separate once thawed. - What if I don’t have mini Reese’s Pieces?
You can chop regular Reese’s Pieces or substitute with M&Ms, chopped chocolate, or even sprinkles for a colorful twist. - Can I make it ahead of time?
Yes! You can prepare the cheese ball up to 2 days in advance. Just wrap it well and store in the fridge, then roll in the coating right before serving. - Is it too sweet?
It’s rich but not overly sweet—the cream cheese and peanut butter balance it out nicely. If you prefer it less sweet, reduce the powdered sugar slightly. - What should I serve it with?
Sweet dippers like graham crackers or fruit are ideal, but salty options like pretzels offer a great contrast. You can even offer both for variety. - How can I make this look even more festive?
Try rolling it in seasonal sprinkles, colored sugar, or themed candy pieces to match your event’s color scheme.
Final Thoughts
Whether you're planning a birthday bash, a holiday celebration, or just looking to sweeten up your weekend, this Reese’s Cheese Ball is a guaranteed crowd-pleaser. It’s simple to make, fun to customize, and absolutely packed with that classic chocolate-peanut butter flavor everyone adores.
It’s one of those recipes that looks impressive but takes minimal effort—perfect for both beginner and seasoned home cooks. Once you try it, you'll want to find every excuse to make it again. I hope this recipe brings as much joy to your table as it has to mine.
Give it a try and let me know how it turns out! Don’t forget to share your creation on social media and tag us—we love seeing your delicious spins on this beloved dessert!


Leave a Reply