Okay, confession time: I used to be the person who’d deep-fry everything just to get that perfect crispy bite. Then, one chaotic game night, I ran out of oil and panicked—until I realized I could bake my beloved broccoli cheese balls instead. And wow, was that a game-changer! These baked broccoli cheese balls are just as crispy, with that same irresistible gooey cheese center, but without the mess (or the guilt). Perfect for last-minute snacks, party platters, or sneaking veggies into picky eaters—just pop them in the oven, and 20 minutes later, you’ve got golden, cheesy magic. Trust me, once you try them baked, you’ll never look back.

Why You’ll Love Baked Broccoli Cheese Balls
Listen, I know what you're thinking—broccoli? In a snack? But hear me out. These little guys are absolute crowd-pleasers. Last Thanksgiving, I brought a tray to my cousin’s house, and her kids (who normally treat veggies like kryptonite) demolished them in minutes. Here’s why they’re a total win:
- Crispy outside, melty inside: That golden crunch gives way to a cheesy, gooey center that’s downright addictive.
- No frying fuss: Just mix, scoop, and bake—no greasy stovetop mess to clean up.
- Sneaky veggie power: Broccoli’s in there, but it’s basically just a cheese delivery system (shh, our secret).
- Party MVP: They’re bite-sized, dippable, and disappear fast at gatherings. Pro tip: Double the batch.
- Kid-approved: Even my nephew, who once hid broccoli in his napkin, asks for seconds.
Seriously, whether you’re hosting, snacking, or just pretending to adult, these are your new best friend. And if anyone asks? Yeah, you totally slaved over them.
Ingredients You’ll Need for Baked Broccoli Cheese Balls
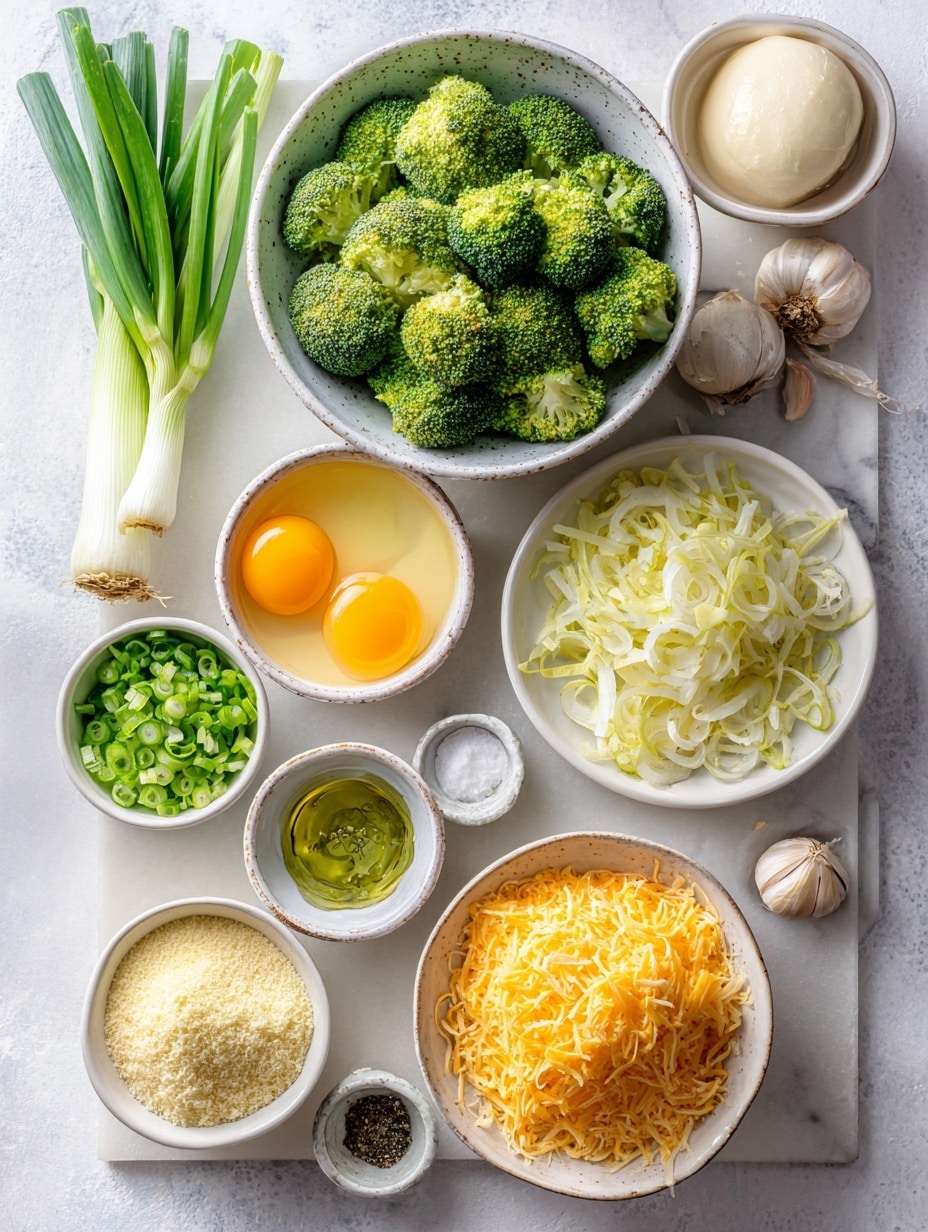
Okay, let’s gather the goods! You probably have most of this already, and if not, it’s all super easy to grab. Here’s what you’ll need:
- 2 cups broccoli florets: Steam these until they’re just tender-crisp—about 5 minutes—then chop finely. Don’t overcook, or they’ll get mushy!
- 1 cup breadcrumbs: Plain or Italian seasoned, whatever you’ve got. Panko works too for extra crunch.
- 1½ cups shredded sharp cheddar cheese: Packed, please! The sharper, the better for that gooey cheese pull.
- ⅓ cup grated Parmesan cheese: Freshly grated if you can—it makes a difference.
- 2 large eggs, beaten: These are the glue that holds it all together.
- 2 tablespoons all-purpose flour: Just enough to keep things from falling apart.
- ½ teaspoon garlic powder: For that savory kick.
- ½ teaspoon onion powder: Adds a little depth without overwhelming.
- Salt and pepper, to taste: Don’t skip the seasoning—it’s key!
- Cooking spray, for greasing the sheet: Keeps the balls from sticking and helps them crisp up.
See? Nothing fancy, just simple, tasty ingredients. Let’s get rolling!
Step-by-Step Instructions for Baked Broccoli Cheese Balls
Alright, let’s get these cheesy little wonders into the oven! Don’t worry—it’s way easier than it looks, and I’ve got all the tips to make sure yours turn out perfect.
Preparing the Mixture
- Preheat that oven! Crank it to 375°F (190°C) and line a baking sheet with parchment paper. Give it a quick spritz with cooking spray—trust me, it’s worth it for that golden crunch.
- Mix it all up. In a big bowl, toss together your chopped broccoli, breadcrumbs, cheddar, Parmesan, eggs, flour, garlic powder, onion powder, salt, and pepper. Stir until everything’s evenly combined, but don’t go nuts—overmixing can make the texture weird. It should hold together when you squeeze a bit in your hand.
Shaping and Baking
- Scoop and roll. Use a cookie scoop or a tablespoon to portion out the mixture, then roll it gently between your palms into 1-inch balls. If they’re a bit sticky, wet your hands lightly—it helps! Space them about an inch apart on the baking sheet so they crisp up evenly.
- Bake to golden perfection. Pop them in the oven for 15-20 minutes, rotating the tray halfway if your oven runs hot. They’re done when they’re firm, golden brown, and smell like cheesy heaven. (If they’re not quite crispy enough, give ’em another minute or two—but watch closely!)
- Let them rest. Cool for 5 minutes before serving—this helps them set and saves you from molten cheese burns. (Learned that one the hard way.)
See? Told you it was easy. Now, try not to eat them all straight off the tray—I won’t judge if you do.
Variations for Baked Broccoli Cheese Balls
One of the best things about these little guys? They’re like a blank canvas for whatever flavors you’re craving. Here are some of my favorite twists—because sometimes, you just gotta mix it up!
- Spice it up: Add a pinch of cayenne or smoked paprika to the mix, or toss in some diced jalapeños for a kick. (My brother calls these "danger balls" because he can’t stop eating them.)
- Cheese swap: Swap cheddar for pepper jack, Gouda, or even blue cheese if you’re feeling fancy. Just keep the total cheese amount the same.
- Gluten-free: Use almond flour or gluten-free breadcrumbs instead of regular flour and breadcrumbs. They’ll still crisp up beautifully!
- Extra veggies: Fold in finely chopped spinach, grated zucchini (squeezed dry!), or even roasted red peppers for color and flavor.
- Herb boost: Fresh chives, parsley, or basil stirred in at the end make them taste fancy with zero extra effort.
Honestly, once you nail the basic recipe, the sky’s the limit. Play around—I’ve yet to find a combo that doesn’t work!
Serving and Storage Tips for Baked Broccoli Cheese Balls
Okay, let’s talk about the best part: eating these! (And, fine, storing the leftovers—if there are any.) Here’s how to make ’em shine:
- Dipping is mandatory: Ranch is classic, but marinara, honey mustard, or even sriracha mayo take these to the next level. My personal fave? A quick garlic-yogurt dip—just mix Greek yogurt with minced garlic, lemon juice, and a pinch of salt.
- Party trick: Keep them warm in a low oven (200°F/95°C) on a wire rack so they stay crispy. Serve with toothpicks for easy grabbing!
- Fridge life: Store cooled leftovers in an airtight container for up to 3 days. They lose a bit of crispness, but they’re still tasty.
- Reheating magic: Pop ’em back in a 350°F (175°C) oven for 5-7 minutes to revive the crunch. Microwaving works in a pinch, but they’ll be softer.
- Freezer-friendly: Freeze unbaked balls on a tray, then transfer to a bag. Bake straight from frozen, adding 2-3 extra minutes. Perfect for emergency snack attacks!
Pro tip: Hide a few in the back of the fridge for yourself. You’ll thank me later.
Helpful Notes for Perfect Baked Broccoli Cheese Balls
A few little things to make sure your broccoli cheese balls turn out *chef’s kiss* every time. First, don’t skip the parchment paper—it’s a game-changer for keeping them from sticking and helps them crisp up beautifully. Second, when steaming the broccoli, aim for tender-crisp, not mushy. Overcooked broccoli = sad, soggy balls. (Learned that the hard way.) And if you’re watching your macros, you can tweak the recipe a bit—swap in low-fat cheese or use almond flour instead of breadcrumbs. But honestly? Life’s short. Go for the full-fat cheddar—it’s worth it. Happy baking!
Frequently Asked Questions About Baked Broccoli Cheese Balls
I get it—you’ve got questions! Here are the ones I hear most often (and the answers I swear by):
- Can I freeze these before baking?
Absolutely! Freeze the shaped balls on a tray first, then transfer to a bag. Bake straight from frozen—just add 2-3 extra minutes. Lifesaver for last-minute guests. - What if I don’t have breadcrumbs?
No sweat! Crushed crackers, panko, or even rolled oats work in a pinch. For gluten-free, almond flour or crushed rice cakes do the trick. - Can I make these ahead?
Yep! Mix the dough, cover, and fridge it for up to 24 hours before shaping and baking. The flavors actually get better! - Why are mine falling apart?
Too much broccoli moisture or not enough binding. Squeeze excess water from chopped broccoli, and if needed, add an extra egg or tablespoon of flour. - Best dipping sauce?
My heart says ranch, but honey mustard, marinara, or even a spicy aioli are all winners. Go wild!
Still stumped? Drop me a comment—I’ve probably messed it up before and can help!
Final Thoughts on Baked Broccoli Cheese Balls
Look, if you take one thing from this recipe, let it be this: broccoli has never been this fun. These little golden nuggets are crispy, cheesy, and downright irresistible—whether you’re feeding a crowd or just treating yourself. (No shame in eating them straight from the tray—I do it too.) So grab that broccoli and get baking. Your snack game is about to level up!
Print
Crispy Baked Broccoli Cheese Balls Recipe
- Total Time: 35 minutes
- Yield: 20-24 balls 1x
- Diet: Vegetarian
Description
Crispy baked broccoli cheese balls with a gooey center, perfect as a snack or appetizer.
Ingredients
- 2 cups broccoli florets (steamed until tender-crisp, then finely chopped)
- 1 cup breadcrumbs (plain or Italian seasoned)
- 1½ cups shredded sharp cheddar cheese
- ⅓ cup grated Parmesan cheese
- 2 large eggs, beaten
- 2 tablespoons all-purpose flour
- ½ teaspoon garlic powder
- ½ teaspoon onion powder
- Salt and pepper, to taste
- Cooking spray, for greasing the sheet
Instructions
- Preheat oven to 375°F (190°C). Line a baking sheet with parchment paper and lightly grease with cooking spray.
- In a large bowl, mix chopped broccoli, breadcrumbs, cheddar cheese, Parmesan cheese, beaten eggs, flour, garlic powder, onion powder, salt, and pepper.
- Shape the mixture into 1-inch balls and place them on the prepared baking sheet.
- Bake for 15-20 minutes until golden brown and crisp.
- Let cool for 5 minutes before serving.
Notes
- Steam broccoli just until tender for the best texture.
- Use a cookie scoop for evenly sized balls.
- Serve with ranch or marinara sauce for dipping.
- Prep Time: 15 minutes
- Cook Time: 20 minutes
- Category: Appetizer
- Method: Baking
- Cuisine: American
Nutrition
- Serving Size: 1 ball
- Calories: 50
- Sugar: 0.5g
- Sodium: 90mg
- Fat: 3g
- Saturated Fat: 1.5g
- Unsaturated Fat: 1g
- Trans Fat: 0g
- Carbohydrates: 4g
- Fiber: 0.5g
- Protein: 3g
- Cholesterol: 20mg
Keywords: baked broccoli cheese balls, vegetarian appetizer, easy snack


Leave a Reply