Butterfinger pie is a no-bake dessert made with crushed Butterfinger candy bars, sweetened condensed milk, cream cheese, whipped topping, and a graham cracker crust. Unlike traditional pies that require baking, this recipe relies on chilling to set, making it an easy treat for any skill level.
The pie is known for its crunchy-meets-creamy texture. The candy provides bits of peanut butter-flavored crunch, while the filling stays rich and fluffy thanks to cream cheese and Cool Whip. It’s not just a pie—it’s a full-blown indulgence.
Think of it as a hybrid between a cheesecake and a candy bar, offering all the flavors of a Butterfinger with none of the oven time. It’s one of those desserts you pull out when you want applause with minimal effort.
Check out our twist on no-bake desserts like Death by Chocolate No-Bake Cheesecake Bars for more chocolate-forward goodness.
Why This Dessert Has Taken Over Kitchens
No-bake pies are a staple in American kitchens, especially when the weather heats up or you need a quick, make-ahead dish. But Butterfinger pie? It’s on another level. Here’s why:
- Effortless Prep: Just mix, layer, chill, and serve.
- Crowd-Pleaser: Kids and adults alike go nuts for the candy-filled goodness.
- Customizable: You can tweak it to include extra toppings, swap crusts, or adjust sweetness.
- Perfect for Any Occasion: Whether it’s a potluck, family dinner, or birthday celebration, this pie fits right in.
Key Ingredients Breakdown
Choosing the Right Butterfinger Bars
Not all Butterfingers are created equal when it comes to this pie. The classic full-size Butterfinger candy bars are ideal. They offer the best texture—crispy and crunchy peanut butter flakes encased in chocolate—that crumbles beautifully into the filling and topping.
Here’s how to choose and prep them:
- Go for fresh bars: They crush easier and have that perfect flaky crispness.
- Crush by hand or with a rolling pin: Place the bars in a zip-top bag and smash until they’re in small, uneven chunks. Too fine, and you lose the texture; too big, and they overpower each bite.
- Don’t substitute with mini Butterfingers unless they’re fresh. They tend to be harder and less flavorful.
Don’t miss our Peanut Butter S’mores Sandwich Cookies for another crave-worthy peanut butter twist.
Why Cream Cheese and Condensed Milk Are Game Changers
These two ingredients do all the heavy lifting when it comes to creating a luscious, velvety filling.
Cream Cheese
- Adds body and tang to balance the sweetness of the candy bars and condensed milk.
- Make sure it’s softened to room temperature before mixing to avoid lumps.
- Full-fat works best—it creates a richer pie.
Sweetened Condensed Milk
- Acts as a binder and sweetener in one.
- No need for extra sugar—this ingredient provides the smooth, sweet base for the filling.
- It also helps the pie firm up once chilled, giving it that picture-perfect slice.
Whipped Topping (like Cool Whip) rounds everything out, lending airiness to the pie so it doesn’t feel too heavy. Want to swap in homemade whipped cream? Yes, you can, but make sure it’s stabilized with a bit of powdered sugar or gelatin so it holds up in the fridge.
For another cream cheese-forward dessert, don’t miss our Mini Cheesecake Tarts—they’re cute, creamy, and crowd-approved.
Ingredient Snapshot Table
Ingredient | Role in Recipe | Tips |
---|---|---|
Graham Cracker Crumbs | Crust base | Use fresh for best texture |
Unsalted Butter | Binds crust | Melt completely before mixing |
Granulated Sugar | Adds crunch to crust | Optional, but enhances flavor |
Cream Cheese | Adds creaminess | Soften fully to avoid lumps |
Sweetened Condensed Milk | Sweetens & thickens | Do not substitute |
Whipped Topping | Lightens filling | Cool Whip or homemade, stabilized |
Butterfinger Bars | Flavor & crunch | Crush just before using |

Butterfinger Pie Recipe
Ingredients
For the Crust
- 1½ cups graham cracker crumbs
- 6 tablespoons unsalted butter melted
- 2 tablespoons granulated sugar
For the Filling
- 1 8 oz package cream cheese, softened
- 1 14 oz can sweetened condensed milk
- 1 8 oz tub whipped topping (like Cool Whip), thawed
- 1 cup crushed Butterfinger candy bars about 3 full-size bars
For the Topping
- 1½ cups whipped topping
- ½ cup crushed Butterfinger candy bars
- Optional: chopped Butterfinger pieces or drizzles for garnish
Instructions
Make the Crust:
- In a medium bowl, mix graham cracker crumbs, melted butter, and sugar until combined. Press the mixture evenly into the bottom and sides of a 9-inch pie dish. Chill in the refrigerator for at least 15 minutes.
Prepare the Filling:
- In a mixing bowl, beat the softened cream cheese until smooth. Add sweetened condensed milk and mix until fully incorporated. Gently fold in the whipped topping and crushed Butterfinger candy bars.
Assemble the Pie:
- Pour the filling into the prepared crust and smooth the top. Spread 1½ cups of whipped topping over the filling.
Add Toppings:
- Sprinkle the top with ½ cup of crushed Butterfinger candy bars and optional decorative candy pieces or syrup.
Chill and Serve:
- Refrigerate for at least 4 hours or until set. Slice and serve chilled.
Notes
- For extra crunch, freeze the Butterfinger bars for 10 minutes before crushing.
- You can bake the crust at 350°F for 8–10 minutes for added stability.
- Use stabilized whipped cream if making your own topping instead of Cool Whip.
- Best enjoyed within 3–4 days. Can be frozen (without toppings) for up to 1 month.
Step-by-Step Recipe Process
Making the Graham Cracker Crust Perfectly
The crust might be simple, but it’s the foundation of your Butterfinger pie—and a soggy or crumbly base can ruin the experience. Here’s how to get it just right:
Step-by-step for the crust:
- Start with fine crumbs: Use a food processor or place graham crackers in a sealed zip bag and crush them with a rolling pin until you have 1½ cups of fine, even crumbs.
- Mix with melted butter and sugar: In a bowl, combine the graham cracker crumbs with 6 tablespoons of melted unsalted butter and 2 tablespoons of granulated sugar. Stir until the crumbs are evenly coated.
- Press into a pie dish: Using the bottom of a measuring cup, press the mixture firmly into a 9-inch pie plate. Work it up the sides to form a solid shell.
- Chill or bake:
- Chill option: Place in the refrigerator for at least 15 minutes to firm up.
- Baked option: Bake at 350°F for 8 minutes if you want a firmer, toasted crust. Let cool completely before adding the filling.
💡 Pro Tip: A well-packed crust helps prevent cracking or falling apart when slicing.
Check out our Easy Pecan Pie Dump Cake for another crust-based dessert that nails flavor and texture balance.
Creating a Light, Creamy Butterfinger Filling
Once your crust is ready, it’s time for the star of the show: the silky, candy-packed filling. This layer is what keeps people coming back for seconds.
How to make it:
- Beat the cream cheese: Use a hand or stand mixer to beat an 8 oz. block of softened cream cheese until smooth. No lumps allowed.
- Add sweetened condensed milk: Slowly pour in one 14 oz. can while continuing to mix. This creates a rich, velvety consistency.
- Fold in whipped topping: Gently fold in one 8 oz. tub of Cool Whip (or stabilized homemade whipped cream). Don’t stir too aggressively—you want to keep it fluffy.
- Add crushed Butterfingers: Fold in 1 cup of crushed Butterfinger bars. This is where the magic happens. You’ll get a blend of texture and that unmistakable peanut butter candy flavor.
Final Assembly Steps
- Fill the crust: Pour the Butterfinger filling into your prepared crust and smooth the top with a spatula.
- Add topping: Spread 1½ cups of whipped topping across the top for a creamy layer.
- Sprinkle more Butterfinger: Add ½ cup crushed candy on top. You can also garnish with extra chunks or a whole Butterfinger bar broken into pieces.
🕒 Chill for 4 hours (or overnight) until fully set.

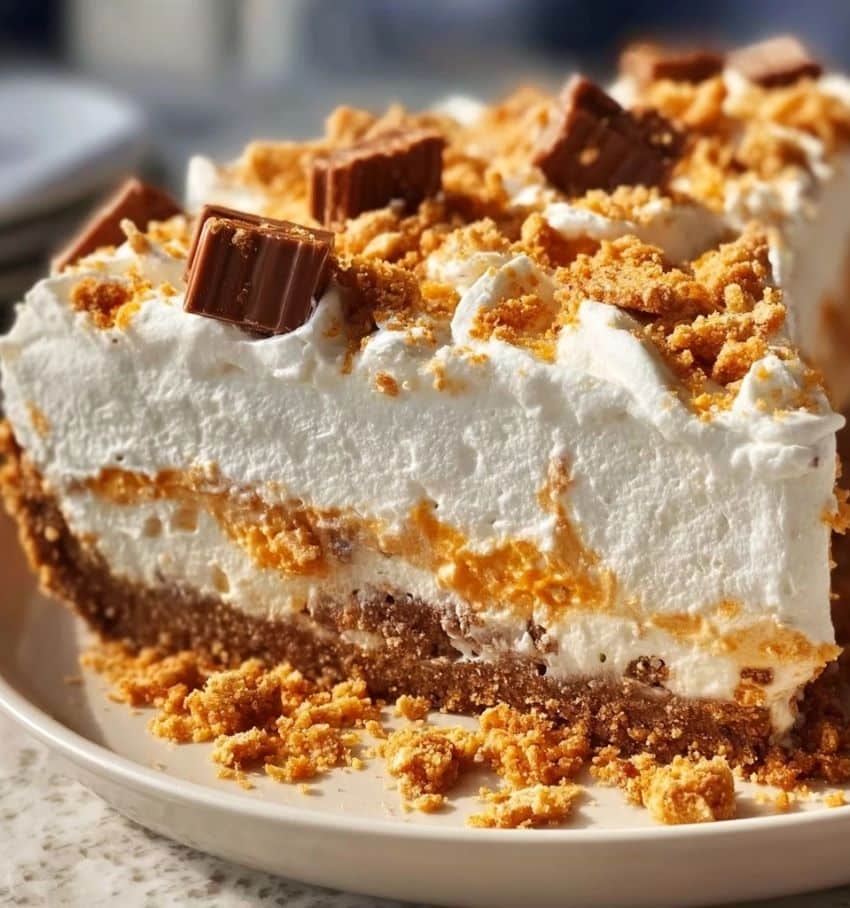
Tips for Perfect No-Bake Butterfinger Pie
Creating the perfect Butterfinger pie isn’t rocket science, but a few smart techniques can take it from good to jaw-dropping. These tips will help you avoid rookie mistakes and elevate your no-bake dessert game.
How to Keep the Crust from Falling Apart
A pie is only as good as its base. Here’s how to make sure your graham cracker crust holds together perfectly when sliced:
- Use the right butter-to-crumb ratio: Stick to 6 tablespoons of melted butter for every 1½ cups of graham cracker crumbs. Too little, and your crust crumbles. Too much, and it turns greasy.
- Firm pressing matters: Use the bottom of a measuring cup or glass to firmly compact the mixture. This step locks the crumbs in place.
- Chill thoroughly: If you’re going no-bake, make sure the crust chills for at least 15–30 minutes before adding the filling. Longer is better.
- Try baking for firmness: For more structure, bake at 350°F for 8–10 minutes and let cool completely.
Don’t miss our Cream Cheese Corn Casserole for another recipe where texture makes all the difference.
Best Tips for Achieving a Smooth Filling
Nothing ruins a dessert vibe like a lumpy or too-dense filling. Here's how to get it smooth, creamy, and airy—every time.
- Room temp cream cheese: This is non-negotiable. Cold cream cheese won’t blend evenly and creates a grainy texture.
- Slowly blend condensed milk: Don’t dump it in all at once. Add it gradually as you mix to keep the texture consistent.
- Fold, don’t whip, the Cool Whip: Stirring too hard knocks out the air. Gently fold with a silicone spatula to keep the mixture fluffy.
- Crush Butterfingers just before folding in: This preserves the crunch and flavor without them going stale or soggy.
Quick Reference Table: Pie-Making Mistakes to Avoid
Mistake | Why It’s a Problem | Fix |
---|---|---|
Not chilling crust | Crust falls apart | Chill 30+ mins or bake 8 mins |
Cold cream cheese | Lumpy filling | Soften before mixing |
Overmixing Cool Whip | Dense, flat filling | Gently fold instead |
Adding toppings too early | Sinks or gets soggy | Add toppings just before serving |
Skipping chill time | Pie won’t set | Chill for minimum 4 hours |
Variations and Flavor Twists
Butterfinger pie is already a showstopper, but why stop there? With a few clever tweaks, you can remix the original recipe into fun, unexpected desserts that still deliver that peanut butter crunch.
Mini Butterfinger Pie Bites for Parties
Hosting a party or need a portable dessert? Turn the classic Butterfinger pie into mini, no-bake bites that disappear in seconds.
Here’s how:
- Use a mini muffin tin lined with cupcake wrappers.
- Spoon a small amount of graham cracker crust into each cup and press firmly.
- Add a dollop of the Butterfinger filling, top with crushed candy, and chill.
Why it works: These bite-sized treats are perfect for portion control, party trays, or lunchbox surprises. They’re just as creamy and crunchy, but far easier to serve.
Want more party-ready ideas? Don’t miss our No-Bake Turtle Mini Cheesecakes—they’re just as poppable and decadent.
Butterfinger Icebox Cake and Other Adaptations
Turn this recipe into an icebox cake for a delicious twist that’s even easier to assemble.
To make a Butterfinger Icebox Cake:
- Swap the graham crust for layered graham crackers or chocolate wafers.
- Layer crackers, Butterfinger filling, and crushed candy in a deep dish or loaf pan.
- Repeat layers and finish with whipped topping and more Butterfinger crumbs.
- Chill overnight for easy slicing.
💡 Bonus Variations:
- Chocolate Crust: Use crushed chocolate cookies or Oreos instead of graham crackers for a richer base.
- Peanut Butter Swirl: Mix ¼ cup peanut butter into the filling for double the nutty goodness.
- Drizzles & Toppings: Add caramel drizzle, chocolate syrup, or chopped peanuts for extra flavor.
Visual Table: Variations at a Glance
Variation | Swap or Add | Notes |
---|---|---|
Mini Pie Bites | Use muffin tin | Perfect for parties and snacks |
Icebox Cake | Graham cracker layers | Easy assembly, slice to serve |
Peanut Butter Swirl | Add ¼ cup to filling | Boosts nutty flavor |
Chocolate Crust | Use Oreos instead | Great for chocoholics |
Caramel Drizzle | Top before serving | Adds gooey texture |
These variations prove that Butterfinger pie isn’t just one dessert—it’s a dessert category.
Storage, Freezing, and Make-Ahead Options
One of the best things about Butterfinger pie—besides how crazy good it tastes—is how well it holds up. Whether you're prepping it for a party or stashing leftovers, this pie is built to last (if you can resist eating it all).
How to Store Butterfinger Pie the Right Way
Refrigeration is key to keeping your pie creamy, firm, and safe to eat. Here’s how to do it right:
- Store covered in the fridge: Use plastic wrap, foil, or a pie container. Covering it keeps the pie from absorbing fridge odors and drying out.
- Shelf life: Butterfinger pie stays fresh for 3 to 4 days in the refrigerator.
- Avoid soggy topping: If you've added extra crushed candy or drizzle, it's best to do that just before serving to keep it crisp.
💡 Tip: Slice only what you need. Leaving the rest untouched helps the remaining pie stay fresh longer.
Looking for more fridge-friendly sweets? Try our Strawberry Pretzel Salad—it’s another no-bake hit with amazing storage life.
Can You Freeze Butterfinger Pie Without Ruining It?
Absolutely. Freezing is a great way to extend the life of this dessert or prep ahead for a busy event.
How to freeze it:
- Wrap the pie tightly with plastic wrap and then foil.
- Place in a freezer-safe container or freezer bag if storing slices.
- Freeze for up to 1 month for the best texture and flavor.
Thawing instructions:
- Transfer the pie to the fridge and let it thaw overnight.
- Avoid microwaving—it can mess up the texture and melt the whipped topping.
Best practices:
- Freeze without topping for best results. Add fresh whipped topping and Butterfinger pieces after thawing.
- Sliced portions thaw quicker and are ideal for grab-and-go servings.
Nutrition Facts and Health Considerations
Butterfinger pie may not scream “healthy,” but enjoying a decadent dessert doesn’t mean you have to throw nutrition entirely out the window. Let’s break down what you’re really getting in a slice and how you can tweak it to fit your dietary needs—without sacrificing that indulgent flavor.
What’s Inside One Slice of Butterfinger Pie
Here’s an estimated breakdown for one slice (assuming 8 servings per pie):
Nutrient | Amount |
---|---|
Calories | ~430 kcal |
Total Fat | 24g |
Saturated Fat | 13g |
Carbohydrates | 48g |
Sugar | 35g |
Protein | 5g |
Sodium | 240mg |
These numbers can vary slightly depending on your brand of whipped topping, cream cheese, or candy bars. It’s safe to say this pie is rich, sweet, and meant to be a treat—not a daily staple.
If you're craving more desserts with a balance of taste and nutrition, check out our Healthy Greek Yogurt Chocolate Chip Cookies—they hit the sweet spot without the guilt.
How to Make It Slightly Healthier Without Losing Taste
Want to indulge a little smarter? Here are a few simple swaps that can lighten up your Butterfinger pie:
- Use reduced-fat cream cheese: You’ll shave off saturated fat and calories without drastically changing flavor.
- Try light whipped topping: Brands like Cool Whip Lite offer fewer calories and sugars.
- Cut the candy: Use ¾ cup crushed Butterfinger in the filling instead of 1 cup, and skip the optional garnish.
- Make a nut-based crust: Almond flour mixed with a bit of butter can be a lower-carb alternative to graham crackers.
- Serve smaller portions: Slice the pie into 10 pieces instead of 8. It’s still satisfying, especially after a meal.
💡 Pro Tip: For a gluten-free version, use certified gluten-free graham crackers and verify all other ingredients.
Common Mistakes to Avoid
Even though Butterfinger pie is one of the easiest no-bake desserts to whip up, a few missteps can quickly derail your pie from dreamy to disappointing. Whether it's a soggy crust, lumpy filling, or flavor that falls flat, let’s cover the common errors and how to avoid them.
Overmixing the Filling
It’s tempting to beat everything until it looks smooth, but overmixing is a major no-no, especially once the whipped topping is involved.
Here’s why it’s a problem:
- Overbeating knocks the air out of your whipped topping, making the filling dense instead of light and creamy.
- It can also lead to a runnier texture, especially if you’re using homemade whipped cream.
Fix:
Fold the whipped topping in gently using a silicone spatula. A soft hand keeps the filling fluffy and stable.
💡 Want to master the no-bake texture game? Check out our No-Bake Chocolate Peanut Butter Crunch Bars for more air-light dessert tricks.
Skipping Chill Time – Why It Matters
This is the number one reason Butterfinger pies fail to set properly. Your pie needs to chill for at least 4 hours—preferably overnight—to hold its shape and develop the best flavor.
Why this matters:
- The filling firms up only when thoroughly chilled.
- Flavors meld and intensify after a few hours in the fridge.
- Slicing too early leads to a runny, messy presentation.
Fix:
If you’re short on time, pop the pie into the freezer for an hour, then transfer to the fridge for another couple of hours.
Serving Suggestions and Presentation Ideas
Once your Butterfinger pie is chilled and ready, it’s time for the most fun part—serving it up in style. From simple toppings to eye-catching plating tricks, these ideas will make your pie the talk of any table, whether you're bringing it to a cookout, holiday gathering, or birthday bash.
Topping Combos That Make It Pop
A beautifully finished pie is all about texture, color, and that little extra. While the classic topping is whipped cream and crushed Butterfinger bars, here are a few next-level options:
- Chocolate or caramel drizzle: Warm up a little sauce and zigzag it over the top for a bakery-worthy finish.
- Chopped roasted peanuts: Adds crunch and complements the peanut butter flavor in the candy.
- Mini Butterfinger bites or shards: For visual interest, add a few standing upright in the center or on each slice.
- Crumbled chocolate cookies: A dusting of cookie crumbs adds visual contrast and pairs great with the graham crust.
- Whipped cream rosettes: Pipe small swirls around the edge for an elegant look.
💡 Want more pie-presentation tricks? Don’t miss our Raspberry Cheesecake Cupcakes—they're all about decorative flair with zero stress.
The Best Times and Events to Serve This Dessert
Butterfinger pie is ridiculously versatile. Here’s where and when it steals the show:
- Summer BBQs & potlucks: No-bake means no oven heat—plus it travels well and holds up outdoors if kept cool.
- Holiday dinners: When the oven’s full of turkey and stuffing, this pie steps in as the perfect make-ahead dessert.
- Birthday parties: Skip the cake and serve this candy-packed crowd-pleaser.
- Game night or movie night: Satisfies every snacky craving without needing utensils—just slice and go.
Final Thoughts
From its creamy filling to the unmistakable crunch of crushed candy bars, Butterfinger pie delivers pure dessert joy with barely any effort. It's a crowd-pleasing, no-bake recipe that you can make ahead, customize, and serve at virtually any occasion—from holidays and cookouts to movie nights and birthday parties.
Even better, it offers flexibility: swap the crust, lighten it up with reduced-fat ingredients, or turn it into party-perfect minis. Whether you're a seasoned baker or just looking for an easy win, this pie nails the balance of simplicity and indulgence.
Frequently Asked Questions
Whether you're making this dessert for the first time or just need a few pro tips, these FAQs will help you perfect your Butterfinger pie experience from start to finish.
Absolutely. In fact, making it a day ahead is ideal. The longer the pie chills, the better the texture and flavor. Simply keep it covered in the fridge until ready to serve. Add final toppings like crushed Butterfingers or drizzle right before presenting for the freshest look.
Stored properly, Butterfinger pie stays fresh for 3 to 4 days in the refrigerator. Cover it tightly with plastic wrap, foil, or store it in an airtight pie container to prevent it from drying out or absorbing other fridge smells.
You’ve got options. Try:
Oreo crust – crushed chocolate sandwich cookies for a richer base.
Digestive biscuits – popular in the UK for a less sweet alternative.
Nilla wafers or shortbread cookies – for a buttery, melt-in-your-mouth base.
Almond flour + butter – a great gluten-free and low-carb crust solution.
Each swap gives the pie a unique texture and flavor profile while still holding up beautifully.
Here’s a no-mess method:
Place candy bars (unwrapped) into a zip-top freezer bag.
Use a rolling pin or meat mallet to smash into small chunks.
Don’t crush too fine—uneven chunks give you that satisfying crunch.
💡 Pro Tip: Freeze the bars for 15 minutes before crushing. It reduces stickiness and helps get clean breaks.
Yes! Kids love it thanks to its candy-filled flavor and creamy texture. Just be mindful of:
Peanut allergies (Butterfingers contain peanuts).
Portion sizes—it’s sweet, so cut small slices for little ones.
Make it fun for birthday parties by serving mini pie cups in cupcake liners or small jars.
Leave a Reply