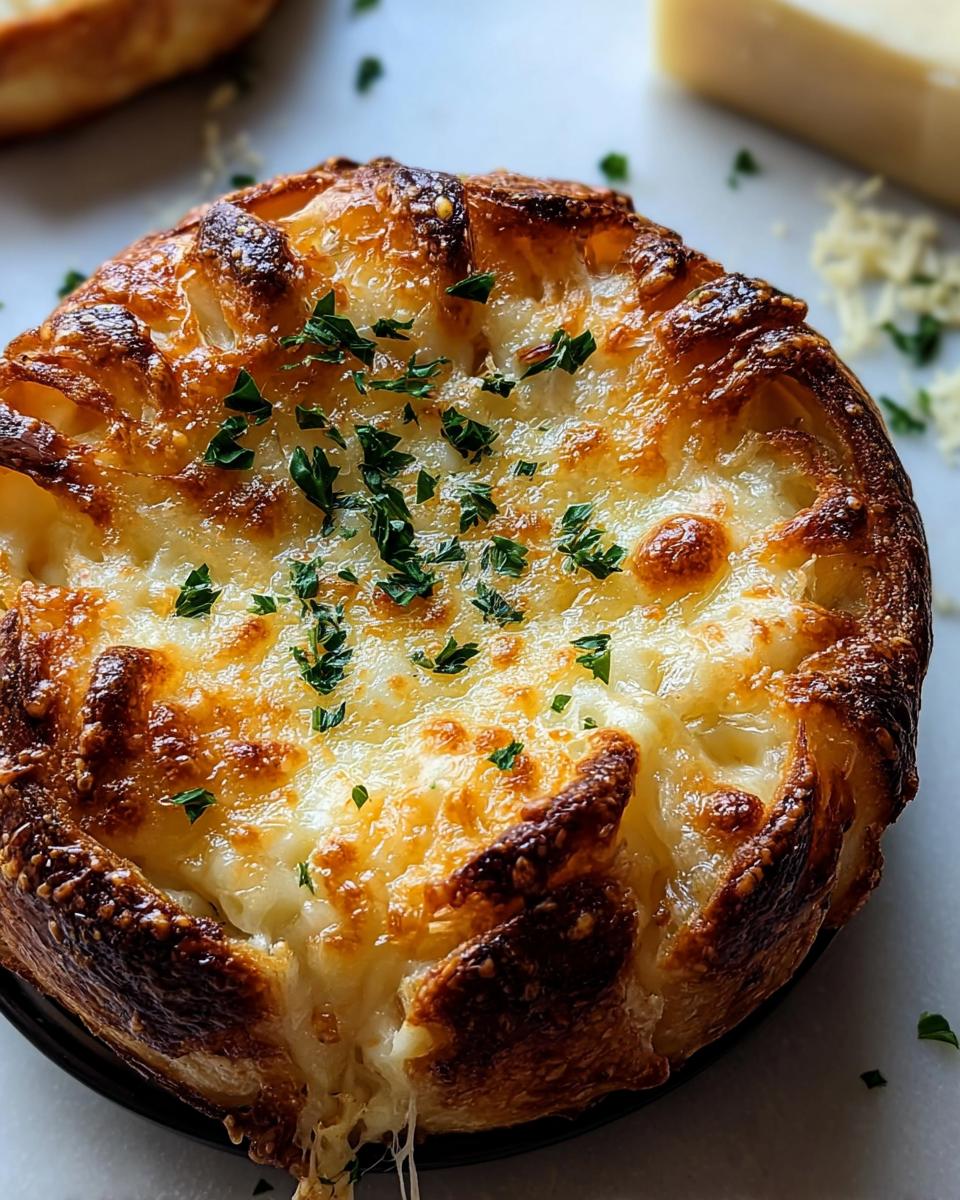
Whenever I think of cozy weekend mornings, the image of my kitchen filled with the buttery, garlicky aroma of Cheesy Garlic Cruffins comes to mind. I can still remember the first time I attempted to make these delightful pastries. My kids were running around, and I was convinced that I needed a little magic to bring us all together. I rolled out the dough, sprinkled it with cheese, and—oh my goodness—the joy on their faces when they took that first bite! It was like a culinary hug that made our hearts sing.

Cheesy Garlic Cruffins are perfect for any occasion, whether it's a lazy Sunday brunch, a picnic in the park, or even just a comforting snack while watching a movie. They’re flaky, savory, and the blend of cheeses combined with garlic is simply irresistible. Plus, who doesn't love a recipe that brings everyone to the table and makes the whole house smell divine? Trust me, once you try these, you’ll want to make them a part of your family traditions!
Why You’ll Love "Cheesy Garlic Cruffin"
- Quick prep time—ready in just over an hour, including rising time!
- Minimal ingredients—most likely already in your pantry.
- Family-friendly—kids love the cheesy, garlicky goodness!
- Freezer-friendly—make a double batch and save some for later!
- Perfect for any meal—great for breakfast, snacks, or even appetizers!
Ingredients You’ll Need
Ingredients for Cheesy Garlic Cruffin
- 2 cups all-purpose flour
- 1 tablespoon granulated sugar
- 1 teaspoon salt
- 2 teaspoons instant yeast
- ½ cup warm milk (around 110°F/43°C works best)
- ¼ cup unsalted butter, melted (use good quality for the best flavor)
- ½ cup warm water (make sure it's warm, not hot!)
- 1 large egg
- ½ cup grated Parmesan cheese (freshly grated is ideal)
- 1 cup shredded mozzarella cheese (feel free to mix it up with other melty cheeses!)
- 3 cloves garlic, minced (more if you’re a garlic lover!)
- ¼ cup unsalted butter, softened (for spreading)
- 1 tablespoon fresh parsley, chopped (optional, for a pop of color and flavor)
Step-by-Step Instructions
Preheat the Oven
- Start by preheating your oven to 375°F (190°C). This is essential for getting those delicious, golden-brown Cruffins!
Make the Dough
- In a large mixing bowl, combine the flour, granulated sugar, salt, and instant yeast. Give it a good stir to mix everything together.
- Pour in the warm milk, melted butter, warm water, and crack in the egg. Mix until the dough comes together smoothly. Don't worry if it seems a bit sticky at first; that's just the yeast getting cozy!
- Once everything is combined, turn the dough out onto a lightly floured surface. Knead it for about 5 minutes until it's nice and elastic. You want it to feel soft and a little bouncy, just like a good pillow!
Let the Dough Rise
- Place your kneaded dough back into the bowl and cover it with a clean kitchen towel or plastic wrap. Let it rise in a warm spot for about 1 hour, or until it has doubled in size. This is the moment when your kitchen will start smelling like magic!
Prepare the Filling
- After the dough has risen, turn it out onto a floured surface again and roll it out into a rectangle, about 12x18 inches. Aim for about ¼-inch thickness.
- Spread the softened butter evenly over the dough, covering every inch of that lovely surface.
- Sprinkle the minced garlic, chopped parsley, grated Parmesan, and shredded mozzarella evenly over the buttered dough. Let your creative side shine here! If you want to add more cheese or herbs, go for it!
Assemble the Cruffins
- Starting from one of the long sides, roll the dough tightly into a log. Make sure it's snug but not too tight, or the filling will spill out!
- Once you have a lovely log, use a sharp knife to cut it into 12 equal pieces. You can also use dental floss for a cleaner cut—just slide it under the dough and pull the ends to cut!
- Place the pieces cut-side up into a greased muffin tin. They might look a bit crowded, but don’t worry! They’ll puff up beautifully as they rise.
- Cover the muffin tin with a towel and let them rise for another 30 minutes. This is the time to prepare your favorite coffee or tea to enjoy while you wait!
Final Bake
- Once they’ve puffed up nicely, pop the muffin tin into your preheated oven. Bake for 20-25 minutes or until the tops are golden brown and the kitchen smells incredible.
- When they’re ready, take them out and let them cool for about 10 minutes before removing them from the tin. This will help them hold their shape and keep that cheesy goodness inside!
Variations
- Swap out the cheeses for a sharp cheddar and pepper jack for a spicy kick.
- Add cooked spinach or sun-dried tomatoes for a burst of flavor.
- Try using whole wheat flour for a healthier twist.
- Make them dairy-free by using vegan butter and dairy-free cheese.
- For a seasonal touch, add pumpkin puree and sage in the filling during fall.
Serving and Storage Tips
Serving
Serve your Cheesy Garlic Cruffins warm, straight from the oven for the best experience. They’re perfect on their own or paired with a light salad or soup. A little extra sprinkle of parsley on top adds a lovely touch and makes them look fancy!
Storage
Store leftover Cruffins in an airtight container at room temperature for up to 2 days. For longer storage, place them in the fridge for up to a week or freeze for up to a month. Reheat in the oven for a few minutes to regain that fresh, flaky texture!
Helpful Notes
- Use fresh garlic for the best flavor; roasted garlic can add a sweet twist.
- Feel free to substitute half the all-purpose flour with whole wheat flour for added nutrition.
- For a nut-free option, ensure all ingredients are free from cross-contamination.
- Add a pinch of red pepper flakes for a spicy kick if desired.
- Consider using gluten-free flour to make this recipe gluten-free.
Frequently Asked Questions
Can I freeze Cheesy Garlic Cruffin?
Yes, you can freeze Cheesy Garlic Cruffins! Just allow them to cool completely, then place them in an airtight container or freezer bag. They can be stored in the freezer for up to a month. When you're ready to enjoy them, simply reheat them in the oven for a few minutes until warmed through.
What can I substitute for the cheeses?
You can substitute the cheeses with your favorites! For example, sharp cheddar or gouda would work beautifully. If you want a dairy-free option, look for plant-based cheeses that melt well. Just keep in mind that the flavor will vary slightly depending on your choice.
How long do leftovers last?
Leftovers can last up to 2 days at room temperature if stored in an airtight container. If you want them to last longer, keep them in the fridge for about a week. Just remember to reheat them in the oven to bring back that fresh, flaky texture!
Final Thoughts
Making Cheesy Garlic Cruffins is not just about baking; it’s about creating moments and memories in your kitchen. I hope you feel inspired to try this recipe and share it with your loved ones. The joy of pulling a tray of warm, cheesy goodness from the oven is truly unmatched. Whether it’s a lazy brunch or a cozy evening snack, these little delights will surely bring smiles all around. So roll up your sleeves, embrace the chaos, and enjoy the process. I can’t wait for you to experience the deliciousness that awaits!
Print
Cheesy Garlic Cruffin
- Total Time: 1 hour 40 minutes
- Yield: 12 Cruffins 1x
- Diet: Vegetarian
Description
A delightful blend of cheesy and garlicky flavors wrapped in a flaky pastry.
Ingredients
- 2 cups all-purpose flour
- 1 tablespoon granulated sugar
- 1 teaspoon salt
- 2 teaspoons instant yeast
- ½ cup warm milk
- ¼ cup unsalted butter, melted
- ½ cup warm water
- 1 large egg
- ½ cup grated Parmesan cheese
- 1 cup shredded mozzarella cheese
- 3 cloves garlic, minced
- ¼ cup unsalted butter, softened
- 1 tablespoon fresh parsley, chopped
Instructions
- In a bowl, mix flour, sugar, salt, and yeast.
- Add warm milk, melted butter, warm water, and egg. Mix until smooth.
- Knead the dough for about 5 minutes until elastic.
- Let it rise for 1 hour or until doubled in size.
- Roll out the dough into a rectangle.
- Spread softened butter on the dough.
- Sprinkle minced garlic, parsley, Parmesan, and mozzarella.
- Roll the dough tightly and cut into pieces.
- Place pieces in a muffin tin and let rise for another 30 minutes.
- Bake at 375°F (190°C) for 20-25 minutes or until golden brown.
Notes
- Use fresh ingredients for the best flavor.
- Experiment with different types of cheese.
- Store leftovers in an airtight container.
- Prep Time: 15 minutes
- Cook Time: 25 minutes
- Category: Baking
- Method: Baking
- Cuisine: Italian
Nutrition
- Serving Size: 1 Cruffin
- Calories: 250
- Sugar: 1g
- Sodium: 400mg
- Fat: 15g
- Saturated Fat: 9g
- Unsaturated Fat: 4g
- Trans Fat: 0g
- Carbohydrates: 24g
- Fiber: 1g
- Protein: 8g
- Cholesterol: 40mg
Keywords: Cheesy Garlic Cruffin
Leave a Reply