Cherries in the Snow is one of those desserts that takes me right back to my childhood. I can still picture my mom pulling this delightful treat out of the fridge during family gatherings, the cool, creamy layers contrasting beautifully against the bright red cherry topping. Everyone would gather around, eyes wide, eagerly awaiting their first bite. It’s a simple dessert that feels like a special occasion, and it has a way of bringing people together, just like those happy memories from my youth.

This no-bake dessert is perfect for summer picnics, holiday celebrations, or even just a cozy night in with loved ones. With its light and airy texture, Cherries in the Snow is a refreshing treat that balances sweetness and creaminess. It’s the kind of dessert that makes you smile, and trust me, once you make it, you’ll want to share it with everyone you know!
Why You’ll Love "Cherries in the Snow"
- Quick and easy to prepare — no baking required!
- Minimal ingredients make it budget-friendly and accessible.
- Perfect for gatherings, allowing you to impress without stress.
- Light and refreshing, making it a great dessert for warmer days.
- Kids love it, and it’s an excellent way to get them involved in the kitchen.
- Can be made ahead, allowing for a hassle-free serving experience.
Ingredients You’ll Need
- 12 oz block-style cream cheese, at room temperature for easy mixing
- ¾ cup powdered sugar, sifted to avoid lumps
- ⅓ cup whole milk, you can substitute with almond milk for a dairy-free version
- ½ teaspoon vanilla extract, use pure vanilla for the best flavor
- 8 oz whipped topping, thawed; consider using homemade whipped cream for a fresher taste
- 1 pre-baked angel food cake, torn into ¾–1 inch pieces; feel free to use store-bought or make your own
- 2 (21 oz each) cans cherry pie filling, or use fresh cherries when in season for a more vibrant flavor
Step-by-Step Instructions
Preheat the Oven
Now, I know what you're thinking — this is a no-bake dessert, so there’s no oven to preheat! But let’s get our serving dish ready. Choose a large trifle dish or a 9x13-inch baking dish, and set it aside. You want something that shows off those beautiful layers, so pick whatever you think will look best on your table!
Make the Cream Cheese Mixture
- In a large mixing bowl, beat the room temperature cream cheese with a hand mixer or a sturdy spatula until it’s smooth and creamy. This step is crucial because you want to avoid any lumps in your mixture.
- Add the sifted powdered sugar, whole milk, and vanilla extract to the bowl. Mix everything together until well combined and you see no more streaks of cream cheese. It should be a lovely, creamy consistency.
- Finally, gently fold in the thawed whipped topping. This makes the whole mixture light and fluffy, which is exactly what you want! Be careful not to overmix; you want to keep that airy texture.
Layer the Cake
- Now, let’s start layering! Begin by placing half of the torn angel food cake pieces at the bottom of your prepared dish. Spread them out evenly to create a nice base.
- Next, take half of the cream cheese mixture and spread it over the cake pieces, making sure to cover them completely. You want every bit of cake to have that creamy goodness!
- Open one can of cherry pie filling and spoon it over the cream cheese layer. Make sure to distribute it evenly — every bite should have a cherry surprise!
- Now, repeat the layers! Add the remaining angel food cake pieces, followed by the last half of the cream cheese mixture, and top it off with the second can of cherry pie filling. This will create a stunning layered dessert that’s sure to impress.
Chill the Dessert
- This is the hardest part — waiting! Cover your dish with plastic wrap or a lid and place it in the refrigerator. Let it chill for at least 2 hours. This allows all those delicious flavors to meld together and makes it easier to serve.
- When you’re ready to serve, simply scoop out portions and watch the layers shine through. Trust me, the anticipation will make that first bite even sweeter!
Variations
- Swap cherry pie filling for blueberry or strawberry for a different fruit flavor.
- Use lemon zest in the cream cheese mixture for a citrusy twist.
- For a lighter version, substitute cream cheese with Greek yogurt.
- Make it gluten-free by using a gluten-free angel food cake.
- Add chopped nuts like pecans or walnuts for extra crunch.
Serving and Storage Tips
Serving
Serve Cherries in the Snow chilled for the best taste. It pairs wonderfully with a dollop of extra whipped topping or a sprinkle of toasted coconut for added flair. You can also garnish with fresh mint leaves for a pop of color!
Storage
Store any leftovers in the refrigerator, covered, for up to 3 days. The flavors actually deepen as it sits! However, I wouldn’t recommend freezing this dessert, as the texture may change once thawed.
Helpful Notes
- For a dairy-free version, use a vegan cream cheese and non-dairy whipped topping.
- Consider using low-fat cream cheese to lighten it up a bit without sacrificing too much flavor.
- Feel free to add a splash of almond extract for a unique flavor twist.
- Crushed graham crackers or cookie crumbs can be layered in for added texture.
- This dessert is a great way to use up leftover angel food cake from other recipes!
Frequently Asked Questions
Can I freeze "Cherries in the Snow"?
No, I wouldn't recommend freezing this dessert. The texture can change once thawed, making it less enjoyable. It's best served fresh or refrigerated for a few days.
What can I substitute for cream cheese?
You can use Greek yogurt for a lighter option or vegan cream cheese if you're looking for a dairy-free alternative. Both will work well in this recipe!
How long does this dessert last in the fridge?
Cherries in the Snow can be stored in the refrigerator for up to 3 days. The flavors actually get better as it sits, so it’s a perfect make-ahead treat!
Final Thoughts
So there you have it, my dear friend! Cherries in the Snow is truly a delightful treat that’s sure to bring smiles and happy memories to your table. I encourage you to give this recipe a try, whether it's for a family gathering, a summer picnic, or just a cozy evening at home. Each bite is a reminder of the joy that comes from sharing food with loved ones. Remember, cooking is all about love and connection, so don’t stress — just enjoy the process, and let those layers of creamy goodness work their magic. Happy cooking!
Print
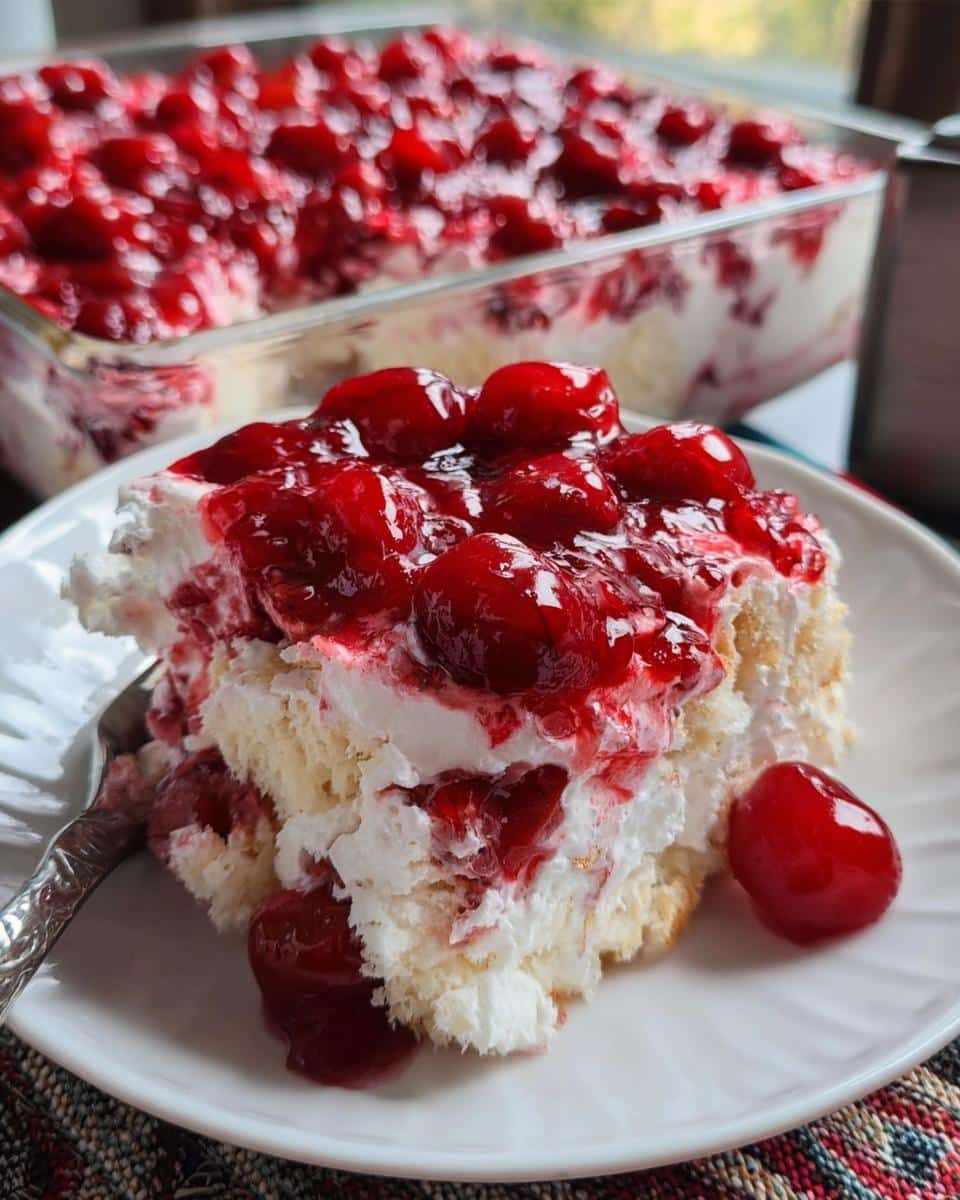
Cherries in the Snow
- Total Time: 2 hours 20 minutes
- Yield: 8 servings 1x
- Diet: Vegetarian
Description
Cherries in the Snow is a delightful dessert featuring cream cheese, whipped topping, and cherry pie filling layered with angel food cake.
Ingredients
- 12 oz block-style cream cheese, room temperature
- ¾ cup powdered sugar, sifted
- ⅓ cup whole milk
- ½ tsp vanilla extract
- 8 oz whipped topping, thawed
- 1 pre-baked angel food cake, torn into ¾–1 inch pieces
- 2 (21 oz each) cans cherry pie filling
Instructions
- In a bowl, beat cream cheese until smooth.
- Add powdered sugar, milk, and vanilla extract. Mix until combined.
- Fold in the whipped topping gently.
- In a serving dish, layer half of the angel food cake pieces.
- Spread half of the cream cheese mixture over the cake.
- Add one can of cherry pie filling on top.
- Repeat the layers with the remaining cake, cream cheese mixture, and cherry pie filling.
- Chill in the refrigerator for at least 2 hours before serving.
Notes
- Use fresh cherries for a variation.
- Make ahead for best flavor.
- Store leftovers in the refrigerator.
- Prep Time: 20 minutes
- Cook Time: 0 minutes
- Category: Dessert
- Method: No-Bake
- Cuisine: American
Nutrition
- Serving Size: 1 serving
- Calories: 320
- Sugar: 30g
- Sodium: 150mg
- Fat: 15g
- Saturated Fat: 8g
- Unsaturated Fat: 5g
- Trans Fat: 0g
- Carbohydrates: 42g
- Fiber: 1g
- Protein: 4g
- Cholesterol: 30mg
Keywords: Cherries in the Snow, dessert, cherry pie filling, no-bake dessert

Leave a Reply