I’ll never forget the first time I made Christmas Cherry Bars—it was pure holiday magic in a pan. I was scrambling last-minute for something festive to bring to my in-laws’ Christmas Eve party, and these bars saved the day. The buttery crust, the sweet-tart cherry filling, and that little drizzle of vanilla glaze? Absolute showstoppers. My husband’s aunt actually pulled me aside to whisper, "These taste like they came from a fancy bakery," and I just grinned because, honestly, they’re embarrassingly easy.

Now, these bars are my go-to for every holiday gathering. They’re the kind of dessert that looks like you fussed for hours but secretly comes together faster than wrapping presents. The red cherries against the golden crust scream Christmas, and the smell? Oh, it’ll have everyone hovering around the kitchen. Whether you’re gifting them to neighbors, serving them at cookie exchanges, or just sneaking bites straight from the pan (no judgment here), these Christmas Cherry Bars are guaranteed to spread holiday cheer—one irresistible bite at a time.
Why You’ll Love Christmas Cherry Bars
Listen, I know everyone claims their holiday recipes are the best—but these bars? They’re in a league of their own. Here’s why you’ll be obsessed:
- Effortless elegance: They look like you spent all day baking, but the dough comes together in one bowl (seriously, even my kids can help).
- That nostalgic holiday flavor: Buttery crust + tart cherries = the taste of Christmas morning in every bite.
- Crazy versatile: Swap the glaze for cream cheese frosting, use different pie fillings (my cousin swears by blueberry), or add chopped almonds for crunch.
- Travel-friendly: Unlike fussy layer cakes, these bars won’t collapse in your car on the way to parties—just stack ’em and go!
- Freezer magic: Make a double batch and freeze half; future-you will high-five present-you when cookie cravings strike in January.
Honestly, the hardest part is not eating the whole pan yourself. (Pro tip: Hide a few pieces before serving. I learned that lesson the hard way.)
Ingredients You’ll Need for Christmas Cherry Bars
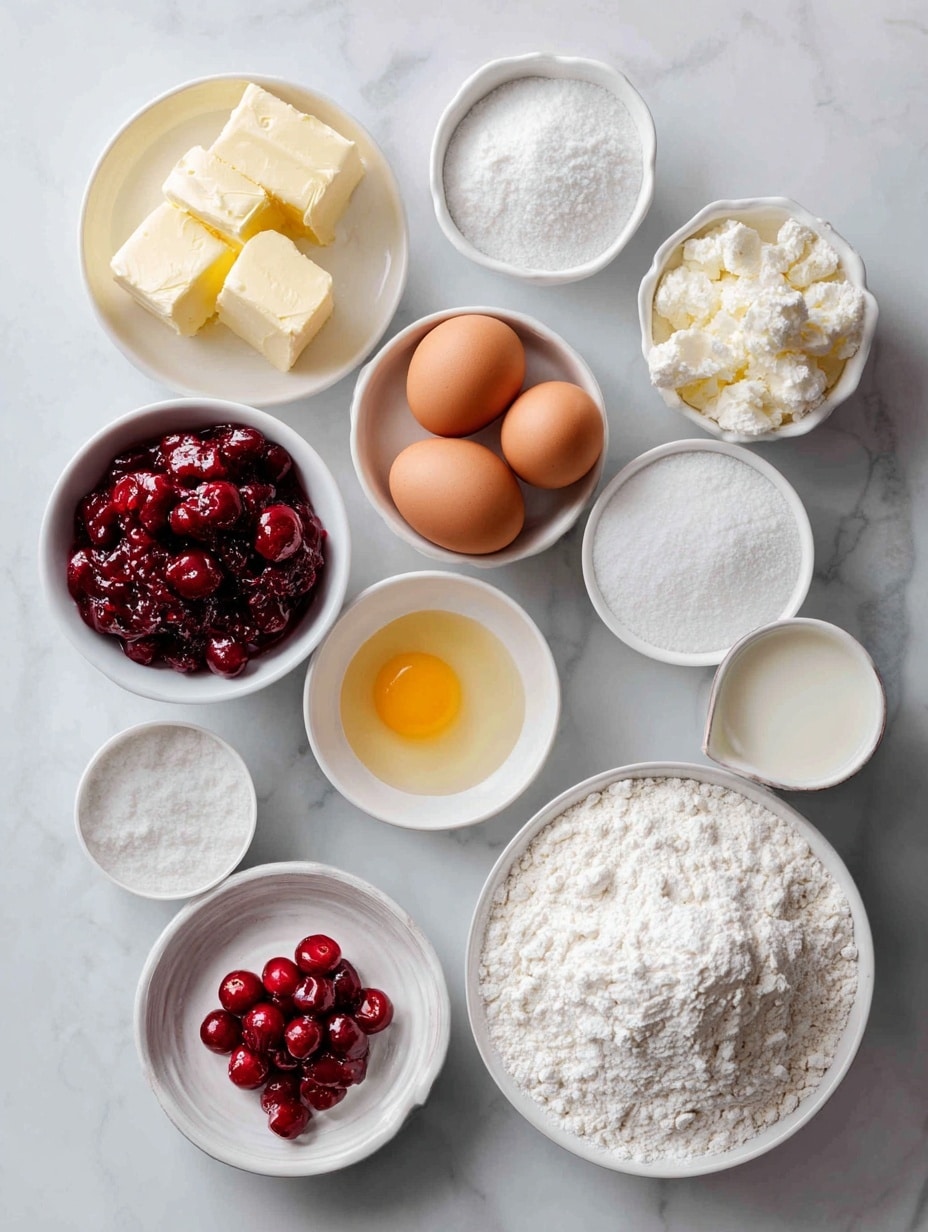
Okay, let’s gather our goodies! The beauty of these bars is that you probably already have most of this in your pantry—no weird, hard-to-find ingredients here. Here’s what you’ll need:
- 1 cup (2 sticks) softened butter – Trust me, "softened" is key here. If it’s too cold, your mixer will revolt. I leave mine on the counter for about an hour before baking.
- 4 large eggs – Room temp is ideal, but if you forget (like I often do), just pop them in warm water for 5 minutes.
- 2 cups packed sugar – Pack it in there nice and tight—this isn’t the time to be shy with sweetness!
- 1 teaspoon vanilla powder – You can use extract if that’s what you’ve got, but the powder gives such a lovely, even flavor.
- 3 cups all-purpose flour – No need to sift unless you’re feeling fancy. Just fluff it up with a fork before measuring.
- 1 teaspoon salt – Balances all that sweetness perfectly.
- One 21-oz can cherry pie filling – The star of the show! I usually grab the "more fruit" kind—extra juicy cherries make all the difference.
Optional Glaze Ingredients
Now, the glaze is totally optional, but let’s be real—it takes these bars from "yum" to "OMG." Here’s what you’ll need if you want that pretty drizzle:
- 1 cup powdered sugar – Sift it if there are lumps (I never do and it’s fine, but perfectionists, go for it).
- ½ cup milk – Whole milk makes it extra creamy, but any kind works.
- ½ teaspoon vanilla powder – Just a little extra vanilla magic.
That’s it! Simple, right? Now let's get mixing—the fun part’s coming up next.
Step-by-Step Instructions for Christmas Cherry Bars
Alright, let’s get baking! Don’t let the layers intimidate you—this is way easier than it looks. Just follow these steps, and you’ll have a pan of holiday magic in no time.
Preparing the Dough
- Preheat your oven to 350°F (175°C) and grab a 9x13-inch baking pan. Grease it really well—I use butter or baking spray, but a quick swipe of oil works too.
- Cream the butter and sugar in a big mixing bowl. Use a hand mixer or stand mixer on medium until it’s light and fluffy, about 2 minutes. Scrape down the sides—those sneaky butter clumps love to hide!
- Add the eggs one at a time, mixing well after each one. This keeps the dough smooth. If it looks a little curdled, don’t panic—just keep mixing; it’ll come together.
- Stir in the vanilla powder (or extract). Smell that? That’s the scent of holiday happiness.
Layering and Baking
- Gradually add the flour and salt. Mix on low until just combined—overmixing makes tough bars, and nobody wants that. The dough will be thick and kinda sticky, like cookie dough.
- Spread two-thirds of the dough into your greased pan. I use damp fingers or a spatula to press it evenly. It might feel thin, but trust me, it puffs up!
- Pour the cherry pie filling over the dough and spread it gently. Leave a tiny border so the cherries don’t stick to the pan edges.
- Dot the rest of the dough on top in little clumps. No need to be perfect—rustic is charming! The filling will peek through beautifully.
- Bake for 35-40 minutes until golden brown. Rotate the pan halfway if your oven heats unevenly (mine’s a drama queen). A toothpick in the crust should come out clean—ignore any cherry juice!
Adding the Glaze
- Let the bars cool completely—I know, the wait is torture! But if you cut them warm, they’ll fall apart. Distract yourself with holiday music.
- Whisk the glaze ingredients in a small bowl until smooth. Want it thicker? Add more sugar. Thinner? More milk. Drizzle it over the bars with a spoon or fork.
- Slice into squares and watch them disappear. Seriously, hide some for yourself first—these bars are notorious for vanishing at parties!
See? Told you it was easy. Now go enjoy your masterpiece—you’ve earned it!
Christmas Cherry Bars Variations
One of my favorite things about these bars is how versatile they are. Feel free to get creative and make them your own! Here are some fun twists to try:
- Switch up the extract: Swap the vanilla powder for almond extract—it pairs beautifully with cherries and adds a lovely nutty flavor.
- Try different fillings: Not a cherry fan? No problem! Use blueberry, apple, or even peach pie filling. My friend made a raspberry version last year, and it was a total hit.
- Add some crunch: Toss in a handful of chopped nuts like almonds, pecans, or walnuts. Sprinkle them on top before baking for extra texture.
- Go citrusy: Add a teaspoon of lemon or orange zest to the dough for a bright, zesty twist.
- Make it chocolatey: Stir in a half cup of mini chocolate chips into the dough for a decadent treat. (Warning: These disappear *fast.*)
- Festive sprinkles: Add a sprinkle of red and green sugar or edible glitter on top of the glaze for a holiday touch.
The possibilities are endless! Whether you stick to the classic or experiment with these variations, these bars are guaranteed to steal the show at any holiday gathering.
Serving and Storage Tips for Christmas Cherry Bars
Here's the thing about these bars—they're almost too pretty to eat. Almost. But when you do dig in, here's how to make sure they're perfect every time:
- Cooling is crucial: I know it's hard to resist, but let them cool completely in the pan (about 2 hours) before slicing. Warm bars crumble, and we want those clean, bakery-style edges!
- Slice smart: Use a sharp knife and wipe it clean between cuts for neat squares. For extra-fancy presentation, dust with powdered sugar right before serving.
- Room temp is best: These taste amazing slightly warm, but the texture holds up better at room temperature. Perfect for leaving out at holiday parties!
- Storage secret: Keep them in an airtight container at room temp for up to 3 days. If it's humid, layer parchment between them to prevent sticking.
- Freeze like a pro: These freeze beautifully! Wrap individual bars in plastic, then foil, and freeze for up to 2 months. Thaw overnight on the counter—they'll taste fresh-baked.
Pro tip: If you're gifting them, stack bars in a holiday tin with parchment between layers. Tie with a ribbon, and voilà—instant edible present!
Helpful Notes for Perfect Christmas Cherry Bars
Okay, let me share a few secret weapons I've picked up after making these bars approximately a zillion times (give or take):
- Dough drama: If your dough feels too sticky to spread, wet your fingers or spatula slightly—it'll glide right into place. But don't overmix it! Lumps are fine, and overworked dough turns tough.
- Oven check: Every oven lies. Mine runs hot, so I start checking at 30 minutes. If the top's browning too fast, tent with foil. No one likes burnt Christmas presents!
- Glaze control: Too thick? Add milk ½ teaspoon at a time. Too runny? More powdered sugar. Aim for "honey consistency"—it should drizzle but not flood.
- Cherry spillage: If your pie filling is extra juicy, sprinkle 1 tablespoon flour over the bottom dough layer first. It'll soak up excess juice like a tasty sponge.
And hey, if nutrition's on your mind—each bar has about 220 calories. But it's Christmas, so maybe just enjoy the magic and worry about salads in January?
Frequently Asked Questions About Christmas Cherry Bars
I get so many questions about these bars—which makes sense because once you try them, you’ll want to know ALL the secrets! Here are the answers to the ones I hear most:
1. Can I use fresh cherries instead of pie filling?
Oh, I love the enthusiasm! But trust me, stick with canned pie filling here. Fresh cherries release too much juice and can make the bars soggy. If you're dead set on fresh, try pitting and cooking them down first with a bit of sugar and cornstarch to thicken. For more information on fruit preservation, check out food safety guidelines.
2. My bars came out crumbly—what went wrong?
Ah, the classic "too eager to cut" mistake! These need to cool COMPLETELY—like, Netflix-an-episode level of waiting. If they still crumble, try adding an extra egg yolk next time for more binding power.
3. Can I make these gluten-free?
Absolutely! Swap the all-purpose flour for a 1:1 gluten-free blend (I like Bob’s Red Mill). The texture might be slightly more delicate, but they’ll still taste amazing.
4. How long do they stay fresh?
At room temp, about 3 days in an airtight container. But let’s be real—they rarely last that long in my house! For longer storage, freeze them (unglazed works best) for up to 2 months.
5. Can I double the recipe?
Yes! Just use two pans—stacking the layers thicker in one pan leads to undercooked middles and burnt edges. Ask me how I know...
Final Thoughts on Christmas Cherry Bars
If there's one holiday recipe I'd trust to bring smiles (and recipe requests) every single time, it's these Christmas Cherry Bars. They've saved me from countless last-minute dessert panics, impressed skeptical in-laws, and even become a tradition my kids beg for each December. The best part? They're practically foolproof—even if you burn the cookies or forget to thaw the pie crust, these bars will still come through like a holiday miracle.
So whether you're baking for a crowd, gifting to neighbors, or just treating yourself to a little festive indulgence (you deserve it!), I hope these bars bring as much joy to your kitchen as they have to mine. After all, isn't that what Christmas baking is all about? Sharing love, one sweet bite at a time. Now go preheat that oven—your new favorite holiday tradition is waiting!
Print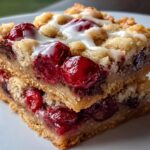
Christmas Cherry Bars
- Total Time: 55 minutes
- Yield: 24 bars 1x
- Diet: Vegetarian
Description
Christmas Cherry Bars are a festive and delicious dessert perfect for the holiday season. These bars feature a buttery base topped with sweet cherry pie filling and an optional vanilla glaze.
Ingredients
- 1 cup of softened butter
- 4 eggs
- 2 cups of sugar
- 1 teaspoon of vanilla powder
- 3 cups of all-purpose flour
- 1 teaspoon of salt
- One can of cherry pie filling
- Optional Glaze:
- 1 cup of powdered sugar
- ½ cup of milk
- ½ teaspoon of vanilla powder
Instructions
- Preheat your oven to 350°F (175°C) and grease a baking pan.
- In a large bowl, cream together the softened butter and sugar until light and fluffy.
- Add the eggs one at a time, mixing well after each addition.
- Stir in the vanilla powder.
- Gradually add the flour and salt, mixing until just combined.
- Spread two-thirds of the dough into the prepared baking pan.
- Spread the cherry pie filling evenly over the dough.
- Drop small pieces of the remaining dough over the cherry filling.
- Bake for 35-40 minutes or until golden brown.
- If using the glaze, whisk together powdered sugar, milk, and vanilla powder, then drizzle over the cooled bars.
Notes
- Let the bars cool completely before cutting.
- Store in an airtight container for up to 3 days.
- Prep Time: 15 minutes
- Cook Time: 40 minutes
- Category: Dessert
- Method: Baking
- Cuisine: American
Nutrition
- Serving Size: 1 bar
- Calories: 220
- Sugar: 18g
- Sodium: 120mg
- Fat: 9g
- Saturated Fat: 5g
- Unsaturated Fat: 3g
- Trans Fat: 0g
- Carbohydrates: 32g
- Fiber: 1g
- Protein: 3g
- Cholesterol: 45mg
Keywords: Christmas, cherry bars, dessert, holiday baking


Leave a Reply