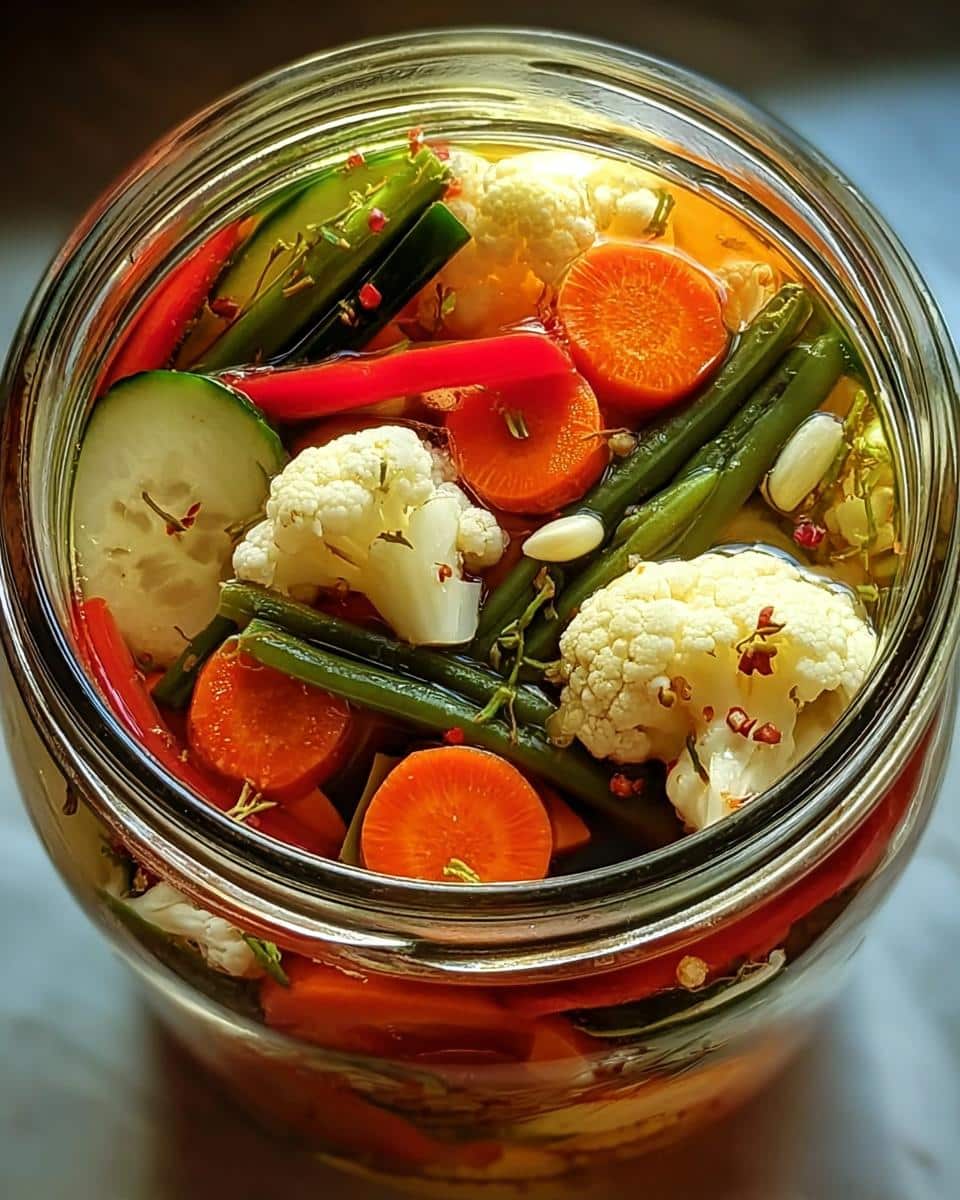
When I think about my childhood summers, I can’t help but remember the crunch of fresh veggies and the zing of tangy pickles at family picnics. My grandma would always whip up her famous Crunchy Tangy Refrigerator Pickled Vegetables, and they were the star of every gathering. We'd sit on the patio, sunlight streaming down, passing jars around and savoring those vibrant, crispy bites. There was something magical about how those simple ingredients transformed into a bold, flavor-packed treat that everyone loved. It felt like summer in a jar!

This recipe is perfect for brightening up your meals, especially during warmer months when fresh produce is at its best. Whether you’re hosting a barbecue, preparing lunches, or just looking for a way to add a burst of flavor to your snacks, these Crunchy Tangy Refrigerator Pickled Vegetables will definitely steal the show. Plus, they’re quick to make, and you can customize them with whatever veggies you have on hand. Let’s dive in and get pickling!
Why You’ll Love "Crunchy Tangy Refrigerator Pickled Vegetables"
- Quick prep time—ready in just 30 minutes!
- Minimal ingredients—using fresh veggies and pantry staples keeps it simple.
- Family-friendly—perfect for all ages; kids love the crunch!
- Customizable—swap in your favorite veggies or whatever's in season.
- Great for meal prep—make a big batch and enjoy them all week.
- Long-lasting—these pickles keep in the fridge for several weeks.
Ingredients You’ll Need
Vegetables
- 2 cups cauliflower florets, washed and cut into bite-sized pieces
- 1 cup sliced carrots, peeled and cut into thin rounds
- 1 cup sliced cucumbers, preferably pickling cucumbers for extra crunch
- 1 red bell pepper, sliced into strips, seeds removed
- 1 cup green beans, trimmed and cut into 2-inch pieces
- 3 cloves garlic, minced for that flavorful kick
Pickling Liquid
- 2 cups white vinegar, which gives that classic tang
- 2 cups water, to balance out the acidity
- 2 tablespoons salt, kosher or sea salt works best
- 1 tablespoon sugar, to add a touch of sweetness
- 2 teaspoons mustard seeds, for a bit of spice
- 1 teaspoon black peppercorns, whole for added flavor
- ½ teaspoon red pepper flakes (optional), if you like a little heat!
Step-by-Step Instructions
Prepare the Vegetables
- Start by washing all your vegetables thoroughly under cold water. This will ensure they're clean and ready for pickling. For the cauliflower, break it into small florets, and for the carrots, peel and slice them into thin rounds. The cucumbers should be cut into slices, and the red bell pepper into strips. Don’t forget to trim and chop the green beans into 2-inch pieces!
Make the Pickling Liquid
- In a medium-sized pot, combine the white vinegar, water, salt, sugar, mustard seeds, black peppercorns, and red pepper flakes. Stir everything together and place the pot over medium-high heat.
- Bring the mixture to a boil while stirring occasionally. You want the salt and sugar to completely dissolve into the liquid, infusing it with all those wonderful flavors. Once it reaches a rolling boil, remove it from the heat!
Pack the Jars
- Now it's time to pack your clean jars! Start by placing a few cloves of minced garlic at the bottom of each jar. Then, carefully layer in the prepared vegetables. It’s okay to get a bit creative here, arranging them in colorful layers. Try to pack them tightly but without squishing them too much!
Pour and Seal
- With the vegetables neatly packed, grab your hot pickling liquid and pour it over the veggies in the jars. Make sure every piece is submerged in the liquid. You might want to leave a little space at the top, about half an inch, to allow for expansion during cooling.
- Once filled, carefully seal the jars with their lids. You want them to be airtight so that those flavors can meld together beautifully!
Cool and Refrigerate
- Let the jars cool down to room temperature on your countertop. This usually takes about 30 minutes. After they’re cool, pop them into the refrigerator.
- For the best flavor, let them chill for at least 24 hours before diving in. Trust me, the wait is worth it! You’ll be rewarded with crunchy, tangy goodness that’s perfect for snacking or serving alongside meals.
Variations
- Add sliced radishes for an extra peppery crunch.
- Incorporate seasonal veggies like asparagus or zucchini during their peak.
- Experiment with fresh herbs, such as dill or thyme, for a fragrant twist.
- Try using apple cider vinegar for a sweeter, fruitier flavor.
- Make a spicy version by adding sliced jalapeños or extra red pepper flakes.
- For a sweeter pickle, include sliced bell peppers and increase the sugar to 2 tablespoons.
Serving and Storage Tips
Serving
These Crunchy Tangy Refrigerator Pickled Vegetables are fantastic served straight from the jar as a snack or side dish. They pair beautifully with grilled meats, sandwiches, or even atop salads for an extra zing. Feel free to mix and match them for a colorful platter!
Storage
Store your pickled vegetables in the refrigerator for up to 4 weeks. Make sure the jars are tightly sealed to keep them fresh. If you notice any changes in color or smell, it’s best to err on the side of caution and discard them. Enjoy the crunch while they last!
Helpful Notes
- If you don't have white vinegar, apple cider vinegar makes a great substitute for a different flavor profile.
- Feel free to adjust the sugar and salt levels to suit your taste. Less sugar will yield a more tangy pickle.
- Adding a pinch of turmeric can give your pickles a beautiful golden hue.
- For a gluten-free version, ensure that your vinegar is gluten-free, which most are.
- Consider adding a few peppercorns or mustard seeds directly into the jars for added flavor.
Frequently Asked Questions
Can I freeze Crunchy Tangy Refrigerator Pickled Vegetables?
Freezing is not recommended for these pickles. The texture of the vegetables will likely become mushy once thawed. These pickles are best enjoyed fresh and crunchy right from the refrigerator!
How do I substitute ingredients?
You can easily swap out vegetables based on your preference or what you have on hand. For example, if you don't like green beans, try asparagus or even sliced bell peppers. For the pickling liquid, you can use apple cider vinegar instead of white vinegar for a sweeter taste.
How long do these pickles last?
When stored properly in the refrigerator, these pickles can last for up to 4 weeks. Just make sure the jars are tightly sealed to maintain their crunch and flavor!
Final Thoughts
There you have it—your very own Crunchy Tangy Refrigerator Pickled Vegetables! I can’t wait for you to experience that satisfying crunch and vibrant flavor that brings a little sunshine to your table. Remember, cooking is all about having fun and experimenting, so don’t be afraid to make these pickles your own. Whether you’re enjoying them solo, sharing with friends, or spicing up a meal, I just know they’ll become a staple in your kitchen. So roll up those sleeves, gather your ingredients, and let’s get pickling! You’ve got this, and I’m cheering you on every step of the way!
Print
Crunchy Tangy Refrigerator Pickled Vegetables
- Total Time: 30 minutes
- Yield: 4 jars 1x
- Diet: Vegetarian
Description
Enjoy a burst of flavor with our Crunchy Tangy Refrigerator Pickled Vegetables. Fresh, crisp, and zesty pickles made effortlessly at home in no time!
Ingredients
- 2 cups cauliflower florets
- 1 cup sliced carrots
- 1 cup sliced cucumbers
- 1 red bell pepper, sliced into strips
- 1 cup green beans, trimmed
- 3 cloves garlic, minced
- 2 cups white vinegar
- 2 cups water
- 2 tablespoons salt
- 1 tablespoon sugar
- 2 teaspoons mustard seeds
- 1 teaspoon black peppercorns
- ½ teaspoon red pepper flakes (optional for heat)
Instructions
- Prepare all vegetables by washing and cutting them as needed.
- In a pot, combine vinegar, water, salt, sugar, mustard seeds, black peppercorns, and red pepper flakes.
- Bring the mixture to a boil, stirring to dissolve the salt and sugar.
- Place the vegetables and minced garlic in clean jars.
- Pour the hot pickling liquid over the vegetables, ensuring they are fully submerged.
- Seal the jars and let them cool at room temperature.
- Refrigerate for at least 24 hours before enjoying.
Notes
- These pickles can last for several weeks in the refrigerator.
- You can adjust the vegetables based on your preference.
- Experiment with different spices for unique flavors.
- Prep Time: 20 minutes
- Cook Time: 10 minutes
- Category: Condiment
- Method: Refrigeration
- Cuisine: American
Nutrition
- Serving Size: ½ cup
- Calories: 50
- Sugar: 2g
- Sodium: 700mg
- Fat: 0g
- Saturated Fat: 0g
- Unsaturated Fat: 0g
- Trans Fat: 0g
- Carbohydrates: 12g
- Fiber: 3g
- Protein: 1g
- Cholesterol: 0mg
Keywords: Crunchy Tangy Refrigerator Pickled Vegetables

Leave a Reply