I swear, Halloween Crinkle Cookies are the reason my kitchen turns into a mad scientist’s lab every October. Picture this: deep cocoa dough rolled in powdered sugar, cracking open as they bake into these gorgeous, spooky little masterpieces—like edible spiderwebs! The first time I made them, my nephew declared them "magic cookies" because of their crackly tops (I didn’t correct him).

They’re ridiculously easy—no fancy skills needed—and the fun part is playing with colors. Orange? Classic. Purple? Witchy vibes. Black? Pure Halloween drama. Whether you’re baking for a party or just bribing tiny trick-or-treaters (it works), these cookies are your new secret weapon.
Why You’ll Love Halloween Crinkle Cookies
Listen, these cookies are like a party in your mouth—and on your baking sheet. Here’s why you’ll be obsessed:
- That *~*magic*~* crinkle: The powdered sugar cracks as they bake, giving them that gorgeous, spooky texture that’s half cookie, half edible art.
- Rich cocoa flavor: They’re not overly sweet—just deep, chocolatey goodness that makes you want to eat three (no judgment).
- Halloween in every bite: Swirl in orange, purple, or black gel coloring for cookies that look as fun as they taste. Bonus: kids lose their minds over the colors.
- Foolproof to make: No mixer, no fancy techniques—just mix, chill, roll, and bake. Perfect for when you’re short on time but want maximum "wow" factor.
- Crowd-pleaser alert: These disappear at parties faster than a ghost in a haunted house. Pack them for potlucks, school events, or… your secret midnight snack stash.
Seriously, once you see those crackly tops and hear the "oohs" from your taste-testers, you’ll get it.
Ingredients You’ll Need for Halloween Crinkle Cookies
Okay, gather ’round the cauldron—here’s your grocery list for cookie magic. Most of this stuff is probably already in your pantry, but let’s double-check:
- 1 cup all-purpose flour (or swap with a 1:1 gluten-free blend—I’ve done it and it works like a charm)
- ½ cup unsweetened cocoa powder (the darker, the spookier—go for Dutch-process if you’re feeling fancy)
- 1 teaspoon baking powder (not soda! Trust me, I’ve mixed them up before and it was… a tragedy)
- ¼ teaspoon salt (just a pinch to balance the sweetness)
- 1 cup granulated sugar (regular white sugar—nothing wild here)
- ¼ cup vegetable oil (or melted coconut oil for a subtle twist)
- 2 large eggs (room temp, please—they mix in smoother and prevent sad, dense cookies)
- 1 teaspoon vanilla extract (the good stuff makes all the difference)
- Gel food coloring (orange, purple, or black—skip liquid dyes unless you want pastel ghosts)
- ½ cup powdered sugar (for rolling—this is what creates those iconic cracks!)
Quick PSA: Gel food coloring is NON-NEGOTIABLE if you want those vibrant Halloween hues. Liquid dye makes the dough sticky and the colors fade—learn from my early failures!
Step-by-Step Halloween Crinkle Cookies Instructions
Alright, let’s get to the fun part—making these little Halloween wonders! Don’t let the crinkles intimidate you; they’re basically just cookies playing dress-up. Follow these steps, and you’ll have a batch of spooky perfection in no time.
Preparing the Dough
- Preheat your oven to 350°F (175°C) and line two baking sheets with parchment paper. This is non-negotiable unless you enjoy scraping cookie remnants off your pans (been there).
- Whisk together the dry stuff: In a medium bowl, combine the flour, cocoa powder, baking powder, and salt. Give it a good whisk to banish any cocoa lumps—they’re the real Halloween monsters here.
- Mix the wet ingredients: In another bowl, beat together the sugar, oil, eggs, and vanilla until smooth. It’ll look kinda glossy and magical—that’s how you know you’re on the right track.
- Combine everything: Gradually add the dry ingredients to the wet mixture, stirring until just combined. The dough will be thick and fudgy—like brownie batter’s cooler cousin.
- Color your dough: Now for the Halloween magic! Divide the dough into portions and tint each with gel food coloring (orange, purple, or black). Knead the color in with your hands (gloves help avoid stained fingers). Pro tip: Start with a little color and add more as needed—it’s easier to go darker than to fix "muddy zombie" hues.
- Chill for 30 minutes: Pop the bowl in the fridge. This step is KEY to preventing cookie puddles. Go fold laundry or watch a spooky movie while you wait.
Shaping and Baking
- Roll ’em up: Scoop tablespoon-sized balls of dough (a cookie scoop is your best friend here) and roll them in powdered sugar. Coat them generously—this is what gives them that ghostly cracked look.
- Space them out: Place the balls on your prepared baking sheets about 2 inches apart. They’ll spread a little, and we don’t want cookie conga lines.
- Bake for 10–12 minutes: The edges should look set, but the centers might still seem soft. That’s perfect—they’ll firm up as they cool. Overbaking = sad, dry cookies, and we don’t do that here.
- Cool like a villain: Let them sit on the baking sheet for 5 minutes before transferring to a wire rack. If you try to move them too soon, they’ll crumble like a haunted house in a horror movie.
And there you go! Spooky, crackly, delicious cookies ready to haunt your dessert table. Now, try not to eat them all before your guests arrive.
Halloween Crinkle Cookies Variations
Okay, let’s talk about playing mad scientist with these cookies. The basic recipe is a dream, but sometimes you gotta switch things up for maximum Halloween chaos. Here are my favorite twists:
- Peppermint spooky: Swap the vanilla for ½ teaspoon peppermint extract—suddenly, your cookies taste like a candy cane masquerading as a Halloween treat. Bonus: red food coloring makes them look extra eerie.
- Mocha ghosts: Add 1 tablespoon instant espresso powder to the dry ingredients for a grown-up, slightly bitter kick. Pair it with black gel dye for "burnt witch" vibes (kidding… mostly).
- Gluten-free ghouls: Use a 1:1 GF flour blend (I like King Arthur’s). They’ll be just as crackly and delicious—no one will guess they’re gluten-free.
- Zombie green: Ditch the Halloween classics and go full monster with neon green dough. Add black sprinkles before baking for a "toxic waste" effect.
- Vegan version: Replace eggs with flax eggs (1 tablespoon ground flax + 2.5 tablespoon water per egg) and use coconut oil. The texture’s a tad denser, but still totally crinkle-worthy.
See? The possibilities are endless. Just don’t blame me when your kitchen turns into a Halloween lab experiment.
Serving and Storage Tips for Halloween Crinkle Cookies
Alright, let’s talk about keeping these spooky little wonders fresh and fabulous—because nobody likes a stale ghost cookie. Here’s how to store ’em and show ’em off:
- Airtight is everything: Once cooled, stash these in an airtight container at room temp. They’ll stay soft and crackly for up to 5 days (if they last that long). Pro tip: Layer them with parchment paper so they don’t stick together.
- Freezer-friendly ghosts: Yes, you can freeze them! Pop cooled cookies in a freezer bag (squeeze out excess air) for up to 2 months. Thaw at room temp—no microwave unless you want zombie mush.
- Party perfect: Stack them on a creepy cake stand or arrange them on a black platter with plastic spiders for maximum Halloween drama. Pair with hot apple cider or a mug of cocoa—it’s a mood.
And if you’re gifting them? Tie ’em up in cellophane bags with orange ribbon. Instant Halloween hero status.
Helpful Notes for Perfect Halloween Crinkle Cookies
Before you dive into cookie chaos, here are my hard-earned tricks for Halloween Crinkle Cookies that’ll make you look like a baking wizard:
- Gel coloring or bust: Seriously, liquid dye makes the dough sticky and the colors look washed-out. Spend the $3 on gel—it’s worth it for those vibrant Halloween shades.
- Chill. The. Dough.: Skipping the fridge time? Congrats, you’ll have cookie pancakes. The colder the dough, the better they hold their shape.
- Underbake slightly: Take them out when the edges are set but centers look soft. They firm up as they cool, and overbaking kills the fudgy magic.
- Room-temp eggs matter: Cold eggs make the dough weirdly lumpy. Just let ’em sit out for 30 minutes—or float them in warm water for a quick fix.
And hey, if you’re counting calories… maybe just eat one? (I never manage to.)
Frequently Asked Questions About Halloween Crinkle Cookies
Got questions? I’ve got answers. Here’s the lowdown on all things Halloween Crinkle Cookies:
- Can I use liquid food coloring instead of gel?
Technically, yes, but I wouldn’t. Liquid dye makes the dough sticky and the colors look dull. Gel coloring is the MVP here—it’s vibrant and doesn’t mess with the dough’s texture. - Why did my cookies spread too much?
Chances are, the dough wasn’t chilled long enough. Cold dough = perfect crinkles. Warm dough = cookie puddles. Also, double-check your baking powder—it’s not the same as baking soda! - Can I make these gluten-free?
Absolutely! Swap the all-purpose flour for a 1:1 gluten-free blend. I’ve done it, and they turn out just as crackly and delicious. - How do I get the colors super vibrant?
Use gel food coloring and add it gradually. Start with a little, knead it in, and add more until you hit your desired shade. Patience is key! - Can I freeze the dough?
Yep! Roll it into balls (skip the powdered sugar step), freeze on a tray, then transfer to a bag. When ready to bake, roll in powdered sugar and bake—no thawing needed!
Still stumped? Drop me a line—I’m here to help you conquer these cookies!
Final Thoughts on Halloween Crinkle Cookies
Listen, if there’s one thing I know, it’s that Halloween Crinkle Cookies are pure edible joy wrapped in powdered sugar. Whether you’re baking them for a party, sneaking them into lunchboxes, or just treating yourself (no shame), they’re guaranteed to spark smiles—and maybe a few dramatic gasps when people see those crackly tops.
So grab your gel colors, channel your inner cookie witch, and whip up a batch. And when you do, tag me—I wanna see your spooky masterpieces! Because honestly, the world could always use more cookies that look (and taste) this good.
Happy haunting… I mean, baking!
Print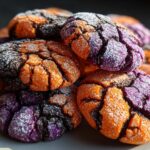
Spooky Halloween Crinkle Cookies with Magical Crackles
- Total Time: 57 minutes
- Yield: 24 cookies 1x
- Diet: Vegetarian
Description
Delicious Halloween-themed crinkle cookies with a rich cocoa flavor and festive colors.
Ingredients
- 1 cup all-purpose flour (or 1:1 GF blend)
- ½ cup unsweetened cocoa powder
- 1 tsp baking powder
- ¼ tsp salt
- 1 cup granulated sugar
- ¼ cup vegetable oil (or melted coconut oil)
- 2 large eggs (room temp)
- 1 tsp vanilla extract
- Gel food coloring (orange, purple, or black)
- ½ cup powdered sugar (for rolling)
Instructions
- Preheat your oven to 350°F (175°C) and line baking sheets with parchment paper.
- In a medium bowl, whisk together flour, cocoa powder, baking powder, and salt.
- In another bowl, mix sugar, oil, eggs, and vanilla until well combined.
- Gradually add the dry ingredients to the wet mixture, stirring until smooth.
- Divide the dough into portions and tint each with orange, purple, or black food coloring.
- Chill the dough for 30 minutes.
- Scoop tablespoon-sized balls of dough and roll them in powdered sugar.
- Place them on prepared baking sheets, spacing 2 inches apart.
- Bake for 10-12 minutes until edges are set.
- Cool on the baking sheet for 5 minutes before transferring to a wire rack.
Notes
- Use gel food coloring for vibrant colors.
- Chilling the dough helps prevent spreading.
- Store cookies in an airtight container for up to 5 days.
- Prep Time: 15 minutes
- Cook Time: 12 minutes
- Category: Dessert
- Method: Baking
- Cuisine: American
Nutrition
- Serving Size: 1 cookie
- Calories: 90
- Sugar: 10g
- Sodium: 35mg
- Fat: 3g
- Saturated Fat: 0.5g
- Unsaturated Fat: 2g
- Trans Fat: 0g
- Carbohydrates: 15g
- Fiber: 1g
- Protein: 1g
- Cholesterol: 15mg
Keywords: Halloween cookies, crinkle cookies, cocoa cookies, festive cookies
Leave a Reply