You know those moments when a candy bar just hits the spot? That’s how I feel about Milky Ways—creamy nougat, gooey caramel, and that perfect milk chocolate coating. But here’s the thing: the homemade version? Oh, it’s even better. I remember sneaking Milky Ways from my grandma’s candy dish as a kid, but the first time I made them myself, I was hooked. No weird ingredients, no mystery textures—just pure, nostalgic sweetness you can whip up in no time.
These Homemade Milky Way Bars are my go-to when I need a little indulgence without the fuss. They’re no-bake, layered with dreamy nougat and caramel, and coated in smooth chocolate—just like the real deal, but with that special homemade touch. Whether you’re making them for a party, a gift, or just because (no judgment here), they’re guaranteed to disappear fast. Trust me, once you try them, store-bought will never compare.

Why You’ll Love These Homemade Milky Way Bars Treat
Okay, let me count the ways these bars will steal your heart—and your taste buds. First off, they’re ridiculously easy. No oven, no fancy equipment, just layers of happiness you can assemble while singing along to your favorite playlist. Here’s why you’ll be obsessed:
- No-bake magic: Skip the oven drama! These bars come together with just a microwave or stovetop and some patience (mostly for chilling—I know, the hardest part).
- That iconic texture: Chewy nougat, velvety caramel, and a crisp chocolate shell? It’s like biting into childhood nostalgia, but better.
- Customizable AF: Swap milk chocolate for dark, sprinkle sea salt on top, or add chopped nuts between layers. Make ‘em yours!
- Crowd-pleaser alert: Bring these to a potluck or package them as gifts—prepare for recipe requests and happy dances.
- Pantry-friendly: Marshmallow fluff, chocolate chips, caramels—you probably have half this stuff already. No obscure ingredients here.
Seriously, if you’ve ever wanted to feel like a candy-making wizard without the hassle, this is your moment. And hey, licking the spoon? Highly encouraged.
Ingredients You’ll Need for Homemade Milky Way Bars Treat
Okay, let’s talk ingredients—because good candy starts with good stuff. The beauty here? No fancy-pants ingredients. Just simple, delicious things you can find at any grocery store (or maybe even in your pantry right now). I’ve grouped everything by layer because, let’s be real, layers are what make these bars magical. Here’s the breakdown:
Nougat Layer Ingredients
- 2 cups milk chocolate chips (I like Ghirardelli or Guittard for that smooth melt, but any good-quality brand works)
- 1 cup marshmallow fluff (not melted marshmallows—trust me, the fluff gives the perfect texture. Look for the Jet-Puffed stuff in the jar!)
- ¼ cup sweetened condensed milk (that sticky, sweet goodness in the can—don’t swap for evaporated milk, it’s not the same!)
Caramel Layer Ingredients
- 1 bag (11 oz / 311 g) soft caramels (Kraft or Werther’s are my go-tos. Unwrap them while watching TV—it’s oddly therapeutic.)
- 2 tablespoon heavy cream (this keeps the caramel super creamy. Half-and-half works in a pinch, but full-fat is best.)
Chocolate Coating Ingredients
- 3 cups milk chocolate chips (or melting wafers if you want extra-shiny bars. Chocolate chips are just easier for most folks.)
- 2 tablespoon vegetable oil or coconut oil (this is the secret for that silky, drip-free coating. You won’t taste it—promise!)
See? Nothing crazy. Just layers of love ready to happen. Now grab your bowls and let’s get melting!
Step-by-Step Instructions for Homemade Milky Way Bars Treat
Alright, let’s dive into the fun part—making these dreamy bars! Don’t let the layers intimidate you; it’s all about taking it one step at a time. I’ll walk you through each stage, from that fluffy nougat to that final chocolate dunk. Here’s how to make magic happen:
Making the Nougat Layer
This is where the Milky Way magic starts. That light, chewy nougat? It’s easier than you think. Just follow these steps:
Melting the ChocolateGrab a microwave-safe bowl and toss in those milk chocolate chips. Microwave them in 30-second bursts, stirring after each one. Seriously, don’t skip the stirring—it keeps the chocolate from seizing up. If you’re feeling fancy, use a double boiler (a heatproof bowl over simmering water), but no judgment if you’re team microwave like me. Just watch it like a hawk—burnt chocolate is a sad thing.
Once the chocolate is smooth and glossy, stir in the marshmallow fluff and sweetened condensed milk. Fold it all together until it’s one happy, creamy mixture. No streaks! This is your nougat base, and it should taste like a cloud of sweetness.
Line an 8x8-inch baking pan with parchment paper (let the edges hang over for easy lifting later). Pour the nougat mix in and spread it evenly with a spatula. Pop it in the fridge for 30 minutes to firm up. Patience, grasshopper—this is the foundation of your masterpiece!
Adding the Caramel Layer
Now for the gooey heart of the bar. Caramel time!
While the nougat chills, unwrap those caramels (pro tip: recruit a helper—or bribe someone with promises of extra bars). Toss them into a saucepan with the heavy cream over low heat. Stir constantly until everything melts into a silky, dreamy pool. Low and slow is key here; we’re not making caramel jerky.
Pull the nougat layer from the fridge—it should be firm but still slightly soft. Pour the warm caramel over the top and spread it gently with an offset spatula or the back of a spoon. Work quickly; caramel thickens as it cools. Once it’s even, back into the fridge it goes for another 30 minutes. Resist the urge to poke it!
Coating with Chocolate
The grand finale! This is where your bars get that signature Milky Way shine.
Melt the remaining chocolate chips with the oil (microwave or double boiler again—your call). The oil is your secret weapon here; it keeps the chocolate fluid and glossy for dipping. Stir until it’s totally smooth—no lumps allowed!
Lift the chilled caramel-nougat slab out of the pan using the parchment overhang. Cut it into 12 even bars (a warm knife wiped clean between cuts helps). Now, the fun part: dunk each bar into the melted chocolate, coating all sides. Use forks or dipping tools to let excess chocolate drip off. Place them on a parchment-lined tray. Feeling fancy? Drizzle extra chocolate on top with a fork for bakery-worthy flair.
Let the chocolate set at room temperature (about 1 hour) or speed it up in the fridge for 15 minutes. Then? Dig in. That first bite of homemade Milky Way goodness? Pure bliss.
And there you have it—homemade Milky Way bars that’ll make you feel like a candy genius. Now, who’s ready to taste-test?
Variations for Your Homemade Milky Way Bars Treat
Okay, let’s get creative! The beauty of these bars is how easily you can tweak them to match your mood—or your pantry. Here are a few fun twists to try:
- Dark chocolate upgrade: Swap the milk chocolate coating for dark chocolate (70% cacao or higher) if you love that rich, bittersweet contrast with the sweet caramel. It’s like a gourmet Milky Way—fancy but still totally approachable.
- Salty-sweet magic: Sprinkle flaky sea salt over the caramel layer before chilling, or dust the finished bars with a pinch. That salty kick against the sweetness? *Chef’s kiss.*
- Crunchy surprise: Stir chopped toasted almonds or pecans into the nougat layer, or press them into the caramel before coating. Adds texture and a little grown-up flair.
See? One recipe, endless possibilities. Go wild—your candy bar, your rules!
Serving and Storage Tips
Alright, you've made these gorgeous bars - now let's talk about keeping them perfect and serving them like a pro. First things first: cutting. That chocolate coating can be tricky if you just hack away at it cold. Here's my foolproof method:
- Warm knife trick: Run your knife under hot water, dry it quickly, then make clean cuts. Wipe the blade between each slice for picture-perfect bars. No jagged edges here!
- Room temp is best: Let the bars sit out for 5-10 minutes before serving - that caramel gets extra gooey when it's not fridge-cold. Perfect texture every time.
- Presentation points: Stack them on a cute plate with parchment between layers, or wrap individually in wax paper tied with twine for gifting. Instant candy shop vibes.
Now, storage - because let's be real, you might not eat all 12 at once (no judgment if you do). Here's how to keep them fresh:
- Airtight is everything: Store in a container with a tight lid at room temp for up to 1 week. No fridge needed unless your kitchen's super warm.
- Freezer friendly: Layer between parchment in a freezer bag for up to 2 months. Thaw at room temp for 30 minutes before serving - the caramel stays dreamy.
- Summer tip: If it's hot out, pop them in the fridge to prevent melting, but let them come to room temp before eating for that perfect Milky Way texture.
Pro tip: Hide a few in the back of the pantry for emergency cravings. You'll thank me later.
Helpful Notes for Perfect Homemade Milky Way Bars Treat
Okay, let’s talk troubleshooting—because even candy-making pros (aka me after many trial runs) run into hiccups. Here’s how to avoid common pitfalls and make sure your bars turn out flawless every time:
- Sticky caramel woes: If your caramel layer feels too soft, chances are it needed more chilling time. Pop the whole pan back in the fridge for another 20 minutes before coating. Too thick? Add a teaspoon more cream when melting—it’ll loosen right up.
- Cracked chocolate coating: This usually happens if the bars are too cold when dipping. Let them sit at room temp for 5 minutes before dunking. If it still cracks, don’t panic—just drizzle more melted chocolate over the top to disguise it. Secret’s safe with me.
- Nougat too firm? If your first layer sets like a brick, you might’ve over-chilled it. Next time, aim for 30 minutes max—it should be set but still slightly yielding when pressed.
- Oil separation in chocolate: If your coating looks grainy or oily, the chocolate got too hot. Low and slow melting is key! If it happens, stir in a handful of extra chocolate chips to bring it back.
A few extra pro tips while we’re at it:
- Quick cleanup: That caramel pot? Fill it with hot water immediately after pouring—the residue will melt right off while you work.
- Dietary tweaks: Use dairy-free chocolate chips and coconut cream for a vegan version. Not quite Milky Way, but still delicious.
- Calorie reality check: Yeah, these aren’t health food—each bar’s about 280 calories of pure joy. Worth every bite if you ask me.
Remember: Even "imperfect" homemade candy tastes amazing. Lopsided layers? Call it rustic charm. Now go forth and conquer those bars!
Frequently Asked Questions
I've gotten so many questions about these bars over the years - here are the big ones that keep popping up, along with my tried-and-true answers:
- Can I use homemade caramel instead of store-bought?
Absolutely! If you've got a favorite caramel recipe, go for it. Just aim for a consistency similar to melted soft caramels - not too runny, not too stiff. About 1 cup of homemade should do the trick. - Why did my layers separate when cutting?
This usually means one layer wasn't fully set before adding the next. Make sure the nougat is firm (no jiggle!) before caramel, and that the caramel doesn't feel sticky before coating. A little patience goes a long way. - Can I freeze the assembled bars before coating?
You can, but I don't recommend it - the condensation when thawing can make the chocolate coating seize. Better to freeze finished bars as directed, or freeze just the caramel-nougat slab (wrap tightly) and coat after thawing. - What's the best way to melt chocolate without a double boiler?
The microwave method works great - just use a glass bowl and stir every 30 seconds. If your chocolate starts looking thick, add a tiny bit more oil (½ teaspoon at a time) to smooth it out. No fancy gadgets needed!
Still have questions? Drop me a note - I'm always happy to troubleshoot candy emergencies!
Final Thoughts on Your Homemade Milky Way Bars Treat
There you have it—the secret to making Milky Way bars that’ll make you feel like a candy legend. Honestly, isn’t it wild how a few simple ingredients can recreate that childhood magic? These bars prove homemade doesn’t mean complicated. They’re sweet, nostalgic, and absolutely worth every sticky finger along the way.
I’d love to hear how yours turn out! Did you add nuts? Go dark chocolate? Tag me on social or leave a comment—I’m always here to celebrate your candy wins. Now go enjoy that first bite. You’ve earned it!
Print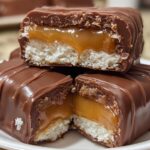
Easy Homemade Milky Way Bars Treat
- Total Time: 35 minutes
- Yield: 12 bars 1x
- Diet: Vegetarian
Description
A delicious homemade version of Milky Way bars with layers of nougat, caramel, and milk chocolate.
Ingredients
- Nougat Layer
- 2 cups milk chocolate chips
- 1 cup marshmallow fluff (or marshmallow crème)
- ¼ cup sweetened condensed milk
- Caramel Layer
- 1 bag (11 oz / 311 g) soft caramels (like Kraft or Werther’s soft)
- 2 tbsp heavy cream
- Chocolate Coating
- 3 cups milk chocolate chips (or melting wafers)
- 2 tbsp vegetable oil or coconut oil (for smooth melting)
Instructions
- Prepare the nougat layer by melting milk chocolate chips and mixing with marshmallow fluff and condensed milk.
- Spread the nougat mixture evenly in a lined pan and refrigerate until firm.
- Melt the caramels with heavy cream to make the caramel layer and spread it over the nougat.
- Chill again until the caramel layer is set.
- Melt the chocolate chips with oil and coat the chilled bars.
- Let the chocolate set before cutting into bars.
Notes
- Use a sharp knife to cut the bars cleanly.
- Store in an airtight container to keep fresh.
- Prep Time: 20 minutes
- Cook Time: 15 minutes
- Category: Dessert
- Method: No-Bake
- Cuisine: American
Nutrition
- Serving Size: 1 bar
- Calories: 280
- Sugar: 32g
- Sodium: 85mg
- Fat: 14g
- Saturated Fat: 8g
- Unsaturated Fat: 5g
- Trans Fat: 0g
- Carbohydrates: 38g
- Fiber: 1g
- Protein: 3g
- Cholesterol: 15mg
Keywords: homemade milky way bars, nougat caramel chocolate bars, easy candy recipe


Leave a Reply