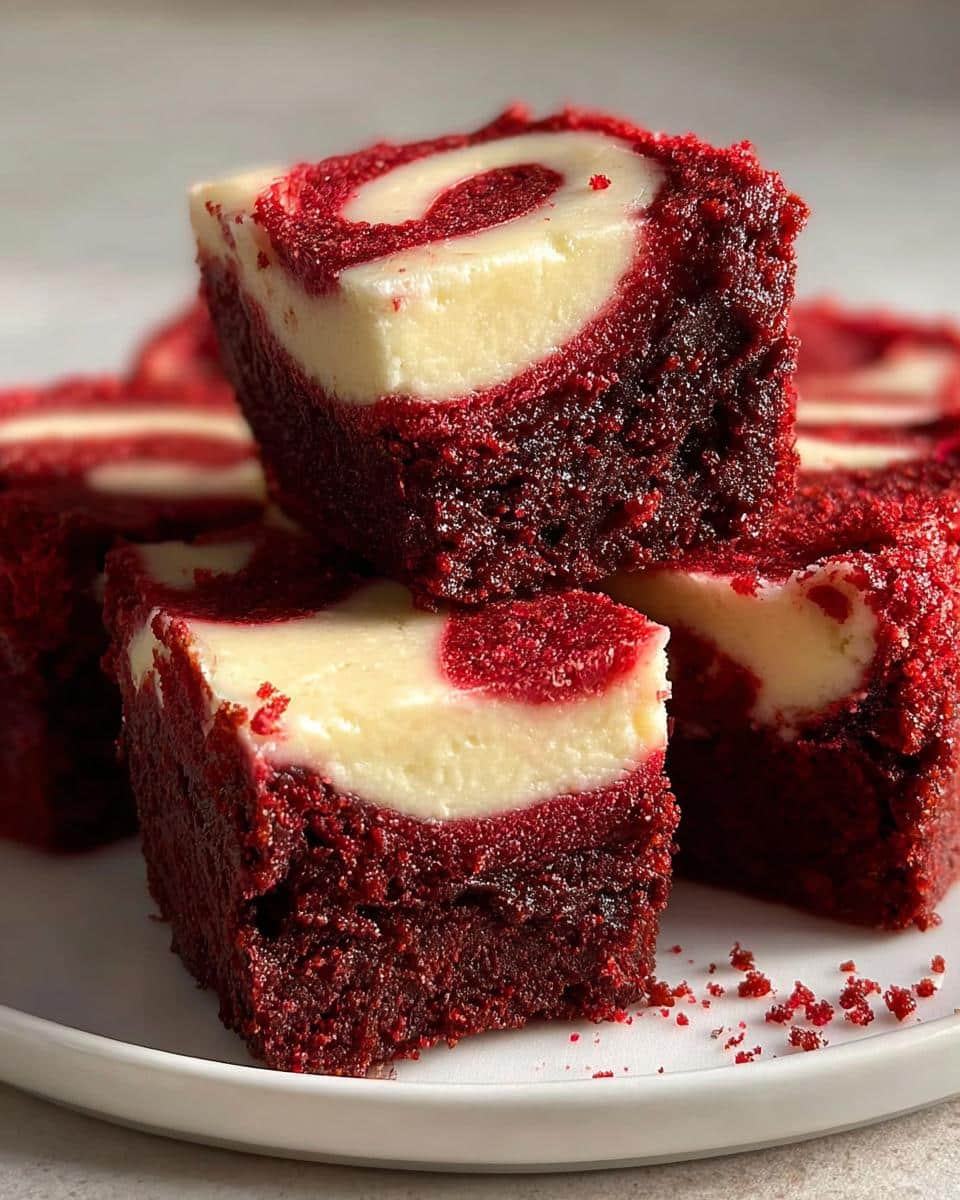
Homemade Red Velvet Brownie Bites have a special place in my heart, reminding me of cozy family gatherings and the sweet laughter of loved ones. I can still picture my grandmother in her apron, pulling a tray of these rich, chocolatey treats from the oven, the creamy cheesecake swirl peeking through like a delicious surprise. It felt like a hug in dessert form, and every bite was simply divine. These little bites of joy are perfect for any occasion, whether it’s a festive holiday celebration or a simple weekend treat to brighten up the day.

As the seasons change and the leaves begin to fall, I find myself craving the warm, comforting flavors of red velvet. These brownie bites not only satisfy that craving but also bring a splash of color to any dessert table. With their decadent combination of rich brownie and tangy cheesecake, they’re sure to impress family and friends alike. Plus, they’re easy to whip up, making them the ideal go-to recipe for any gathering or just a sweet indulgence for yourself!
Why You’ll Love "Homemade Red Velvet Brownie Bites"
- Quick and easy to prepare, taking just about 50 minutes from start to finish.
- Rich, chocolatey flavor combined with a luscious cheesecake swirl that’s simply irresistible.
- Perfect for sharing at parties, holidays, or just a cozy night in with your family.
- Minimal ingredients required, making it a budget-friendly dessert option.
- Freezer-friendly, so you can make a batch ahead of time and enjoy them anytime!
- Fun and festive, adding a pop of red to your dessert table, ideal for celebrations.
Ingredients You’ll Need
- 9 tablespoon unsalted butter (melted, for rich flavor)
- 1 ¼ cups granulated sugar (for sweetness)
- ¼ cup unsweetened cocoa powder (sifted, to avoid lumps)
- ½ teaspoon pure vanilla extract (for that warm, inviting flavor)
- 1 tablespoon red food coloring (gel or liquid works; adjust for desired color)
- ⅛ teaspoon salt (to enhance the sweetness)
- ¼ teaspoon espresso powder (optional, but it deepens the chocolate flavor)
- ½ teaspoon white vinegar (helps to activate the baking process)
- 2 large eggs (room temperature, to blend smoothly)
- ¾ cup all-purpose flour (measured, spooned and leveled)
- 9 oz cream cheese (softened, for a creamy cheesecake swirl)
- 3 tablespoon granulated sugar (to sweeten the cheesecake layer)
- ½ teaspoon pure vanilla extract (for the cheesecake layer)
- 1 large egg yolk (adds richness to the cheesecake swirl)
Step-by-Step Instructions
Preheat the Oven
First things first! Preheat your oven to 350°F (175°C). This is crucial for getting those brownie bites baked just right, so don’t skip this step. Trust me, your kitchen will start to smell heavenly before you know it!
Melt the Butter
Next, grab a bowl and melt your unsalted butter. You can do this in the microwave or on the stovetop — just be careful not to let it bubble too much. We want it melted, not cooked! Let it cool for a moment while we get our other ingredients ready.
Mix the Brownie Base
In that same bowl with your melted butter, add in the granulated sugar, unsweetened cocoa powder, pure vanilla extract, red food coloring, salt, espresso powder, and white vinegar. Mix everything together until it’s smooth and well combined. It should look rich and velvety, like a beautiful sunset! Now, add the eggs one at a time, mixing well after each addition. This is where the magic starts to happen!
Add the Flour
Now it’s time to add the flour. Gently fold it into the mixture until just combined. Don’t overmix! It’s okay if there are a few small lumps; we want to keep that fudgy texture. You’ve got this!
Prepare the Cheesecake Swirl
In a separate bowl, beat the softened cream cheese, granulated sugar, pure vanilla extract, and egg yolk until it’s smooth and creamy. This is going to be the dreamy cheesecake layer that brings these brownie bites to a whole new level. It should be silky and luscious — perfect for swirling!
Assemble the Layers
Line your baking pan with parchment paper for easy removal. Now, pour half of your brownie mixture into the pan and spread it evenly. Next, drop spoonfuls of the cheesecake mixture over the brownie layer, letting it be a little messy — it’s all part of the fun! Pour the remaining brownie mixture on top and use a knife to swirl it all together. Don’t worry if it doesn’t look perfect; that’s the beauty of homemade desserts!
Bake
Pop your baking pan into the preheated oven and bake for about 25-30 minutes. You’ll know they’re done when a toothpick inserted into the center comes out mostly clean. Just a few moist crumbs are perfectly fine; we don’t want them to dry out!
Cool and Cut
Once they’re baked to perfection, allow your brownie bites to cool in the pan for about 10-15 minutes. Then, lift them out using the parchment paper and let them cool completely on a wire rack before cutting them into squares. Trust me, the wait will be worth it when you take that first bite!
Variations
Get creative with these brownie bites! You can add a dash of peppermint extract to the batter for a festive twist during the holidays. If you’re feeling adventurous, try folding in some chopped walnuts or white chocolate chips for added texture. For a lighter version, substitute half the butter with unsweetened applesauce. Need it gluten-free? Just swap the all-purpose flour for a gluten-free blend, and you’re good to go!
Serving and Storage Tips
Serving
These Homemade Red Velvet Brownie Bites are delightful served warm with a dollop of whipped cream or a scoop of vanilla ice cream on the side. For an extra touch, dust them with powdered sugar before serving. They make a festive addition to any dessert table!
Storage
Store any leftovers in an airtight container at room temperature for up to 3 days or in the fridge for up to a week. If you want to keep them longer, freeze them in a tightly sealed container for up to 3 months. Just thaw them at room temperature before enjoying!
Helpful Notes
For the best results, use room temperature ingredients, especially the cream cheese. If you need a dairy-free option, substitute the cream cheese with a dairy-free alternative like cashew cream. You can also replace the butter with coconut oil for a different flavor. If you prefer a less sweet dessert, reduce the sugar in both the brownie and cheesecake layers. And remember, feel free to add in mini chocolate chips for an extra chocolatey touch!
Frequently Asked Questions
Can I freeze Homemade Red Velvet Brownie Bites?
Absolutely! You can freeze these brownie bites once they’ve cooled completely. Just place them in a tightly sealed container or a freezer bag, and they’ll stay good for up to 3 months. When you’re ready to enjoy them, simply thaw them at room temperature, and they’ll taste just as delicious!
How can I substitute ingredients in this recipe?
For common substitutions, you can replace the granulated sugar with brown sugar for a deeper flavor. If you don’t have unsweetened cocoa powder, you can use Dutch-processed cocoa powder instead. For the cream cheese, a dairy-free alternative or even Greek yogurt can work in a pinch. Just make sure it’s smooth for that lovely cheesecake swirl!
What if I don't have red food coloring?
If you’re out of red food coloring, you can use beet juice for a natural alternative, or even pomegranate juice. Just keep in mind that the color may not be as vibrant, but it will still add a lovely hue and flavor!
How should I store these brownie bites?
Store your brownie bites in an airtight container at room temperature for up to 3 days. If you want them to last longer, keep them in the fridge for up to a week. Just remember to let them come to room temperature before serving for the best texture!
Can I make these brownie bites dairy-free?
Yes, you can! To make these brownie bites dairy-free, substitute the cream cheese with a dairy-free cream cheese alternative, and replace the butter with coconut oil or a dairy-free butter substitute. Just be sure to check labels for any hidden dairy ingredients!
Final Thoughts
I truly hope you give these Homemade Red Velvet Brownie Bites a try! They’re not just a dessert; they’re a way to create sweet memories with family and friends. The blend of rich chocolate and creamy cheesecake is simply irresistible, and the vibrant color adds a festive touch to any occasion. So roll up your sleeves, gather your ingredients, and enjoy the delightful process of baking. You’ve got this, and I can’t wait for you to experience the joy of these little bites of heaven. Happy baking, my friend!
Print
Homemade Red Velvet Brownie Bites
- Total Time: 50 minutes
- Yield: 16 brownie bites 1x
- Diet: Vegetarian
Description
Homemade Red Velvet Brownie Bites are rich, chocolatey treats with a creamy cheesecake swirl.
Ingredients
- 9 tbsp butter (unsalted)
- 1 ¼ cups sugar
- ¼ cup cocoa powder (sifted)
- ½ tsp vanilla
- 1 tbsp red food coloring
- ⅛ tsp salt
- ¼ tsp espresso powder
- ½ tsp vinegar
- 2 eggs
- ¾ cup flour (all-purpose)
- 9 oz cream cheese (room temperature)
- 3 tbsp sugar
- ½ tsp vanilla
- 1 egg yolk
Instructions
- Preheat your oven to 350°F (175°C).
- In a bowl, melt the butter.
- Add sugar, cocoa powder, vanilla, red food coloring, salt, espresso powder, vinegar, and mix well.
- Incorporate the eggs one at a time, mixing well after each addition.
- Add in the flour and stir until combined.
- In another bowl, beat cream cheese, sugar, vanilla, and egg yolk until smooth.
- Line a baking pan with parchment paper and pour in half the brownie mixture.
- Drop spoonfuls of the cheesecake mixture over the brownie layer.
- Pour the remaining brownie mixture on top and swirl with a knife.
- Bake for 25-30 minutes or until a toothpick comes out clean.
- Allow to cool before cutting into squares.
Notes
- Use room temperature ingredients for best results.
- Store leftovers in an airtight container.
- Prep Time: 20 minutes
- Cook Time: 30 minutes
- Category: Dessert
- Method: Baking
- Cuisine: American
Nutrition
- Serving Size: 1 brownie bite
- Calories: 150
- Sugar: 10g
- Sodium: 100mg
- Fat: 7g
- Saturated Fat: 4g
- Unsaturated Fat: 2g
- Trans Fat: 0g
- Carbohydrates: 20g
- Fiber: 1g
- Protein: 2g
- Cholesterol: 40mg
Keywords: Red Velvet, Brownies, Cheesecake
Leave a Reply