Ingredients
Scale
- 2 8 oz packages cream cheese, softened
- 1 cup white sugar
- 2 large eggs
- 1 teaspoon vanilla extract
- 12 vanilla wafers (Nabisco Nilla Wafers recommended)
- 12 paper baking cups
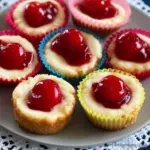
- 1 21 oz can cherry pie filling
Instructions
Step 1: Prep Your Tools
- Preheat your oven to 350°F (175°C).
- Line a standard 12-cup muffin tin with paper baking cups.
- Place one vanilla wafer at the bottom of each cup to form the crust.
Step 2: Make the Cheesecake Batter
- In a large mixing bowl, beat the softened cream cheese until smooth and creamy.
- Gradually add in the sugar, mixing until well combined.
- Beat in the eggs, one at a time, followed by the vanilla extract.
- Scrape down the sides of the bowl and mix until smooth.
Step 3: Assemble and Bake
- Divide the cheesecake batter evenly among the 12 baking cups, filling each about 3/4 full.
- Tap the muffin tin gently on the counter to release any air bubbles.
- Bake for 18-22 minutes, or until the centers are set and the tops look slightly puffed.
- Remove from the oven and let cool in the pan for 10 minutes.
- Transfer to a wire rack to cool completely.
Step 4: Add the Cherry Topping
- Once the cheesecakes are completely cooled, top each with a spoonful of cherry pie filling.
- Cover and refrigerate for at least 2 hours before serving (overnight is even better).
Notes
-
Room Temp Cream Cheese: Make sure it’s softened for a smooth batter.
-
Avoid Overbaking: They should still jiggle slightly in the center when you pull them out.
-
Creative Toppings: Try whipped cream, chocolate ganache, or fresh berries.
-
Mini Muffin Version: Use mini muffin tins and smaller wafers for bite-sized treats.
-
Make Ahead: Great for preparing a day in advance—they get even better with time.
- Prep Time: 15 minutes
- Cook Time: 20 minutes
Nutrition
- Calories: 240