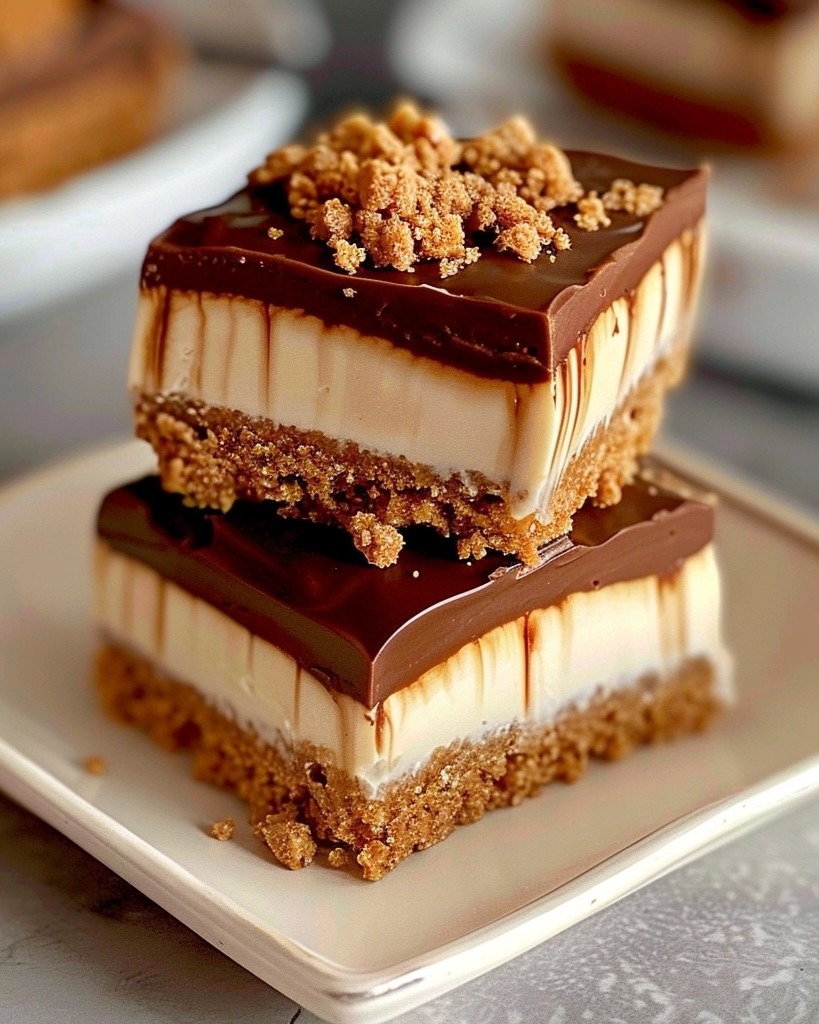
When I first stumbled across a jar of Biscoff spread years ago, I had no idea it would spark such a delicious obsession. That deep caramel flavor, spiced just right — it’s like comfort in a jar. My first taste reminded me of warm autumn afternoons, cinnamon-scented kitchens, and cozy family gatherings. This No-Bake Biscoff Slice quickly became a go-to dessert in our home, especially during holidays or when we needed something sweet without the fuss of turning on the oven.
Over time, this simple treat became a tradition. I’ve served it at countless birthdays, tea parties, and quiet nights in — and it never fails to impress. Perfect for any season, this slice is a rich, creamy, and no-fail treat that’s especially wonderful for last-minute get-togethers, bake sales, or cozy weekends at home. It’s elegant enough to impress guests but easy enough for weeknight cravings. And the best part? You don’t even have to bake it. Just a little stirring, a bit of chilling, and you’ve got a show-stopping dessert with minimal effort.
Why You’ll Love No-Bake Biscoff Slice
- No oven required! Ideal for summer days, dorm rooms, or busy weeks when baking isn’t an option.
- Minimal ingredients – just a handful of pantry staples and you’re set. No fancy gadgets or hard-to-find items.
- Quick to prepare – only 15 minutes of hands-on time before chilling. Great for spontaneous dessert cravings!
- Perfectly sweet and spiced with that irresistible Biscoff flavor — caramel, cinnamon, and a little magic.
- Freezer-friendly – make ahead and enjoy whenever the craving strikes. Always have dessert ready.
- Customizable and fun – add nuts, chocolate chips, or even a swirl of Nutella for a unique twist.
- Crowd-pleaser – always a hit at potlucks, parties, or afternoon tea. Kids and adults love it alike.
Ingredients You’ll Need
- 250g Biscoff biscuits, crushed
(about one standard packet; crush finely for a smooth, sturdy base. You can use a food processor or a ziplock bag and rolling pin.) - 100g unsalted butter, melted
(you can use salted if you prefer a sweet-salty balance — it adds a little extra flavor depth.) - 1 cup cream cheese, softened
(full-fat works best for a rich texture. Let it come to room temp for easier mixing.) - ½ cup powdered sugar
(sift for a smoother mixture and to avoid lumps.) - 1 cup Biscoff spread
(smooth or crunchy works — use what you love! You could even do a half-and-half mix for variety.) - 1 teaspoon vanilla extract
(adds depth and warmth to the filling.) - 100g dark chocolate, melted
(choose a quality bar that melts well; dairy-free versions work too. You can use milk or white chocolate if you prefer.) - Extra Biscoff biscuits for topping (optional)
(crushed or halved, for texture and presentation. Adds a delightful crunch.)
Step-by-Step Instructions
- Prepare the base: In a large mixing bowl, combine the crushed Biscoff biscuits and melted butter. Stir until the crumbs are fully coated and the texture resembles wet sand.
- Press and chill: Pour the mixture into a lined 8x8 inch square pan and press it down firmly using the back of a spoon or a flat-bottomed glass. Smooth the surface. Place the pan in the fridge to set for about 30 minutes while you prepare the filling.
- Make the filling: In another bowl, beat the softened cream cheese and sifted powdered sugar until smooth and creamy. Add the Biscoff spread and vanilla extract. Mix well until the filling is thick and luscious.
- Assemble the slice: Remove the base from the fridge and pour the Biscoff filling on top. Spread it out evenly with a spatula or the back of a spoon, smoothing the top as much as possible.
- Top with chocolate: Drizzle the melted dark chocolate across the surface. You can spread it out in an even layer or create a decorative swirl using a knife or toothpick.
- Add extra biscuit crunch (optional): Sprinkle some extra crushed or halved Biscoff biscuits on top for added texture and a nice visual touch.
- Chill again: Refrigerate the slice for at least 3 hours, or until fully set. For best results and clean slices, chill overnight.
- Slice and serve: Once firm, cut into bars or squares using a warm knife (dip in hot water and dry with a towel for cleaner cuts). Serve chilled and enjoy every bite!
Serving and Storage Tips
- Serve chilled as a dessert centerpiece, or pair with coffee for a luxurious afternoon treat.
- Perfect for parties or tea-time spreads. Slice into bite-sized pieces for easy sharing, or go big for decadent dessert plates.
- Add toppings: Whipped cream, fresh berries, or a dusting of cocoa powder make great finishing touches.
- Store in the fridge in an airtight container. It stays fresh for up to 5 days and keeps its texture beautifully.
- Freeze for later: Wrap individual slices in cling film and store in a freezer-safe container. Keeps well for up to 2 months. Thaw in the fridge overnight before serving.
- Make ahead friendly: Ideal for prepping a day or two before an event. No last-minute baking stress!
Helpful Notes
- Dairy-free option: Use a plant-based cream cheese and dairy-free chocolate. There are great alternatives that still give you that rich, creamy texture.
- Gluten-free version: Replace the Biscoff biscuits with a gluten-free spiced cookie or gluten-free graham crackers.
- Crunch lovers: Stir in chopped toasted almonds, hazelnuts, or pecans to the filling for added texture.
- Chocolate variety: Swap the dark chocolate for white chocolate, milk chocolate, or even a caramel drizzle.
- Layer experiment: Want to get fancy? Add a layer of Nutella, dulce de leche, or even crushed Oreos between the base and filling.
- Kid-friendly version: Skip the dark chocolate and top with colorful sprinkles or mini marshmallows.
Frequently Asked Questions
- Can I freeze this No-Bake Biscoff Slice?
Absolutely! Wrap slices individually or in layers with parchment in a freezer-safe container. Thaw overnight in the fridge for best texture. - What if I don’t have cream cheese?
You can substitute with mascarpone for a richer finish or Greek yogurt for a tangier, lighter version. - Can I use crunchy Biscoff spread?
Yes! Crunchy spread adds a delightful texture and works just as well as the smooth version. - How long does it take to set?
It needs a minimum of 3 hours in the fridge, but for firm, clean slices, let it chill overnight. - Can I make it ahead of time?
Definitely. It’s perfect for prepping in advance — the flavors even develop a bit more after a day in the fridge. - Can I double the recipe?
Yes, just use a larger baking dish and double all the ingredients. The chilling time may be slightly longer.
Final Thoughts
There’s something so comforting and satisfying about a dessert that doesn’t ask much of you — and this No-Bake Biscoff Slice is just that. With its spiced biscuit base, creamy filling, and decadent chocolate top, it checks every box for flavor, texture, and ease. Whether you’re making it for a special gathering or a treat just for you, this slice is sure to become a favorite.
I truly hope you give this recipe a try. It’s easy, delicious, and endlessly adaptable to your taste. Don’t forget to snap a photo of your creation and tag me on social media — I love seeing how everyone makes it their own. Happy no-baking, friends!
Print
No-Bake Biscoff Slice
- Total Time: 3 hours 15 minutes
- Yield: 16 slices 1x
Description
A rich and creamy no-bake dessert made with crushed Biscoff biscuits, luscious Biscoff and cream cheese filling, and a decadent chocolate topping. Perfect for easy entertaining or indulgent treats.
Ingredients
- 250 g Biscoff biscuits (crushed)
- 100 g unsalted butter (melted)
- 1 cup cream cheese (softened)
- ½ cup powdered sugar (sifted)
- 1 cup Biscoff spread
- 1 tsp vanilla extract
- 100 g dark chocolate (melted)
- Extra Biscoff biscuits for topping (optional)
Instructions
- Mix crushed biscuits and melted butter until combined. Press into a lined 8x8 inch pan. Chill for 30 minutes.
- Beat cream cheese and powdered sugar until smooth. Add Biscoff spread and vanilla. Mix until creamy.
- Spread filling over the chilled base. Smooth the top.
- Drizzle with melted chocolate. Optional: Add crushed biscuits on top.
- Chill for at least 3 hours, preferably overnight.
- Slice and serve chilled. Enjoy!
Notes
-
Use dairy-free alternatives for a vegan version.
-
Substitute with gluten-free cookies for a gluten-free treat.
-
Store in fridge for 5 days or freeze up to 2 months.
- Prep Time: 15 minutes
Nutrition
- Calories: 300


Leave a Reply