Okay, let me tell you about my absolute favorite dessert hack—this No-Bake Peanut Butter Pie. The first time I made it, I was rushing to throw together something sweet for a last-minute barbecue, and wow, did this save the day. It’s creamy, dreamy, and packed with that rich peanut butter flavor we all love, but here’s the best part: you don’t even need to turn on your oven. Just mix, chill, and boom—dessert magic.

Seriously, this pie is perfect for those days when you’re craving something indulgent but don’t feel like baking (or sweating over a hot stove). Total active time? Only about 20 minutes of hands-on prep. The rest is just letting it chill in the fridge—4 hours max—so you can set it and forget it. And trust me, the moment you slice into that silky peanut butter filling layered over that buttery graham cracker crust? Pure happiness.
Why You’ll Love This No-Bake Peanut Butter Pie
Listen, this pie isn’t just good—it’s downright irresistible, and here’s why:
- Zero oven required: Perfect for summer days (or anytime you just can’t deal with heat).
- Beginner-friendly magic: If you can stir and fold, you’ve got this. No fancy skills needed.
- Creamy, dreamy texture: That peanut butter filling? Like biting into a fluffy cloud of sweetness.
- Minimal cleanup: One bowl, a pie dish, and a whisk—that’s it. No baking sheets to scrub!
- Crowd-pleaser: Kids, adults, even picky eaters? Gone. Seconds will be demanded.
Honestly, it’s the dessert that keeps on giving. You’ll make it once, and suddenly it’ll be your go-to for every potluck, picnic, or "I need chocolate NOW" emergency.
Ingredients for Your No-Bake Peanut Butter Pie
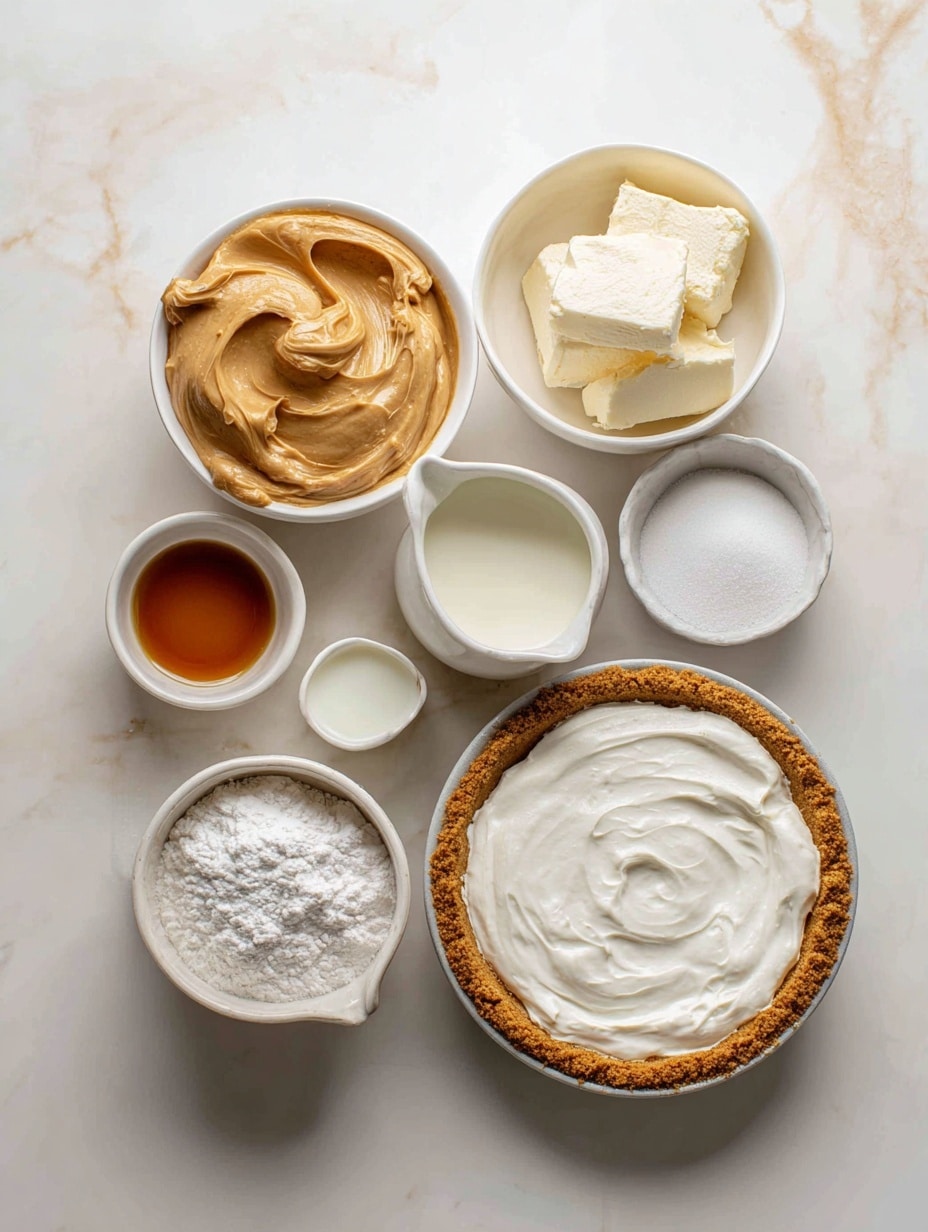
Alright, let's gather the goods! Here's what you'll need for that perfect, creamy pie:
- 1 ½ cups graham cracker crumbs - Not whole crackers! You want those fine crumbs for the perfect crust texture.
- ½ cup unsalted butter, melted - Measure it melted, but let it cool just slightly so it doesn't make the crust soggy.
- 8 oz cream cheese, softened - This needs to be at room temp, people! No lumps allowed.
- 1 cup creamy peanut butter - Skip the natural or crunchy stuff here—we need smooth for that velvety filling.
- 1 cup confectioners' sugar - If yours is clumpy, give it a quick sift first.
- 1 cup heavy whipping cream - Must be cold, straight from the fridge—this is key for getting those perfect stiff peaks.
- 3 tablespoon cocoa powder - Unsweetened, for that pretty dusting on top.
Ingredient Notes and Tips
A couple pro tips before we dive in:
- For the cream cheese—leave it out on the counter for at least an hour. If you're impatient (like me sometimes), you can microwave it for 10-second bursts, but don't let it get melty!
- That heavy cream? Cold is gold. I even pop my mixing bowl in the freezer for 5 minutes before whipping.
- If your peanut butter has separated (looking at you, natural brands), stir it really well first—we don't want any oily surprises.
- When melting the butter for the crust, let it cool for about 5 minutes before mixing with the crumbs. Hot butter = sad, soggy crust.
See? Easy peasy. Now let's make some magic!
How to Make No-Bake Peanut Butter Pie: Step-by-Step
Alright, let's get to the fun part—actually making this beauty! Don't worry, it's foolproof. Just follow these steps, and you'll have pie perfection in no time.
Preparing the Graham Cracker Crust
First things first—the crust. Grab a medium bowl and toss in your graham cracker crumbs and that slightly cooled melted butter. Mix it up until it looks like wet sand and holds together when you pinch it. Now, dump it into your pie dish and press it down firmly with your fingers or the bottom of a flat cup. You want it nice and compact so it doesn't crumble when you slice it later. No baking needed—just set it aside while you work on the filling.
Making the Creamy Peanut Butter Filling
Now for the star of the show! In a large bowl, beat that softened cream cheese until it's completely smooth—this is crucial. Any lumps now will stay lumps forever, so take your time. Next, add in the peanut butter and confectioners' sugar and mix it all together until it's silky and dreamy. Scrape down the sides of the bowl halfway through to make sure everything gets incorporated.
In another bowl (or your stand mixer if you're fancy), whip that cold heavy cream until stiff peaks form. That means when you lift the whisk out, the peaks stand straight up and don't flop over. This gives your pie that light, fluffy texture. For more tips on whipping cream, check out this guide on whipping cream.
Combining and Assembling the Pie
Here's where you gotta be gentle. Add about a third of your whipped cream to the peanut butter mixture and fold it in using a rubber spatula. Think of it like you're turning pages in a book—slow and deliberate. You don't want to deflate all that air you just whipped in! Once that's incorporated, add the rest of the whipped cream and fold until no white streaks remain.
Now, pour this heavenly mixture into your waiting crust and smooth the top with your spatula. Don't stress about making it perfect—rustic is charming!
Chilling and Finishing Your No-Bake Peanut Butter Pie
Pop that pie in the fridge and walk away for at least 4 hours. I know it's tempting to peek, but trust me—this chilling time is what turns that creamy filling into sliceable perfection. Right before serving, dust the top with cocoa powder using a fine mesh sieve for that bakery-worthy finish.
See? Told you it was easy. Now comes the hardest part—waiting!
Delicious Variations for Your No-Bake Peanut Butter Pie
Okay, let’s play around! This pie is like your favorite blank canvas—here’s how to make it your own:
- Cookie crust swap: Ditch the graham crackers and use crushed Oreos instead. Chocolate + peanut butter? Yes, please! Just swap equal amounts.
- Chocolate overload: Fold in ½ cup mini chocolate chips to the filling, or drizzle melted chocolate on top before chilling.
- PB&J vibes: Spread a thin layer of strawberry jelly over the crust before adding the filling. Instant nostalgia!
- Banana boost: Slice bananas over the crust, or mix mashed banana right into the filling. Elvis would approve.
- Nutty alternatives: Try almond butter or cashew butter if you’re feeling fancy—just keep it smooth, not crunchy.
Really, the sky’s the limit. Make it once classic, then get creative—I won’t judge if you eat your experiments straight from the pie dish.
Serving and Storing Your No-Bake Peanut Butter Pie
Alright, pie’s chilled, you’re drooling—now let’s talk serving secrets. For picture-perfect slices, run your knife under hot water and wipe it dry between cuts. That warm blade glides right through the creamy filling like butter (pun totally intended). Serve it straight from the fridge—that cool, velvety texture is everything.
Got leftovers? (Unlikely, but just in case.) Cover the pie tightly with plastic wrap or foil and stash it in the fridge for up to 3 days. The crust might soften a smidge, but it’ll still taste amazing. Word to the wise: don’t freeze it. The whipped cream loses its magic, and the texture goes all weird. Trust me, better to just... uh... "dispose" of it properly (wink).
Helpful Notes for the Perfect No-Bake Peanut Butter Pie
Before you dash off to make this pie (and I know you’re itching to), here are my golden rules for success:
- Temperature matters: Room temp cream cheese blends smooth, cold cream whips stiff—don’t shortcut this!
- Gentle hands: When folding in the whipped cream, think "soft clouds," not "arm workout." Overmixing = sad, dense pie.
- Patience is a virtue: That 4-hour chill isn’t optional. Walk away—it’s what transforms gloop into sliceable bliss.
- Slice stats: Each piece is about 420 calories of pure joy (worth every single one, if you ask me).
Remember, baking (or in this case, not baking) is science—but also love. Follow these, and you’re guaranteed pie perfection every time.
Frequently Asked Questions About No-Bake Peanut Butter Pie
Okay, let’s tackle those burning questions I always get about this pie—because trust me, you’re not the first to wonder!
- Can I use natural peanut butter?
I don’t recommend it, friend. The oil separation can make your filling greasy and weird. Stick to the regular creamy stuff for that perfect, velvety texture. - Can I make this dairy-free?
You can try! Swap in vegan cream cheese and use coconut cream instead of heavy whipping cream. Just know the texture might be slightly different—still tasty, but not identical. - How do I know when the whipped cream has stiff peaks?
Easy! Lift your whisk straight up—if the peaks stand tall and don’t flop over, you’re golden. If they curl? Keep whipping. (And no, you can’t overdo it by accident—I’ve tried.) - Can I skip the cocoa powder topping?
Absolutely! It’s just for looks. Or get fancy with chocolate shavings, crushed peanuts, or even a caramel drizzle instead. - Help—my filling’s too soft after chilling!
No panic! Either your cream wasn’t whipped enough, or it needed more chill time. Pop it back in the fridge for another hour or two—it’ll firm up.
See? All the pie mysteries, solved. Now go forth and conquer that dessert!
Final Thoughts on This No-Bake Peanut Butter Pie
Look, if there’s one dessert recipe I’d trust to save your sanity (and sweet tooth), it’s this pie. Simple, no-fuss, and guaranteed to disappear faster than you can say "peanut butter." Whether it’s a party, a Tuesday night, or just because—this pie’s got your back. Now go make it, share it (or don’t!), and savor every creamy bite. You deserve it.
Print
Creamy No-Bake Peanut Butter Pie Delight
- Total Time: 4 hrs 20 mins
- Yield: 1 pie (8 servings) 1x
- Diet: Vegetarian
Description
A creamy no-bake peanut butter pie with a graham cracker crust.
Ingredients
- 1 ½ cups graham cracker crumbs
- ½ cup unsalted butter, melted
- 8 oz cream cheese, softened
- 1 cup creamy peanut butter
- 1 cup confectioners' sugar
- 1 cup heavy whipping cream
- 3 tbsp cocoa powder
Instructions
- Mix graham cracker crumbs and melted butter in a bowl.
- Press the mixture into a pie dish to form the crust.
- In another bowl, beat cream cheese, peanut butter, and confectioners' sugar until smooth.
- Whip the heavy cream until stiff peaks form.
- Fold the whipped cream into the peanut butter mixture.
- Spread the filling evenly over the crust.
- Dust the top with cocoa powder.
- Chill for at least 4 hours before serving.
Notes
- Use smooth peanut butter for the best texture.
- Chill the pie for at least 4 hours to set properly.
- Store leftovers in the refrigerator.
- Prep Time: 20 mins
- Cook Time: 0 mins
- Category: Dessert
- Method: No-Bake
- Cuisine: American
Nutrition
- Serving Size: 1 slice
- Calories: 420
- Sugar: 24g
- Sodium: 180mg
- Fat: 32g
- Saturated Fat: 14g
- Unsaturated Fat: 12g
- Trans Fat: 0g
- Carbohydrates: 30g
- Fiber: 2g
- Protein: 8g
- Cholesterol: 50mg
Keywords: No-Bake Peanut Butter Pie, Peanut Butter Dessert, Easy Pie Recipe


Leave a Reply