I still remember the first time I made these No-Bake Pretzel Bars with Salted Caramel—it was a total game-changer. I had friends coming over last minute, and I needed something quick, impressive, and, let’s be honest, something that wouldn’t require me turning on the oven in the middle of summer. These bars saved the day! The salty crunch of pretzels, the rich chocolate-peanut butter layer, and that gooey salted caramel on top? Absolute perfection. They’re the kind of dessert that disappears fast, whether it’s a potluck, a late-night snack craving, or just because you deserve a little treat. And the best part? No baking required—just mix, layer, and chill. Trust me, once you try these, you’ll be hooked.
What I love most is how effortlessly they come together. You don’t need fancy skills or equipment—just a microwave, a pan, and a little patience while they set. They’re the ultimate crowd-pleaser, striking that perfect balance between sweet and salty. Whether you’re a caramel fanatic or a chocolate-peanut butter devotee (or both!), these bars are your new best friend. Plus, they’re customizable—swap in dark chocolate, use gluten-free pretzels, or even drizzle extra caramel on top if you’re feeling extra indulgent. Ready to dive in? Let’s get started!

Why You’ll Love No-Bake Pretzel Bars with Salted Caramel
Oh, where do I even start? These bars are basically magic in dessert form. Here’s why you’re going to adore them:
- No oven required! Perfect for hot days or when you just can’t be bothered to preheat anything. Just melt, layer, and chill.
- Sweet, salty, crunchy, and gooey—all in one bite. The pretzel base gives that satisfying crunch, while the caramel and chocolate-peanut butter layers melt in your mouth.
- Ready in under 20 minutes (plus chilling time). Seriously, the hardest part is waiting for them to set—but it’s worth it.
- Impressively easy, deceptively fancy. These look like you spent hours, but they’re a breeze. Your friends will never guess how simple they are.
- Customizable! Swap the chocolate, use almond butter, or throw on a sprinkle of sea salt for extra flair. Make them your own.
Basically, if you love desserts that are low-effort but high-reward, these bars are your new go-to. Don’t say I didn’t warn you—they disappear fast!
Ingredients You’ll Need for No-Bake Pretzel Bars with Salted Caramel
Okay, let’s talk ingredients—because these bars are all about the perfect combo of textures and flavors. Here’s what you’ll need (and a few little tips to make sure everything goes smoothly):
- 3 cups mini pretzels – Crush them up, but leave some bigger chunks for that satisfying crunch. I just toss them in a zip-top bag and whack them lightly with a rolling pin. No need to be too precise—rustic is good here!
- 1½ cups semi-sweet chocolate chips – Divided! You’ll use 1 cup for the main layer and save ½ cup for sprinkling on top. If you’re feeling fancy, dark chocolate works too.
- ½ cup peanut butter – Smooth or chunky, your call! Split it in half—half for melting with the chocolate, half for drizzling later. Almond butter or sunflower seed butter are great swaps if you need nut-free.
- 1½ cups soft caramels – About 11 ounces, unwrapped (yes, unwrapping them is the most tedious part—I won’t lie). Store-bought squares or those little caramel bits both work.
- 2 tablespoon heavy cream or milk – This helps the caramel melt into silky perfection. Any milk works, but cream makes it extra luscious.
- 2 tablespoon butter – Just a little to keep the caramel smooth and glossy. Salted or unsalted is fine—your choice!
- Flaky sea salt – For that *chef’s kiss* finish. Maldon salt is my go-to, but any flaky salt will do.
That’s it! Simple, right? Now, let’s get layering.
Step-by-Step Instructions for No-Bake Pretzel Bars with Salted Caramel
Preparing the Pretzel Base
First things first—grab an 8x8 inch pan and line it with parchment paper. Trust me, this makes lifting the bars out later a breeze (plus, no sticking disasters!). Now, take those crushed pretzels and dump them into the pan. Use your hands or the bottom of a glass to press them down firmly. You want a solid, even layer—think of it like building a foundation for all that deliciousness to come. Don’t stress about perfection, though. A few gaps here and there? Totally fine. That just adds to the rustic charm.
Creating the Chocolate-Peanut Butter Layer
Time for the magic! In a microwave-safe bowl, toss in 1 cup of those chocolate chips and half of the peanut butter. Microwave in 30-second bursts, stirring after each one, until everything’s melted and gloriously smooth. (Careful—it gets hot!) Pour this over your pretzel base and spread it evenly with a spatula. Pro tip: A little wobble of the pan helps it settle into all the nooks and crannies. Now, pop it in the fridge for about 10 minutes just to let it set a bit. This keeps the layers from merging into a delicious but messy puddle.
Adding the Salted Caramel Topping
While that chills, let’s tackle the caramel. Unwrap those caramels (yes, it’s tedious—put on some music!) and toss them into a bowl with the cream and butter. Microwave them in 30-second intervals, stirring in between, until it’s all melted and dreamily pourable. This usually takes about 1½ to 2 minutes total. Once it’s smooth, carefully pour it over the chocolate layer and tilt the pan to spread it out. Work quickly—caramel sets fast! Sprinkle a pinch of flaky sea salt over the top now if you want that salty-sweet contrast to really sing.
Finishing Touches and Chilling
Almost there! Scatter the remaining ½ cup of chocolate chips and the rest of the peanut butter (just dollop little bits here and there) over the caramel. No need to be neat—random is perfect. Now, the hardest part: patience. Slide the pan into the fridge and let it chill for at least 2 hours, or until everything’s totally set. I know, I know—it’s torture to wait, but resist the urge to cut into it early! Once it’s firm, lift the bars out using the parchment, slice into squares, and prepare for the compliments to roll in.
Variations for No-Bake Pretzel Bars with Salted Caramel
Okay, here’s the fun part—making these bars your own! They’re like a blank canvas for your dessert dreams. Here are a few twists I love:
- Gluten-free? Swap in gluten-free pretzels—they work just as well for that salty crunch.
- Dark chocolate lover? Use dark chocolate chips instead of semi-sweet for a richer, less sweet vibe.
- Nut-free option? Skip the peanut butter and try sunflower seed butter or even tahini for a fun twist.
- Extra decadent? Drizzle melted caramel or chocolate on top after slicing—because why not?
- Seasonal spin? Crush some peppermint candies and sprinkle them on top for a holiday version, or mix in a handful of toasted coconut flakes for tropical flair.
The best part? These bars are forgiving. Play around, taste as you go, and make them exactly how you like. No rules, just deliciousness!
Serving and Storage Tips for No-Bake Pretzel Bars with Salted Caramel
Alright, let’s talk about the best ways to enjoy these bars—because you’ll want to savor every bite! When it’s time to slice, use a sharp knife and wipe it clean between cuts for neat squares. (Though honestly, jagged edges taste just as good.) They’re perfect straight from the fridge—cold, firm, and packed with that addictive sweet-salty crunch. Serve them on a platter at parties, pack them in lunchboxes, or—no judgment—eat one straight from the pan with a fork. As for storage? Keep them in an airtight container in the fridge for up to 5 days. If you’re planning ahead, they freeze beautifully too—just layer parchment between bars and stash them for up to a month. Thaw in the fridge before devouring. Easy, right?
Helpful Notes for No-Bake Pretzel Bars with Salted Caramel
A few extra tips to make sure your bars turn out absolutely perfect—because sometimes the little things make all the difference!
- Microwave magic: When melting the caramel, keep an eye on it—it can go from smooth to scorched fast! Stick to 30-second bursts and stir well in between. If it starts bubbling aggressively, stop early and let the residual heat do the rest.
- Dairy-free? Swap the heavy cream for coconut cream or almond milk, and use dairy-free chocolate chips. Just check your caramel ingredients too—some brands sneak in dairy.
- Too sticky to slice? Pop the bars in the freezer for 15 minutes before cutting—clean slices every time.
- Nutrition note: These are definitely a treat (hey, life’s short!), with about 240 calories per bar. But they pack a decent 4g protein from the peanut butter, so at least there’s that!
- Emergency shortcut: Out of caramels? Melt ¾ cup of store-bought caramel sauce with 1 tablespoon butter—works in a pinch!
Remember, cooking should be fun. If something goes slightly wonky? Call it “rustic” and eat it anyway. No one will complain!
Frequently Asked Questions About No-Bake Pretzel Bars with Salted Caramel
I get it—sometimes even the easiest recipes spark a few questions. Here are the answers to the ones I hear most often (and trust me, I’ve asked them myself a time or two!):
- Can I use store-bought caramel sauce instead of melting caramels?
Absolutely! Swap in ¾ cup of caramel sauce mixed with 1 tablespoon butter. Heat it slightly to make it pourable, then proceed as usual. Just check the thickness—some sauces are runnier, so you might need to chill the bars longer. - Help! My caramel layer is too hard after chilling. What did I do wrong?
No panic! You might’ve overcooked the caramel a smidge. Next time, microwave it in shorter bursts. For now, let the bars sit at room temp for 5-10 minutes before slicing—they’ll soften up. - Can I make these nut-free?
Totally. Skip the peanut butter or use sunflower seed butter instead (just note it’ll taste a bit earthier). And double-check that your chocolate chips are nut-free if allergies are a concern. - Why is my chocolate layer seizing or clumping?
Ah, the dreaded seize! It happens if even a drop of water sneaks into the chocolate. Make sure your bowl and utensils are bone-dry. If it does seize, add a tiny splash of oil (not water!) and stir gently to smooth it out. - How do I prevent the layers from mixing when I pour the caramel?
That quick 10-minute chill for the chocolate layer is key. If you’re still worried, pop the pan in the freezer for 5 minutes before adding caramel—it’ll firm up fast!
See? No question is too silly. And if I missed yours, just wing it—these bars are pretty hard to mess up!
Final Thoughts on No-Bake Pretzel Bars with Salted Caramel
Look, I’ll level with you—these bars are dangerously addictive. The salty pretzel crunch, the creamy chocolate-peanut butter, that oozy caramel… it’s basically dessert heaven in one bite. And the fact that they come together with zero baking? Icing on the cake (or should I say, caramel on the bar?). Whether you’re whipping them up for a party, a midnight snack, or just because you deserve something sweet, they never disappoint. So go ahead—grab that bag of pretzels and get layering. Trust me, your future self (and anyone lucky enough to snag a bite) will thank you. Happy no-baking!
Print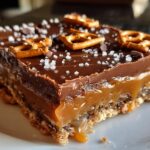
No-Bake Pretzel Bars with Salted Caramel Delight
- Total Time: 2 hours 20 mins
- Yield: 16 bars 1x
- Diet: Vegetarian
Description
Easy no-bake dessert bars with a pretzel base, chocolate-peanut butter layer, and salted caramel topping.
Ingredients
- 3 cups mini pretzels (crushed with some bigger chunks)
- 1½ cups semi-sweet chocolate chips (divided for layers)
- ½ cup peanut butter (smooth or chunky, split between layers)
- 1½ cups soft caramels (≈11 oz, unwrapped)
- 2 tbsp heavy cream or milk
- 2 tbsp butter
- Flaky sea salt to taste
Instructions
- Line an 8x8 inch pan with parchment paper.
- Press crushed pretzels firmly into the bottom of the pan.
- Melt 1 cup chocolate chips with half the peanut butter, then spread over pretzels.
- Melt caramels with cream and butter, then pour over chocolate layer.
- Sprinkle remaining chocolate chips and peanut butter on top.
- Chill for 2 hours until set, then cut into bars.
Notes
- Store in fridge for up to 5 days.
- Microwave caramel in 30-second bursts for easier melting.
- Use gluten-free pretzels if needed.
- Prep Time: 15 mins
- Cook Time: 5 mins
- Category: Dessert
- Method: No-Bake
- Cuisine: American
Nutrition
- Serving Size: 1 bar
- Calories: 240
- Sugar: 21g
- Sodium: 180mg
- Fat: 12g
- Saturated Fat: 5g
- Unsaturated Fat: 6g
- Trans Fat: 0g
- Carbohydrates: 30g
- Fiber: 2g
- Protein: 4g
- Cholesterol: 5mg
Keywords: no-bake pretzel bars, salted caramel dessert, easy chocolate peanut butter bars


Leave a Reply