You know those cookies that disappear the second you set them out? That’s exactly what happens with these Peanut Butter Butterfinger Cookies. I swear, they’re dangerous—soft, chewy peanut butter cookies loaded with crunchy bits of Butterfinger candy bars. Every bite is like a little party in your mouth. I first made them for a bake sale years ago, and let’s just say they sold out before I even finished setting up. Now, they’re my go when I need a guaranteed crowd-pleaser. And the best part? They come together in under 30 minutes—just enough time to preheat the oven and sneak a few bites of dough. This recipe makes about 24 cookies, but trust me, you’ll want to double it.

Why You’ll Love Peanut Butter Butterfinger Cookies
- They’re dangerously easy. Seriously, if you can cream butter and sugar, you can make these. No fancy techniques—just mix, scoop, and bake.
- That perfect chewy texture. The peanut butter keeps them soft in the middle with just the right amount of crisp around the edges. No sad, dry cookies here!
- Butterfinger magic. The chopped candy bars melt into little pockets of caramelized crunch. It’s like a surprise in every bite.
- Quick to disappear. These are the cookies people sneak seconds (or thirds) of. Bake a double batch if you want any left for yourself.
- No chill time. Unlike some cookie doughs, this one goes straight from the bowl to the oven. Instant gratification!
- Kid (and adult) approved. Peanut butter + candy? It’s a universal crowd-pleaser, whether it’s for lunchboxes, potlucks, or stress-baking at midnight.
Honestly, the hardest part is not eating all the Butterfinger pieces before they make it into the dough. (I may or may not keep an extra stash for “quality control.”)
Ingredients You’ll Need for Peanut Butter Butterfinger Cookies
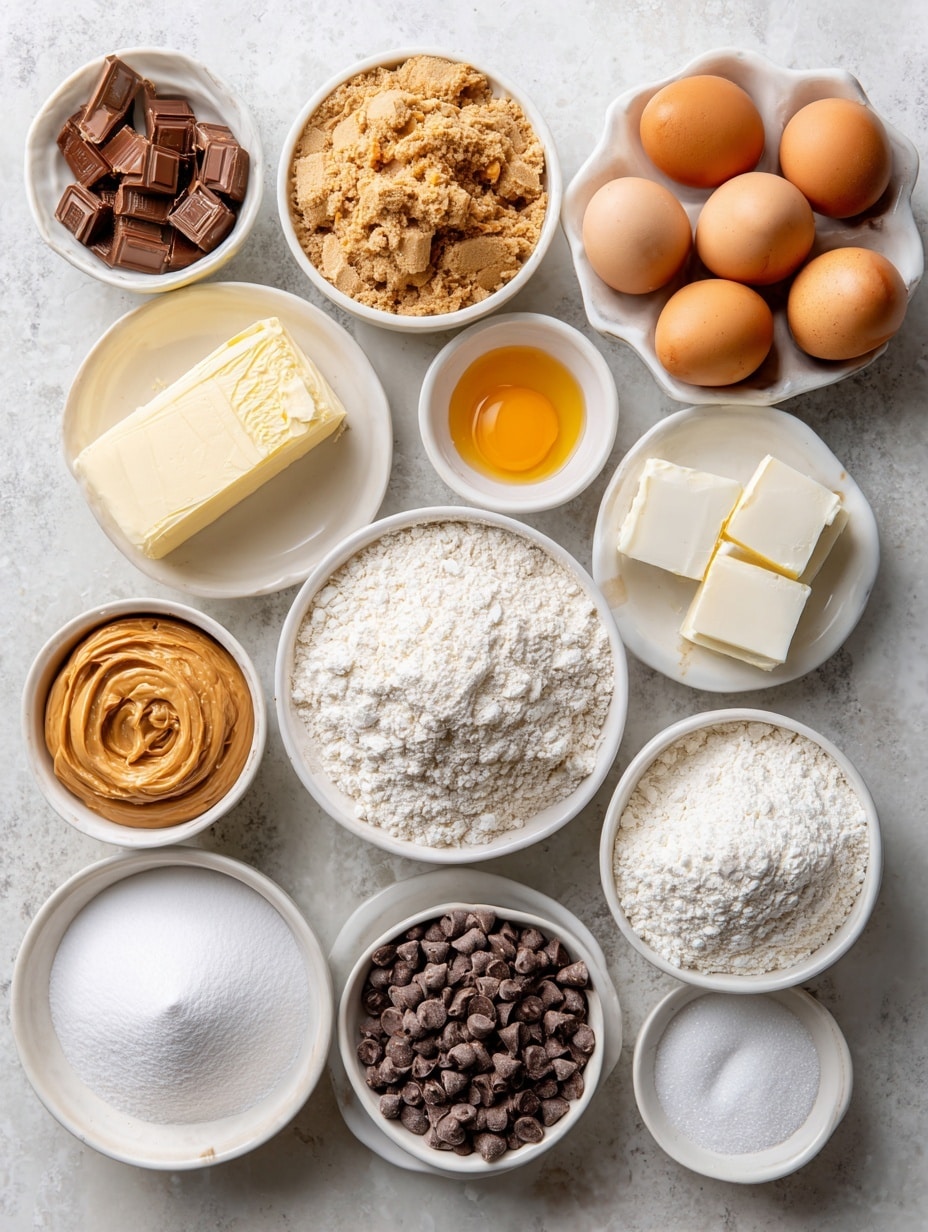
- ¾ cup (1 and ½ sticks) butter, softened – Not melted! Leave it on the counter for 30 minutes or so, or give it a quick zap in the microwave at 10% power if you’re impatient like me.
- ½ cup granulated sugar – Just regular old white sugar, nothing fancy here.
- ½ cup brown sugar, packed – Press it firmly into the measuring cup—this is key for that chewy texture. Light or dark works, but I like dark for extra molasses oomph.
- 1 cup peanut butter – Not the natural kind that separates. Go for the classic shelf-stable stuff (like Jif or Skippy) for the best consistency.
- 1 large egg – Mine’s always cold from the fridge, but I let it sit in warm water for 5 minutes to take the chill off.
- 1 ½ teaspoons vanilla – The cheap stuff is fine, but if you’ve got the good bourbon vanilla, this is the time to use it.
- 1 ½ cups all-purpose flour – Spoon it lightly into the measuring cup and level it off. No scooping—that packs in too much!
- ½ teaspoon baking soda + ½ teaspoon baking powder – Yes, both! They work together for the perfect rise.
- ¼ teaspoon kosher salt – If you’re using table salt, use just a pinch—it’s saltier.
- 16 ounces Butterfinger bars, chopped – About 8 full-size bars. Chop them into pea-sized bits—some powdery crumbs are fine too. (Pro tip: freeze the bars for 10 minutes first so they don’t melt while chopping!)
That’s it! No weird ingredients hiding in the back of your pantry. And hey, if you end up with extra Butterfinger pieces? Consider it a chef’s tax.
Step-by-Step Peanut Butter Butterfinger Cookies Instructions
Preparing the Dough
- Preheat that oven! Crank it to 350°F (175°C) and line your baking sheets with parchment paper. Trust me, parchment saves you from scrubbing caramelized Butterfinger off pans later.
- Cream butter and sugars like it’s your job. Beat the softened butter, granulated sugar, and packed brown sugar together in a big bowl for 2-3 minutes until it’s light and fluffy. If your mixer sends sugar flying (been there), drape a towel over it!
- Bring in the peanut butter party. Add the peanut butter, egg, and vanilla to the butter mixture. Mix until it’s smooth—no streaks! Scrape down the sides halfway through.
- Whisk dry ingredients separately. In another bowl, whisk together flour, baking soda, baking powder, and salt. This keeps everything evenly distributed—no bitter baking soda pockets!
- Combine wet and dry gently. Gradually add the dry ingredients to the wet, mixing just until the flour disappears. Overmixing = tough cookies, and we don’t want that.
- Fold in the Butterfinger chaos. Add all those chopped candy bits and fold with a spatula until they’re evenly scattered. The dough will be thick and sticky—that’s perfect!
Baking and Cooling
- Scoop with abandon. Use a tablespoon cookie scoop (or a regular spoon) to drop dough onto prepared sheets, spacing them 2 inches apart. They spread! Resist crowding—burnt Butterfinger edges are tragic.
- Bake one sheet at a time. 10-12 minutes is the sweet spot. They’ll look underdone at 10 minutes (edges just barely golden), but carryover baking finishes them. Want crispier cookies? Go for 12 minutes.
- Let them cool—seriously. Leave cookies on the baking sheet for 5 minutes before transferring to a rack. The Butterfinger bits are molten lava at first, and moving them too soon = crumbly disaster.
Pro tip: If your kitchen’s warm, pop the dough bowl in the fridge between batches to prevent overspreading. And don’t panic if some Butterfinger pieces melt into gooey pools—they’ll firm up as they cool into crunchy little treasures.
Peanut Butter Butterfinger Cookies Variations
- Switch up the nut butter. Almond butter or cashew butter work beautifully here—just stick with the non-natural kind for the right texture.
- Candy bar swap. Out of Butterfingers? Crushed Heath bars or chopped Snickers make fantastic stand-ins (though Snickers will be chewier).
- Add chocolate chips. Because why not? A half-cup of semisweet chips mixed in takes these over the top.
- Make 'em spicy. Stir in ½ teaspoon cinnamon or a pinch of cayenne for a sneaky kick that plays off the peanut butter.
- Go mini. Use a teaspoon scoop for bite-sized cookies—perfect for parties (and for pretending you're not eating as many).
The beauty of this recipe? It's basically a blank canvas for your candy cabinet. Raid those Halloween leftovers or clearance Easter candy—I won't judge!
Serving and Storage Tips for Peanut Butter Butterfinger Cookies
- Serve warm for melty magic. These cookies are next-level when slightly warm—the Butterfinger bits get extra gooey. Just 10 seconds in the microwave does the trick!
- Pair with cold milk or coffee. The peanut butter richness begs to be dunked. My husband swears they’re best with black coffee to balance the sweetness.
- Keep ‘em crispy. Store cooled cookies in an airtight container at room temperature with a slice of bread tossed in. The bread steals humidity, keeping cookies chewy for up to 5 days (if they last that long).
- Freeze like a pro. These freeze beautifully! Layer cooled cookies between parchment in a freezer bag for up to 3 months. Thaw at room temp or zap for 15 seconds.
- Revive stale cookies. If they lose their chew (how?!), place them in a container with a damp paper towel overnight. They’ll soften right up.
This batch makes about 24 cookies, but I always stash a few in the freezer for emergencies—like when the neighbor texts, “Can I borrow sugar?” Wink.
Helpful Notes for Perfect Peanut Butter Butterfinger Cookies
- Peanut butter matters. Natural peanut butter (the kind that separates) will make your cookies oily and flat. Stick with the classic creamy or crunchy shelf-stable stuff—it’s got the right stabilizers for perfect texture.
- Chop, don’t crush. You want Butterfinger pieces small enough to distribute evenly but big enough to give that satisfying crunch. I aim for pea-sized bits—some powdery crumbs are fine, but huge chunks make spreading uneven.
- Cold dough = thicker cookies. If your dough feels too soft after mixing (maybe your kitchen’s warm), pop it in the fridge for 15 minutes before scooping. This prevents overspreading.
- They’ll seem underdone. Pull the cookies when the edges are just golden but the centers still look puffy and soft. They firm up as they cool—overbaking leads to hockey pucks.
- Nutrition heads-up: These aren’t health food (duh), but each cookie packs about 220 calories with 4g protein from the peanut butter. Balance is key—eat one with an apple and call it a snack!
Oh, and if your Butterfinger pieces melt into shiny pools while baking? That’s normal! They’ll crisp up as they cool into those addictive caramelized bits.
Frequently Asked Questions About Peanut Butter Butterfinger Cookies
- 1. Can I use natural peanut butter?
I wouldn’t recommend it. Natural peanut butter tends to separate and can make the cookies oily or spread too much. Stick with the classic creamy or crunchy kind for the best results. - 2. Can I freeze the dough?
Absolutely! Scoop the dough into balls, freeze them on a baking sheet, then transfer to a freezer bag. Bake straight from frozen—just add an extra minute or two to the baking time. - 3. What if I don’t have Butterfinger bars?
No worries! Crushed Heath bars, chopped Snickers, or even Reese’s Pieces make great substitutes. Get creative with whatever candy you have on hand. - 4. Why are my cookies flat?
If your butter was too soft or melted, the cookies can spread too much. Make sure your butter is softened but still cool to the touch. Chilling the dough for 15 minutes before baking can also help. - 5. Can I make these gluten-free?
Yes! Swap the all-purpose flour for a 1:1 gluten-free blend. Just double-check that your baking powder and peanut butter are gluten-free too.
Still have questions? Drop them in the comments—I’m here to help you bake the perfect batch!
Final Thoughts on Peanut Butter Butterfinger Cookies
Listen, if there’s one cookie recipe I’d bet my reputation on, it’s these. They’re the kind of treat that turns first-time bakers into kitchen heroes and has friends begging for the recipe. Between the peanut butter hug and those Butterfinger explosions, every bite feels like a little victory. And honestly? The fact that they come together in less time than it takes to watch a sitcom episode is just icing on the cake (or, well, crumbs on the cookie). Bake them for your next potluck, your kid’s lunchbox, or just because the candy aisle called your name—you won’t regret it. Now go forth and conquer that cookie jar!
Print
Peanut Butter Butterfinger Cookies Everyone Craves
- Total Time: 27 minutes
- Yield: 24 cookies 1x
- Diet: Vegetarian
Description
Chewy peanut butter cookies packed with chopped Butterfinger candy bars for a sweet and crunchy twist.
Ingredients
- ¾ cup butter, softened (1 and ½ sticks)
- ½ cup granulated sugar
- ½ cup brown sugar, packed
- 1 cup peanut butter (not natural)
- 1 large egg
- 1 ½ teaspoons vanilla
- 1 ½ cups all-purpose flour, spooned and leveled
- ½ teaspoon baking soda
- ½ teaspoon baking powder
- ¼ teaspoon kosher salt
- 16 ounces Butterfinger, chopped
Instructions
- Preheat oven to 350°F (175°C). Line baking sheets with parchment paper.
- Cream butter, granulated sugar, and brown sugar until light and fluffy.
- Beat in peanut butter, egg, and vanilla until smooth.
- In a separate bowl, whisk flour, baking soda, baking powder, and salt.
- Gradually mix dry ingredients into wet ingredients until just combined.
- Fold in chopped Butterfinger pieces.
- Drop dough by rounded tablespoons onto prepared baking sheets, spacing 2 inches apart.
- Bake for 10-12 minutes or until edges are lightly golden.
- Cool on baking sheets for 5 minutes, then transfer to wire racks.
Notes
- Use regular peanut butter for best texture.
- Chop Butterfinger into small pieces for even distribution.
- Store in an airtight container for up to 5 days.
- Prep Time: 15 minutes
- Cook Time: 12 minutes
- Category: Dessert
- Method: Baked
- Cuisine: American
Nutrition
- Serving Size: 1 cookie
- Calories: 220
- Sugar: 15g
- Sodium: 180mg
- Fat: 12g
- Saturated Fat: 5g
- Unsaturated Fat: 5g
- Trans Fat: 0g
- Carbohydrates: 24g
- Fiber: 1g
- Protein: 4g
- Cholesterol: 25mg
Keywords: peanut butter cookies, butterfinger cookies, crunchy cookies, easy dessert

Leave a Reply