Whenever I think of the Peanut Butter Cup Chocolate Roll, I’m transported back to my childhood kitchen, where the sweet scent of chocolate and peanut butter would dance through the air. My mom would whip this up for birthdays, holidays, or just because it was Tuesday! It was the kind of treat that brought everyone together, and I loved sneaking tastes of the filling while she wasn’t looking. It’s a dessert that holds so many delightful memories, and every time I make it, I feel like I’m wrapping my family in a big, cozy hug of flavor.

This recipe is perfect for any occasion, whether you’re celebrating a special day or simply want to treat your loved ones to something scrumptious. The Peanut Butter Cup Chocolate Roll is not just a dessert; it’s a piece of nostalgia that reminds me of laughter, joy, and the warmth of family. Plus, it’s surprisingly easy to make, which is always a win in my book! So, let’s roll up our sleeves and get started on this delicious journey!
Why You’ll Love "Peanut Butter Cup Chocolate Roll"
- Quick prep time of just 30 minutes means you can whip this up even on busy days.
- Minimal ingredients make it easy to gather everything you need without a trip to the store.
- Family-friendly dessert that appeals to both kids and adults alike — who can resist chocolate and peanut butter?
- Perfect for making ahead; it can be stored in the fridge for a day or two, making entertaining a breeze.
- Freezer-friendly; slice and freeze for later indulgences when that chocolate craving strikes.
- Customization options abound — feel free to mix in your favorite candy or nuts for a personal touch!
Ingredients You’ll Need
Ingredients List
- ¾ cup all-purpose flour
- ¼ cup unsweetened cocoa powder (I love using Dutch-processed for a deeper flavor!)
- 1 teaspoon baking powder
- ¼ teaspoon salt
- 4 large eggs at room temperature (this helps them whip up fluffier!)
- ¾ cup granulated sugar
- 2 tablespoon vegetable oil (can substitute with melted coconut oil for a twist)
- 1 teaspoon vanilla extract
- ¼ cup milk (whole milk gives the best richness)
- ¾ cup creamy peanut butter (smooth is key for spreading)
- ½ cup powdered sugar
- ½ cup heavy cream (for the filling)
- 1 teaspoon vanilla extract (for the filling, extra flavor boost!)
- 1 cup chopped peanut butter cups (use your favorite brand, but mini ones work wonderfully)
- ½ cup heavy cream for ganache (again, whole milk is perfect, but you can use light cream if needed)
- ¾ cup semi-sweet chocolate chips (dark chocolate chips are a delicious option too!)
Step-by-Step Instructions
Preheat the Oven
- First things first, let’s preheat that oven to 350°F (175°C). You want it nice and toasty for our chocolate roll.
- While that’s warming up, grab a baking sheet and grease it with a little butter or cooking spray. Then, line it with parchment paper to make sure our chocolate roll doesn’t stick — trust me, this is key!
Make the Cake Batter
- In a medium bowl, mix together ¾ cup all-purpose flour, ¼ cup unsweetened cocoa powder, 1 teaspoon baking powder, and ¼ teaspoon salt. Whisk it all together until it’s nice and combined.
- In another large bowl, beat 4 large eggs and ¾ cup granulated sugar using an electric mixer until the mixture is light and fluffy — this usually takes about 3-5 minutes.
- Now, add in 2 tablespoon vegetable oil, 1 teaspoon vanilla extract, and ¼ cup milk to the egg mixture. Mix well until everything is nicely blended together.
- Gradually add the dry mixture to the wet mixture, mixing just until combined. Don’t overdo it! A few lumps are perfectly fine — they’ll bake away.
Bake the Cake
- Pour the batter into your prepared baking sheet and spread it evenly with a spatula. Make sure it reaches the corners!
- Pop it into the preheated oven and bake for about 15-20 minutes. You’ll know it’s done when a toothpick inserted in the center comes out clean. Just keep an eye on it, as ovens can vary!
- Once baked, remove it from the oven and let it cool in the pan for about 10 minutes. Then, carefully lift it out using the parchment paper and let it cool completely on a wire rack.
Prepare the Filling
- In a mixing bowl, combine ¾ cup creamy peanut butter, ½ cup powdered sugar, ½ cup heavy cream, and 1 teaspoon vanilla extract. Beat these together until the mixture is smooth and creamy. This filling is going to be heavenly!
Assemble the Roll
- Once the cake is completely cool, spread the peanut butter filling evenly over the cake. Be generous — you want every bite to be delicious!
- Sprinkle 1 cup of chopped peanut butter cups over the filling. Ah, the little bits of heaven, right?
- Now, it’s time to roll it up! Starting from one end, gently roll the cake away from you, using the parchment paper to help guide it. Roll it tightly, but don’t stress if it cracks a bit — it’s all going to taste amazing!
- Once rolled, wrap it in plastic wrap and refrigerate for at least an hour to help it hold its shape.
Make the Ganache
- While the roll is chilling, let’s make our ganache. In a small saucepan, heat ½ cup heavy cream over medium heat until it’s just simmering. Don’t let it boil!
- Once simmering, pour it over ¾ cup semi-sweet chocolate chips in a bowl. Let it sit for a minute or two to soften the chocolate, then stir until it’s silky smooth. This ganache is going to be the cherry on top!
Serve the Roll
- After chilling, carefully remove the roll from the fridge and unwrap it. Place it on a serving platter.
- Drizzle the warm ganache over the top, letting it cascade down the sides. It’s okay if it gets a little messy — that just means it’s homemade!
- Slice it into generous pieces, and get ready for the oohs and aahs. Serve with a side of whipped cream or a scoop of ice cream if you’re feeling extra indulgent!
Variations
- For a chocolate overload, replace the peanut butter with Nutella for a hazelnut twist.
- Add a pinch of cinnamon to the batter for a warm, spiced flavor.
- Use gluten-free flour for a gluten-free version that everyone can enjoy.
- Try mixing in chopped bananas or crushed pretzels for added texture and flavor.
- Top with crushed candy canes during the holidays for a festive flair!
Serving and Storage Tips
Serving
Serve the Peanut Butter Cup Chocolate Roll chilled or at room temperature for the best flavor. Slice it into generous pieces and drizzle with any leftover ganache. For an extra indulgent touch, add a dollop of whipped cream or a scoop of vanilla ice cream on the side. Your family and friends will be begging for seconds!
Storage
Store any leftovers in an airtight container in the refrigerator for up to 3 days. You can also freeze slices for up to a month; just wrap them tightly in plastic wrap before placing them in a freezer bag. When you’re ready to enjoy, let them thaw in the fridge overnight.
Helpful Notes
- If you need a dairy-free option, substitute heavy cream with coconut cream and use dairy-free chocolate chips.
- Feel free to swap out the granulated sugar for coconut sugar for a lower glycemic index alternative.
- For a nut-free version, use sun butter or a seed butter in place of peanut butter.
- Chopped chocolate bars can replace chocolate chips if you prefer a chunkier texture.
- Adding a splash of espresso powder to the batter deepens the chocolate flavor beautifully!
Frequently Asked Questions
Can I freeze the Peanut Butter Cup Chocolate Roll?
Yes, you can absolutely freeze the Peanut Butter Cup Chocolate Roll! Just slice it into pieces, wrap each slice tightly in plastic wrap, and place them in a freezer bag. They’ll keep well for up to a month. When you’re ready to enjoy, let them thaw in the fridge overnight.
What can I use instead of heavy cream?
If you're looking for alternatives to heavy cream, you can use coconut cream for a dairy-free option, or even half-and-half for a lighter version. Just keep in mind that the texture and richness may vary slightly with these substitutions.
How long will the roll last in the fridge?
The Peanut Butter Cup Chocolate Roll will last in the fridge for up to 3 days when stored in an airtight container. Just make sure it’s well-wrapped to keep it fresh and delicious!
Final Thoughts
As you can see, the Peanut Butter Cup Chocolate Roll is not just a dessert; it’s an experience filled with joy, laughter, and the sweet taste of nostalgia. I hope you give this recipe a try and find the same delight in each bite that I do. It’s perfect for gatherings, celebrations, or those cozy nights at home when you just want something sweet. Remember, cooking is all about having fun and making memories, so don’t be afraid to make this your own. Happy baking, and I can’t wait to hear how yours turns out!
Print
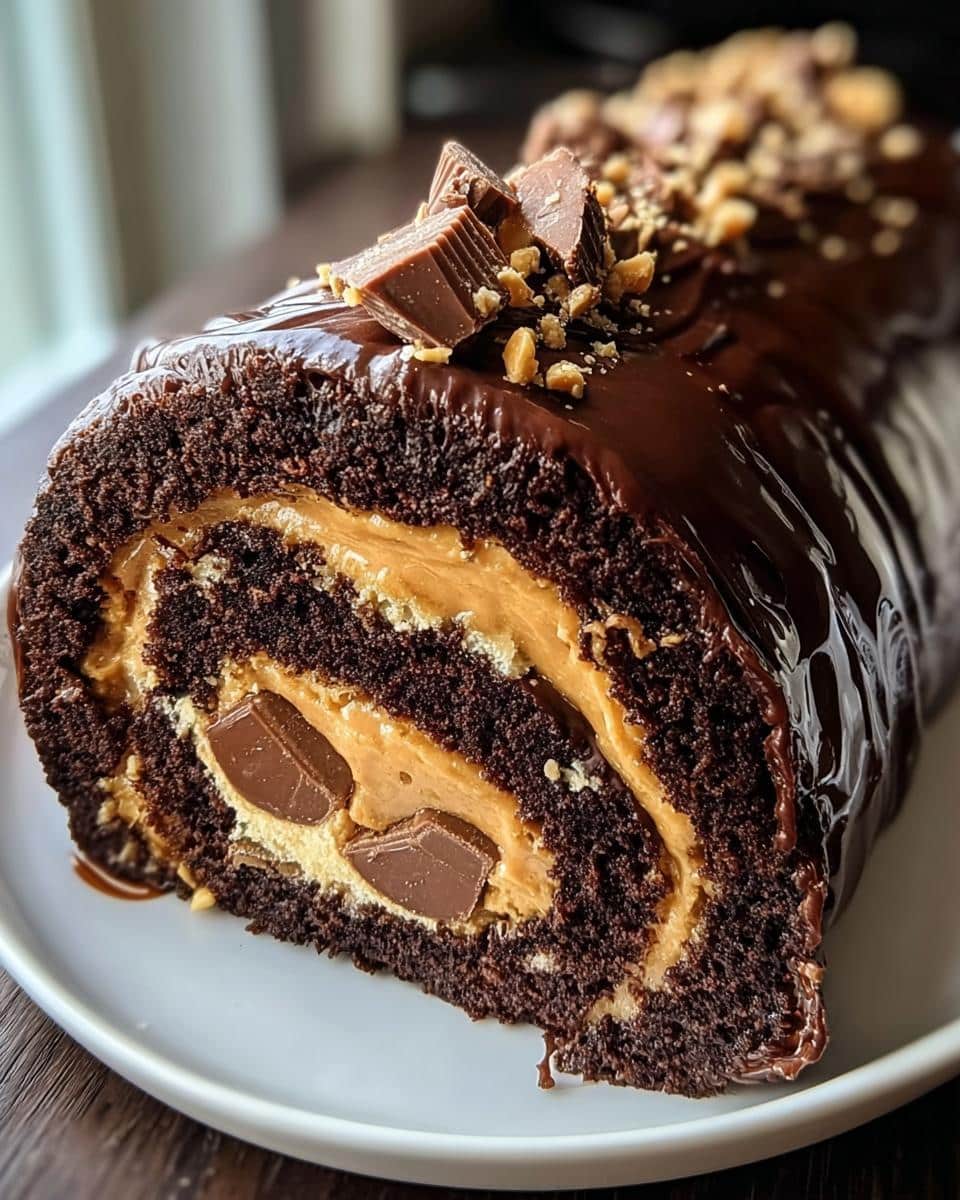
Peanut Butter Cup Chocolate Roll
- Total Time: 1 hour
- Yield: 12 servings 1x
- Diet: Vegetarian
Description
A delicious chocolate roll filled with peanut butter and topped with chocolate ganache.
Ingredients
- ¾ cup all-purpose flour
- ¼ cup unsweetened cocoa powder
- 1 tsp baking powder
- ¼ tsp salt
- 4 large eggs at room temperature
- ¾ cup granulated sugar
- 2 tbsp vegetable oil
- 1 tsp vanilla extract
- ¼ cup milk
- ¾ cup creamy peanut butter
- ½ cup powdered sugar
- ½ cup heavy cream
- 1 tsp vanilla extract
- 1 cup chopped peanut butter cups
- ½ cup heavy cream for ganache
- ¾ cup semi-sweet chocolate chips
Instructions
- Preheat oven to 350°F (175°C).
- Grease a baking sheet and line with parchment paper.
- In a bowl, mix flour, cocoa powder, baking powder, and salt.
- In another bowl, beat eggs and sugar until light and fluffy.
- Add oil, vanilla, and milk to egg mixture. Mix well.
- Gradually add dry ingredients to wet ingredients. Mix until combined.
- Pour batter into prepared baking sheet. Spread evenly.
- Bake for 15-20 minutes or until a toothpick comes out clean.
- Remove from oven and let cool.
- For the filling, beat peanut butter, powdered sugar, heavy cream, and vanilla until smooth.
- Spread filling over cooled cake. Sprinkle chopped peanut butter cups on top.
- Roll the cake tightly. Wrap in plastic wrap and refrigerate.
- For the ganache, heat heavy cream until simmering. Pour over chocolate chips. Stir until smooth.
- Remove roll from fridge and drizzle with ganache.
Notes
- Store in the refrigerator.
- Can be made a day in advance.
- Use any type of chocolate chips for ganache.
- Prep Time: 30 minutes
- Cook Time: 20 minutes
- Category: Dessert
- Method: Baking
- Cuisine: American
Nutrition
- Serving Size: 1 slice
- Calories: 350
- Sugar: 25g
- Sodium: 150mg
- Fat: 20g
- Saturated Fat: 8g
- Unsaturated Fat: 10g
- Trans Fat: 0g
- Carbohydrates: 35g
- Fiber: 2g
- Protein: 6g
- Cholesterol: 50mg
Keywords: Peanut Butter Cup, Chocolate Roll, Dessert


Leave a Reply