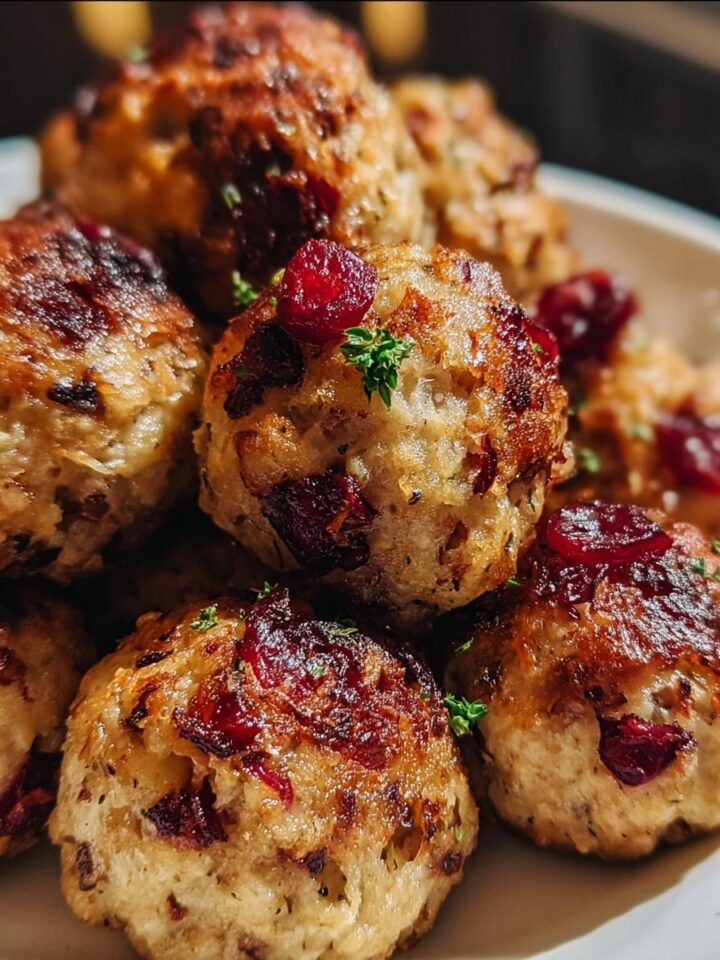
I’ll never forget the first time I made potato cheese sticks. It was game night with friends, and I needed something quick, cheesy, and downright irresistible. These crispy, golden sticks were a hit—gone in minutes! They’re the perfect blend of fluffy potato, savory bacon, and gooey cheddar, all wrapped up in a crunchy panko crust. Trust me, once you try them, you’ll be hooked.

What I love most about potato cheese sticks is how easy they are to whip up. With just a handful of ingredients and about 30 minutes, you’ve got a crowd-pleasing appetizer that works for parties, snacks, or even a fun family treat. Plus, who can resist that first bite when the cheese oozes out? Let’s get cooking!
Why You’ll Love Potato Cheese Sticks
Let me tell you, these potato cheese sticks are little bites of joy. I’ve lost count of how many times I’ve made them, but every single time, they disappear faster than I can say, "Wait, let me take a photo first!" Here’s why they’re a total winner:
- Crispy outside, gooey inside: That first crunch gives way to melty cheddar—pure magic. My friend’s kid once called them "cheese fireworks," and honestly, that’s the perfect description.
- No fancy skills needed: If you can mash potatoes and roll stuff, you’re golden. I once made these after a long workday while half-asleep, and they still turned out amazing.
- Party superheroes: Last Super Bowl, I doubled the batch—thank goodness, because my brother-in-law ate eight before halftime. They’re always the first appetizer to vanish.
- Endlessly adaptable: Swap in mozzarella for stringy pulls, add jalapeños for heat, or use sweet potatoes for a twist. They’re like a blank canvas for your cravings.
- Kid-approved: My picky niece will only eat "orange foods" (don’t ask), but these? She gobbles them up and asks for more.
Seriously, if happy noises were a recipe, this would be it. You’ll hear everyone at the table going "Mmm…" followed by "Can I have another?"
Ingredients You’ll Need for Potato Cheese Sticks
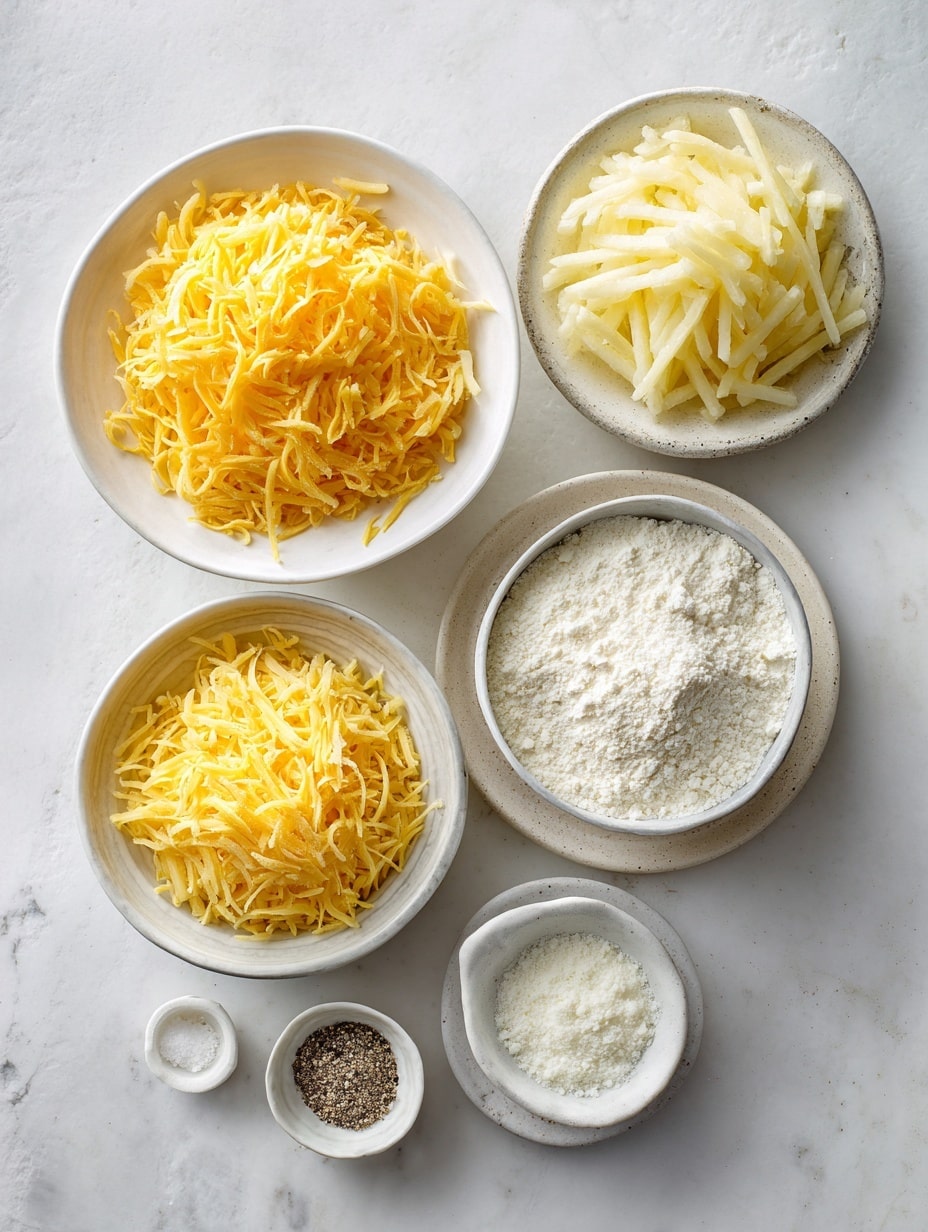
Okay, let’s gather our goodies! The beauty of this recipe is that you probably have half of these things in your kitchen already. Here’s what you’ll need—and a few little tips I’ve picked up along the way:
- 3 russet potatoes, cooked, cooled, and cubed (cold potatoes hold their shape better when mixing—trust me on this)
- 1 block cheddar cheese, cut into strips (sharp cheddar is my go-to, but any melty cheese works)
- ¼ cup bacon, diced (crispy bacon bits add that smoky punch—I’ve been known to "accidentally" snack on these while prepping)
- ¼ cup green onion, finely diced (scallions work too; just the green parts if you want milder flavor)
- ½ cup sour cream (this keeps the potato mixture creamy without making it soggy)
- 1 teaspoon salt + ½ teaspoon pepper (adjust to taste—I usually add an extra pinch because, well, yum)
- ⅔ cup cornstarch (for that first crispy coating layer)
- 100 g panko breadcrumbs (the Japanese-style ones give the best crunch—don’t skip these!)
- Flour (as needed) (just all-purpose, nothing fancy)
- 1 egg, beaten (for the glue that holds the breadcrumbs on)
- 1 liter vegetable, canola, or peanut oil (for frying—high smoke point is key here)
See? Nothing crazy! Just good, simple ingredients that turn into something magical. Now, let’s get our hands messy.
Step-by-Step Potato Cheese Sticks Instructions
Alright, let’s dive into the fun part—making these crispy, cheesy wonders step by step. Don’t worry if you’ve never fried anything before; I’ll walk you through it like I’m right there in your kitchen, cheering you on!
Preparing the Potato Mixture
- Mash it up: In a big bowl, toss in your cold cubed potatoes (cold is key—they hold together better!). Add the sour cream, salt, pepper, diced bacon, and green onions. Now, get in there with your hands or a fork and mix until everything’s evenly combined. You want it sticky enough to hold shape but not mushy—think thick mashed potatoes with bits of bacon peeking through.
Pro tip: If the mixture feels too wet, sprinkle in a bit of flour. Too dry? A tiny splash of milk or extra sour cream will save the day.
Forming and Coating the Sticks
- Cheese time: Grab a golf-ball-sized portion of the potato mix and flatten it in your palm. Pop a strip of cheddar in the center, then gently roll the potato around it, sealing the edges. Aim for a stick shape—about 3 inches long and 1 inch thick. Don’t stress perfection; rustic is charming!
- The triple dip: Set up three shallow bowls: one with flour, one with beaten egg, and one with panko. Roll each stick in flour (shaking off excess), dunk in egg (let the extra drip off), then coat thoroughly in panko. Press lightly so the crumbs stick. Lay them on a tray—they’re ready for their hot oil bath!
Fun fact: I use one hand for dry steps and one for wet to avoid "breadcrumb fingers." Works like a charm!
Frying to Perfection
- Heat it right: Pour oil into a deep pot (fill no more than halfway) and heat to 350°F (175°C). No thermometer? Test with a breadcrumb—if it sizzles immediately, you’re golden. Too hot? The coating burns before the cheese melts. Too cool? Greasy sticks. Patience pays off here!
- Fry in batches: Gently lower 3-4 sticks into the oil using tongs or a slotted spoon. Don’t crowd the pot—they need room to float and brown evenly. Fry for 3-4 minutes until deep golden. Listen for that happy crackle!
- Drain and devour: Transfer to a paper towel-lined plate to soak up extra oil. Sprinkle with a pinch of salt while hot. Serve immediately—that cheese pull waits for no one!
Warning: Standing near these while they cool is dangerous. I’ve burned my fingers more times than I’d care to admit "testing" them. Worth it!
Potato Cheese Sticks Variations
One of my favorite things about this recipe? How easy it is to mix things up! Here are some fun twists I’ve tried (and loved) over the years. Don’t be afraid to get creative—I’ve yet to meet a version that wasn’t delicious.
- Cheese swap: Try mozzarella for epic cheese pulls (kids go wild for this one) or pepper jack for a spicy kick. Once, I used gouda with a pinch of smoked paprika—oh man, tasted like a campfire in the best way.
- Veggie boost: Mix in ¼ cup finely chopped spinach (squeezed dry!) or roasted red peppers for color. My sneaky way to add greens without complaints.
- Meat lovers: Swap bacon for crispy pancetta or diced ham. Or go wild—my uncle once added chopped pepperoni, and now it’s his signature move.
- Spice it up: Add ½ teaspoon garlic powder to the potato mix or a dash of cayenne to the breadcrumbs. For buffalo fans, toss the fried sticks in hot sauce butter—game changer!
- Gluten-free: Use almond flour and gluten-free panko. My celiac friend says they’re just as crispy, and she’s brutally honest about GF swaps.
The moral? Don’t stick to the script—unless you’re sticking cheese in potatoes. That part's non-negotiable.
Serving and Storage Tips for Potato Cheese Sticks
Listen, I know it’s tempting to sneak a bite while cooking—I do it every time—but these guys are best served piping hot, right after frying. That’s when the cheese is at peak gooeyness and the panko is still singing with crunch. Arrange them on a platter with small bowls of dipping sauces (ranch, spicy mayo, or marinara are my go-tos) and watch them disappear!
Leftovers? No problem! Let them cool completely, then store in an airtight container in the fridge for up to 2 days. To reheat, pop them in an air fryer at 375°F for 3-4 minutes—they’ll crisp right back up. Just don’t microwave unless you enjoy sad, soggy sticks (learned that the hard way).
Helpful Notes for Perfect Potato Cheese Sticks
After making these more times than I can count (and yes, burning a batch or two along the way), here are my golden rules for potato cheese stick success:
- Cold potatoes are your friends: Warm ones turn mushy when mixing—I stick mine in the fridge for 30 minutes before cubing. Bonus: chilling the formed sticks for 15 minutes before frying helps them hold shape.
- Oil temperature is everything: That 350°F sweet spot isn’t just a suggestion. Too cold = greasy, too hot = burnt outside, cold cheese inside. A candy thermometer is worth its weight in gold here.
- Serve FAST: These wait for no one. The cheese starts setting after about 5 minutes, so fry in batches and eat as they come out. (No judgment if you stand by the stove snacking.)
- Low-lactose option: Swap cheddar for aged gouda or swiss—they’re naturally lower in lactose but still melt beautifully. My lactose-sensitive cousin swears by this tweak!
Remember: Even "messy" sticks taste incredible. My first attempt looked like abstract art, but the flavor? Absolute perfection.
Frequently Asked Questions About Potato Cheese Sticks
I get asked about these crispy wonders all the time—so here are the answers to the questions that pop up most often. (And yes, "Can I eat the whole batch myself?" counts as a valid question—answer: absolutely.)
- Can I prep these ahead?
Yes! Assemble the sticks (up to breading) and freeze on a tray. Once solid, transfer to a bag. Fry straight from frozen—just add 1-2 extra minutes. - What if I don’t have panko?
Regular breadcrumbs work, but they won’t be as crunchy. Crushed cornflakes or crushed potato chips? Now we’re talking. - Can I bake instead of fry?
You can! Brush with oil and bake at 400°F for 20 mins, flipping halfway. They’re good—but let’s be honest, fried is magic. - Help! My cheese leaked out!
No stress—it happens! Chill sticks before frying, seal edges tightly, and don’t overstuff. Even leaky ones taste amazing. - Gluten-free options?
Swap flour for cornstarch and use GF panko. My friend uses crushed rice crackers with killer results.
Still stumped? Toss me a question in the comments—I’ve probably made every mistake so you don’t have to!
Final Thoughts on Potato Cheese Sticks
If there’s one recipe that never fails to bring smiles (and empty plates), it’s these potato cheese sticks. Crispy, cheesy, and packed with flavor—they’re the ultimate crowd-pleaser. Whether it’s game day, a party, or just a Tuesday night craving, trust me, these little sticks of joy are always worth the effort. Now go forth and fry up some happiness!
Print
Crispy Potato Cheese Sticks
- Total Time: 30 mins
- Yield: 12 sticks 1x
- Diet: Low Lactose
Description
Crispy potato cheese sticks with a savory blend of bacon, cheddar, and green onions, perfect for snacking.
Ingredients
- 1 teaspoon salt
- ½ teaspoon pepper
- ¼ cup green onion, diced
- ½ cup sour cream
- 3 russet potatoes, cooked and cubed
- ¼ cup bacon, diced
- 1 block cheddar cheese, cut into strips
- ⅔ cup cornstarch
- 100 g panko breadcrumbs
- Flour (as needed)
- Egg (as needed)
- 1 litre vegetable oil, canola, or peanut oil
Instructions
- Mix potatoes, salt, pepper, green onion, sour cream, and bacon in a bowl.
- Take a portion of the mixture, flatten it, and place a cheese strip in the center.
- Roll the mixture around the cheese to form a stick.
- Coat the sticks in flour, then dip in beaten egg, and roll in panko breadcrumbs.
- Heat oil in a deep pan to 350°F (175°C).
- Fry the sticks until golden brown, about 3-4 minutes.
- Drain on paper towels and serve warm.
Notes
- Use cold cooked potatoes for better texture.
- Ensure oil is hot enough to prevent sticking.
- Serve immediately for the best crispiness.
- Prep Time: 20 mins
- Cook Time: 10 mins
- Category: Appetizer
- Method: Frying
- Cuisine: American
Nutrition
- Serving Size: 1 stick
- Calories: 120
- Sugar: 1g
- Sodium: 200mg
- Fat: 8g
- Saturated Fat: 3g
- Unsaturated Fat: 4g
- Trans Fat: 0g
- Carbohydrates: 10g
- Fiber: 1g
- Protein: 4g
- Cholesterol: 20mg
Keywords: Potato cheese sticks, fried snacks, cheesy appetizer

Leave a Reply