I still remember the first time I made Soft Christmas Peppermints — it was one of those happy kitchen accidents that turned into a holiday tradition. I’d run out of store-bought candies for my cookie trays, and in a pinch, I whipped up these little minty wonders with what I had in the pantry. And oh my, the way my family raved about them! Now, they’re the first treat to disappear at every holiday gathering.
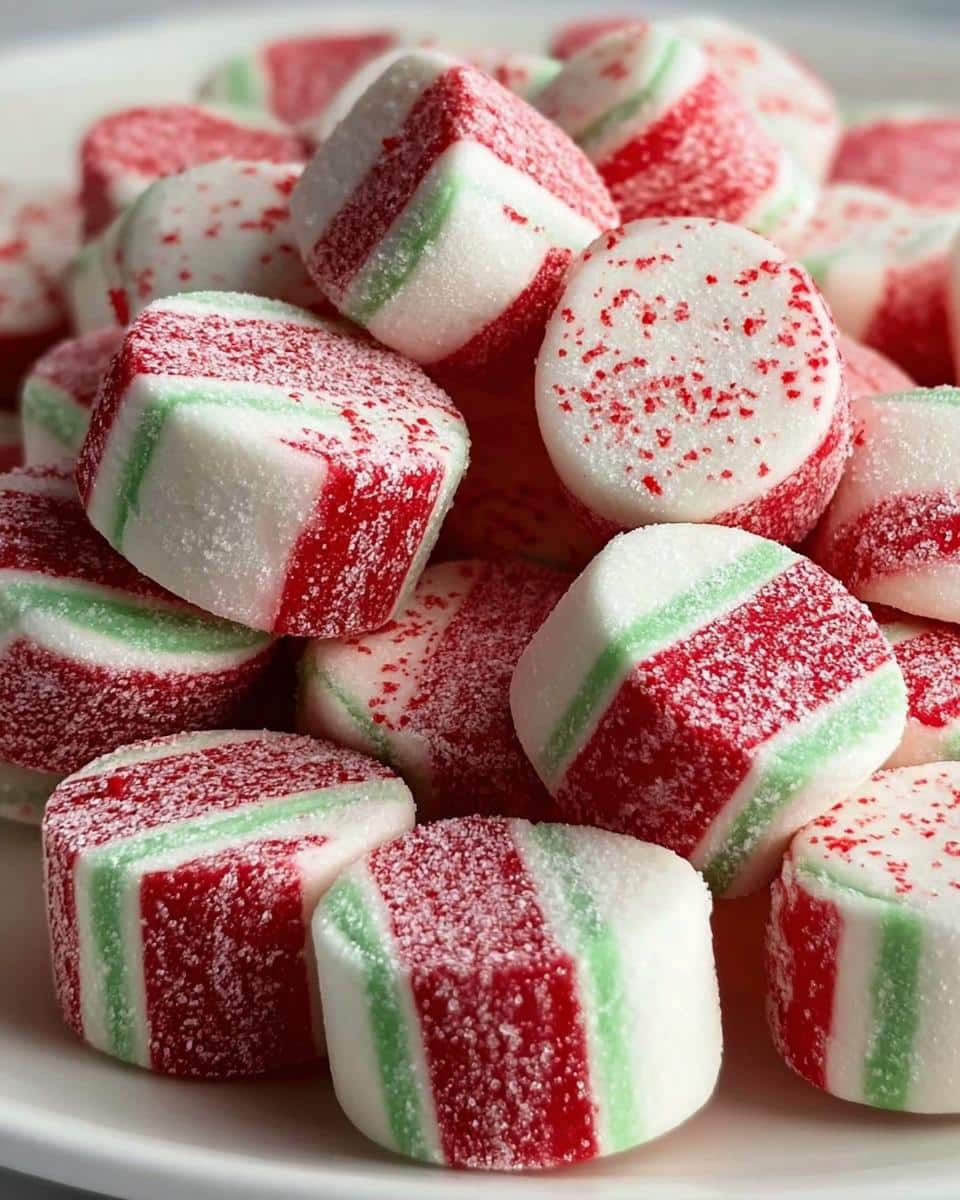
These Soft Christmas Peppermints are the epitome of holiday magic. They’re ridiculously easy to make (no baking required!), yet they look so festive with their cheery red and green swirls. The peppermint flavor is just right — refreshing but not overwhelming — and that melt-in-your-mouth texture? Pure bliss. Whether you're filling candy dishes, tucking them into gift boxes, or sneaking a few for yourself (no judgment here), they’re the perfect little bite of Christmas cheer.
Why You’ll Love Soft Christmas Peppermints
- Effortless to make: No baking, no fancy equipment — just mix, knead, and shape. Perfect for last-minute holiday prep!
- Festive and fun: The vibrant red and green swirls scream Christmas. Kids love helping with the coloring part (though fair warning: it might get messy).
- Just the right minty kick: Not too strong, not too weak — that peppermint flavor hits all the cozy holiday notes without feeling like toothpaste.
- Melt-in-your-mouth magic: The texture is dreamy. Soft, slightly chewy, and coated in a delicate crunch of sugar.
- Gift-worthy: Package them in cute jars or cellophane bags, and suddenly you’re the most thoughtful person at the cookie exchange.
Ingredients You’ll Need for Soft Christmas Peppermints
- 3 ¾ cups powdered sugar (plus extra for dusting your hands and work surface — trust me, it helps!)
- ⅓ cup sweetened condensed milk (the sticky-sweet glue that holds it all together; don’t skip this!)
- ½ teaspoon peppermint extract (use pure extract for the best flavor — imitation can taste a bit harsh)
- Red and green gel food coloring (gel works better than liquid here — it gives vibrant color without making the dough too wet)
- Granulated sugar (for coating — just a little bowlful for rolling. Regular white sugar gives that classic candy-shop crunch.)
That’s it! Five simple ingredients, and you’re on your way to peppermint heaven. I always keep extra powdered sugar nearby in case the dough feels sticky — sometimes humidity plays tricks on us. And if you’re feeling fancy, a tiny pinch of salt can balance the sweetness beautifully, but that’s totally optional.
Step-by-Step Instructions for Soft Christmas Peppermints
Mixing the Dough
First things first — dust your hands and workspace with powdered sugar. This stuff sticks like crazy otherwise! In a big bowl, dump in your powdered sugar, sweetened condensed milk, and peppermint extract. Stir with a wooden spoon at first (it’ll look crumbly — that’s normal!), then get in there with your hands. Knead it like you’re mad at it for about 3-4 minutes until it turns into a smooth, playdough-like ball. If it sticks to your fingers, sprinkle on a bit more powdered sugar. You’re aiming for soft but not sticky — think fresh sugar cookie dough.
Coloring and Shaping
Now for the fun part! Divide your dough into two equal blobs. Add 2-3 drops of green gel coloring to one and red to the other (start with less — you can always add more!). Knead each portion until the color’s fully mixed (wear gloves if you don’t want rainbow hands). Roll each color into skinny ropes about ½-inch thick. Line them up side by side, then gently twist them together like a candy cane. Cut into ½-inch pieces with a sharp knife — don’t squish them! If they flatten a bit, roll them gently between your palms.
Coating and Drying
Pour some granulated sugar into a shallow bowl. Drop a few candies in at a time and roll them around until they’re lightly coated — this gives that classic sugary crunch. Arrange them on parchment paper (not wax paper — they’ll stick!) about an inch apart. Let them dry uncovered for at least 2 hours so the exterior sets. They’ll still be soft inside — that’s what makes them magical! Pro tip: Hide them somewhere cool so little fingers (or yours) don’t “test” them all before the party.
Variations of Soft Christmas Peppermints
Oh, the possibilities with these little guys! Once you’ve mastered the classic version, try these fun twists to mix things up. For a chocolatey surprise, drizzle melted white or dark chocolate over the finished candies — just zigzag it on with a fork and let it set. If peppermint isn’t your thing (or you want to surprise your guests), swap in almond extract or even orange extract for a festive citrus twist. Feeling extra? Add a tiny drop of cinnamon oil to the red dough for a "candy cane hot cocoa" vibe. And hey, if you’re not into food coloring, roll them in crushed candy canes instead of sugar for a natural red-and-white look. Christmas magic, your way!
Serving and Storage Tips for Soft Christmas Peppermints
These little candies are happiest when they’re front and center in your holiday spread! Pile them in a pretty bowl for easy grabbing, or tie them up in cellophane bags with ribbon for adorable edible gifts. They’re perfect alongside hot cocoa or coffee — something about that minty freshness just sings with warm drinks.
For storage, an airtight container is your best friend. Layer them between sheets of parchment paper so they don’t stick together, and they’ll keep their soft texture for about 2 weeks at room temperature (though let’s be real — they’ll vanish way before then). If you somehow end up with leftovers (rare, but possible), they freeze beautifully for up to 3 months. Just thaw at room temperature for an hour before serving — no one will guess they weren’t made fresh that day!
Helpful Notes for Perfect Soft Christmas Peppermints
- Gel coloring is key: Liquid food coloring can make the dough too sticky — gel gives vibrant color without messing with the texture. If you must use liquid, add it drop by drop and be ready to adjust with extra powdered sugar.
- Texture troubles? If your dough feels too dry, add a teaspoon of condensed milk. Too sticky? Sprinkle powdered sugar gradually until it’s workable. Humidity affects this recipe, so don’t stress — just adapt!
- Diet tweaks: For a slightly lighter version, swap half the powdered sugar with Swerve confectioners’ sweetener. Vegan? Coconut condensed milk works surprisingly well here (just expect a hint of coconut flavor).
- Extra sparkle: Roll finished candies in sanding sugar instead of granulated for holiday glitter. Edible glitter? Even better — go wild!
Remember, these are forgiving candies — even if your ropes aren’t perfect or colors bleed a little, they’ll still taste amazing. The best part? No one knows what they’re “supposed” to look like except you. Happy accidents make the sweetest memories!
Frequently Asked Questions About Soft Christmas Peppermints
- Can I use liquid food coloring instead of gel?
You can, but go easy! Liquid makes the dough sticky fast. Start with 1-2 drops max per color, and keep extra powdered sugar handy to balance the texture. - How long do these stay fresh?
About 2 weeks in an airtight container at room temp. They might dry out a tad after day 5, but that sugary coating helps keep them dreamy. - What if I don’t have sweetened condensed milk?
Try evaporated milk with 1 tablespoon sugar mixed in, or 3 tablespoon softened cream cheese. Texture shifts slightly, but still delicious! - Help! My dough won’t hold shape!
Too much condensed milk or humidity. Sprinkle powdered sugar bit by bit until it’s kneadable — it’ll come together, promise. - Can I make these ahead and freeze?
Absolutely! Freeze in layers with parchment between. Thaw uncovered so the sugar coating stays crisp.
See? No question too silly. If your candies aren’t "magazine perfect" but taste amazing, you’ve won Christmas.
Final Thoughts on Soft Christmas Peppermints
Honestly, if these Soft Christmas Peppermints don’t become your new holiday staple, I’ll eat my Santa hat. They’re that perfect mix of nostalgic charm and couldn’t-be-easier baking (or rather, no-baking!). There’s something so special about homemade candies — the way they make your whole house smell like a candy cane factory, the joy of shaping them with your hands, the little gasps when guests realize you made them from scratch. Whether you’re gifting them, serving them, or shamelessly hoarding the batch for yourself (again, no judgment), they’re pure edible happiness. So grab that powdered sugar and get mixing — your new Christmas tradition starts now!
Print
Easy Soft Christmas Peppermints
- Total Time: 15 minutes
- Yield: 40 candies 1x
- Diet: Vegetarian
Description
Make soft peppermint candies for Christmas with this simple recipe.
Ingredients
- 3 ¾ cups powdered sugar (plus extra for dusting)
- ⅓ cup sweetened condensed milk
- ½ teaspoon peppermint extract
- Red and green food coloring (gel preferred)
- Granulated sugar (for coating)
Instructions
- Mix powdered sugar, condensed milk, and peppermint extract.
- Knead until smooth.
- Divide dough and color portions red and green.
- Roll into ropes and cut into pieces.
- Coat with granulated sugar.
- Let dry before serving.
Notes
- Store in an airtight container.
- Use gel food coloring for best results.
- Prep Time: 15 minutes
- Cook Time: 0 minutes
- Category: Dessert
- Method: No-Bake
- Cuisine: American
Nutrition
- Serving Size: 1 candy
- Calories: 45
- Sugar: 11g
- Sodium: 2mg
- Fat: 0g
- Saturated Fat: 0g
- Unsaturated Fat: 0g
- Trans Fat: 0g
- Carbohydrates: 11g
- Fiber: 0g
- Protein: 0g
- Cholesterol: 0g
Keywords: peppermint candy, Christmas sweets, homemade candy


Leave a Reply