Strawberry Cheesecake Dump Cake is the kind of dessert that feels like a warm hug in every bite. I remember discovering this gem at a family reunion — someone had brought it in a glass baking dish, and the smell of sweet strawberries and buttery cake drew everyone to the dessert table before dinner was even served. It’s rich, fruity, and creamy all at once, with the simplest prep imaginable.

This dessert has since become one of my favorite go-to recipes, especially when I want to make something that feels special but doesn’t take hours. It's the kind of treat you can throw together last minute when company’s on the way or when you're craving something warm and comforting after dinner. With layers of tangy strawberry filling, sweet cream cheese, and a buttery cake topping, every bite is a delightful blend of flavor and texture.
Whether you’re hosting a potluck, need a quick weeknight dessert, or want something cozy for a holiday gathering, this dump cake delivers big flavor with minimal fuss. With the beloved flavors of strawberry cheesecake baked into a golden, buttery topping, it’s guaranteed to be a crowd-pleaser.
Why You’ll Love Strawberry Cheesecake Dump Cake
- Incredibly easy — no mixing bowls or fancy steps required.
- Crowd-pleasing flavors — like cheesecake and cobbler had a baby.
- Minimal prep — just dump, layer, and bake.
- Uses pantry staples — great when you need a quick dessert.
- Customizable — swap fillings or add toppings.
- Perfect for potlucks and holidays — serves a group and travels well.
- Beginner-friendly — foolproof even if you're new to baking.
- Versatile serving options — perfect warm, cold, or room temp.
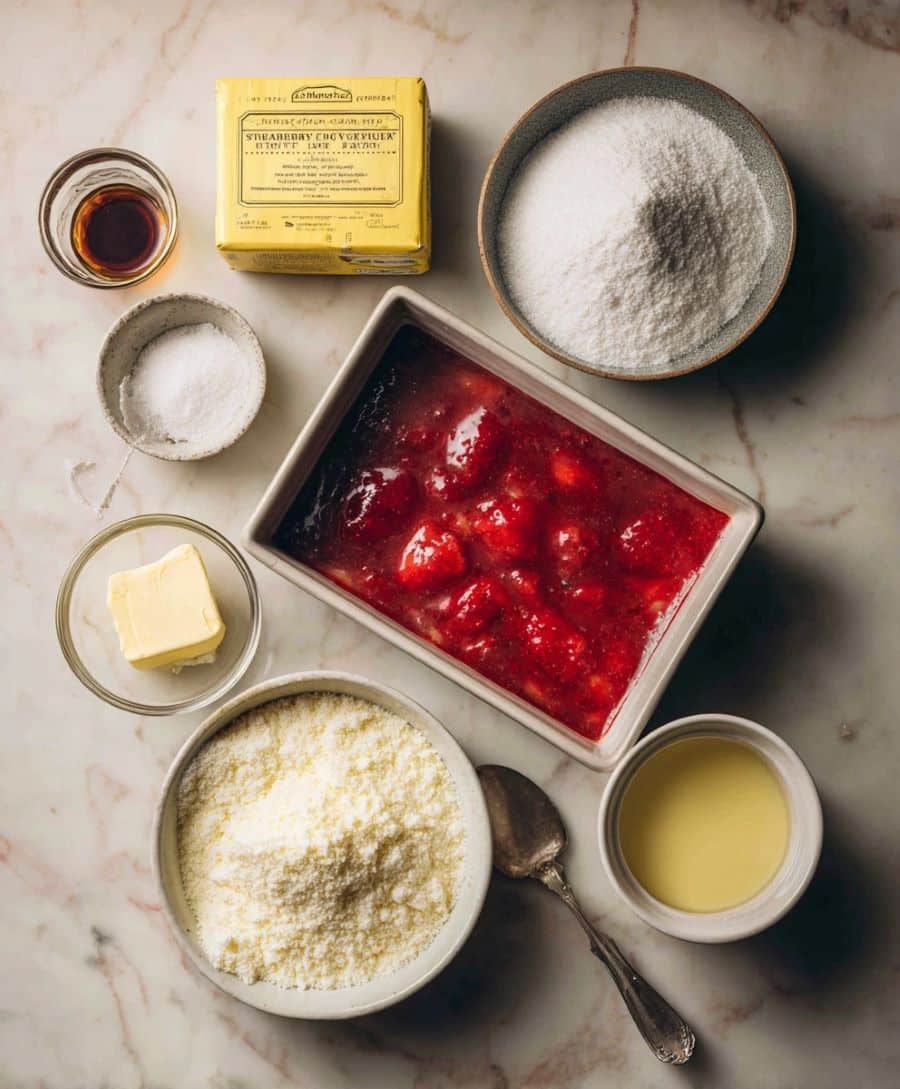
Ingredients You’ll Need
- 1 box yellow or white cake mix — either works beautifully and gives a golden, buttery crust.
- 1 (21 oz) can strawberry pie filling — sweet, juicy base that brings the fruity punch.
- 1 (8 oz) package cream cheese, softened — brings the cheesecake richness and creamy texture.
- ½ cup granulated sugar — to sweeten the cream cheese layer.
- 1 teaspoon vanilla extract — enhances the cheesecake flavor with a warm aroma.
- ½ cup unsalted butter, melted — to create a golden, buttery topping.
Optional additions:
- Fresh strawberries — for added texture and a homemade feel.
- Chopped nuts or graham crackers — for a crunchy finish.
Step-by-Step Instructions
- Preheat your oven to 350°F (175°C). Lightly grease a 9x13-inch baking dish with nonstick spray or butter.
- Spread the strawberry pie filling evenly across the bottom of the baking dish. Use a spatula to smooth it out.
- Prepare the cheesecake layer:
- In a medium bowl, beat the softened cream cheese with the granulated sugar and vanilla extract until smooth and creamy.
- Dollop spoonfuls of the cream cheese mixture over the pie filling. You can gently swirl it with a spoon or leave it in chunks.
- Add the dry cake mix:
- Sprinkle the dry cake mix evenly over the entire dish. Do not stir. The dry mix should completely cover the cream cheese and fruit layers.
- Pour melted butter over the top of the cake mix. Try to drizzle it evenly to moisten as much of the surface as possible. It’s okay if some dry spots remain — they’ll bake into a lovely, crumbly topping.
- Bake for 40–45 minutes or until the top is golden and bubbly and the edges are slightly crisp.
- Cool for 10–15 minutes before serving. The layers will firm up slightly as it sits, making it easier to scoop and serve.
Serving and Storage Tips
- Serve warm with a generous scoop of vanilla ice cream or a dollop of whipped cream.
- Garnish with fresh strawberries or a sprinkle of powdered sugar for a pretty finish.
- Delicious warm, but also tastes great chilled — try it the next day straight from the fridge!
- Store leftovers in an airtight container in the refrigerator for up to 4 days.
- To reheat, microwave individual portions in 30-second increments until warmed through.
- Freeze individual portions by wrapping in plastic and placing in a freezer-safe bag. Thaw in the fridge overnight before reheating.
Helpful Notes
- Soften your cream cheese fully to make it easier to mix with sugar and vanilla.
- If your butter doesn’t cover all the cake mix, spritz dry areas with a little cooking spray or dot with small pieces of butter.
- Swirling the cheesecake layer into the strawberry filling adds a marbled effect and helps the flavors meld together.
- Try different pie fillings like raspberry, cherry, or blueberry for a fun twist.
- Add a touch of cinnamon or nutmeg to the cake mix for a warm spice note.
- Want more crunch? Sprinkle graham cracker crumbs or chopped pecans on top before baking.

Frequently Asked Questions
- Can I use fresh strawberries instead of pie filling?
Yes, but it’s best to cook them down with some sugar and a bit of lemon juice into a compote first to match the consistency and sweetness of pie filling. - Do I have to soften the cream cheese?
Yes — softened cream cheese blends much more easily, giving you a smooth, creamy texture without lumps. - Can I use a different flavor of pie filling?
Absolutely! Cherry, blueberry, raspberry, and peach are all delicious alternatives. - Is the cake supposed to be gooey in the center?
Yes, the center should be soft and creamy beneath the crusty golden top — similar to a cobbler or a layered pudding cake. - Can I prepare this in advance?
Yes! You can bake it the day before and reheat portions as needed. It holds up well in the fridge for a few days. - Can I make it gluten-free?
Yes, just use your favorite gluten-free cake mix and double-check that your pie filling and other ingredients are certified gluten-free.
Final Thoughts
Strawberry Cheesecake Dump Cake is proof that you don’t need complicated steps or fancy techniques to make a decadent dessert. It’s a little indulgent, a lot delicious, and guaranteed to disappear fast at any gathering. Whether you’re new to baking, cooking for a crowd, or simply craving something sweet and homey, this recipe checks all the boxes. It’s fruity, creamy, buttery, and best of all — it’s made with love and very little effort. Don’t forget to snap a pic and share it — I’d love to see your version of this irresistibly easy dessert!
Print
Strawberry Cheesecake Dump Cake - Ingredients
- Total Time: 1 hour 10 minutes
- Yield: 12 1x
Description
This Strawberry Cheesecake Dump Cake features layers of luscious strawberry pie filling, creamy vanilla cheesecake, and a buttery cake mix topping. It’s easy, delicious, and perfect for potlucks, holidays, or everyday cravings.
Ingredients
- 1 box yellow or white cake mix
- 1 21 oz can strawberry pie filling
- 1 8 oz package cream cheese, softened
- ½ cup granulated sugar
- 1 tsp vanilla extract
- ½ cup unsalted butter (melted)
- Optional: fresh strawberries (chopped nuts, or graham cracker crumbs for garnish)
Instructions
- Preheat oven to 350°F (175°C) and grease a 9x13-inch baking dish.
- Spread strawberry pie filling evenly in the bottom of the dish.
- In a bowl, mix softened cream cheese with sugar and vanilla until smooth.
- Drop spoonfuls of the cream cheese mixture over the pie filling. Swirl if desired.
- Sprinkle dry cake mix evenly on top.
- Drizzle melted butter over the cake mix.
- Bake for 40–45 minutes until golden and bubbly.
- Cool for 10–15 minutes before serving.
Notes
-
Soften cream cheese for easy mixing.
-
Add chopped pecans or graham cracker crumbs for texture.
-
Try different pie fillings like cherry, blueberry, or peach.
-
Store in the fridge up to 4 days; freeze portions for up to 2 months.
- Prep Time: 10 minutes
- Cook Time: 45 minutes
Nutrition
- Calories: 310


Leave a Reply