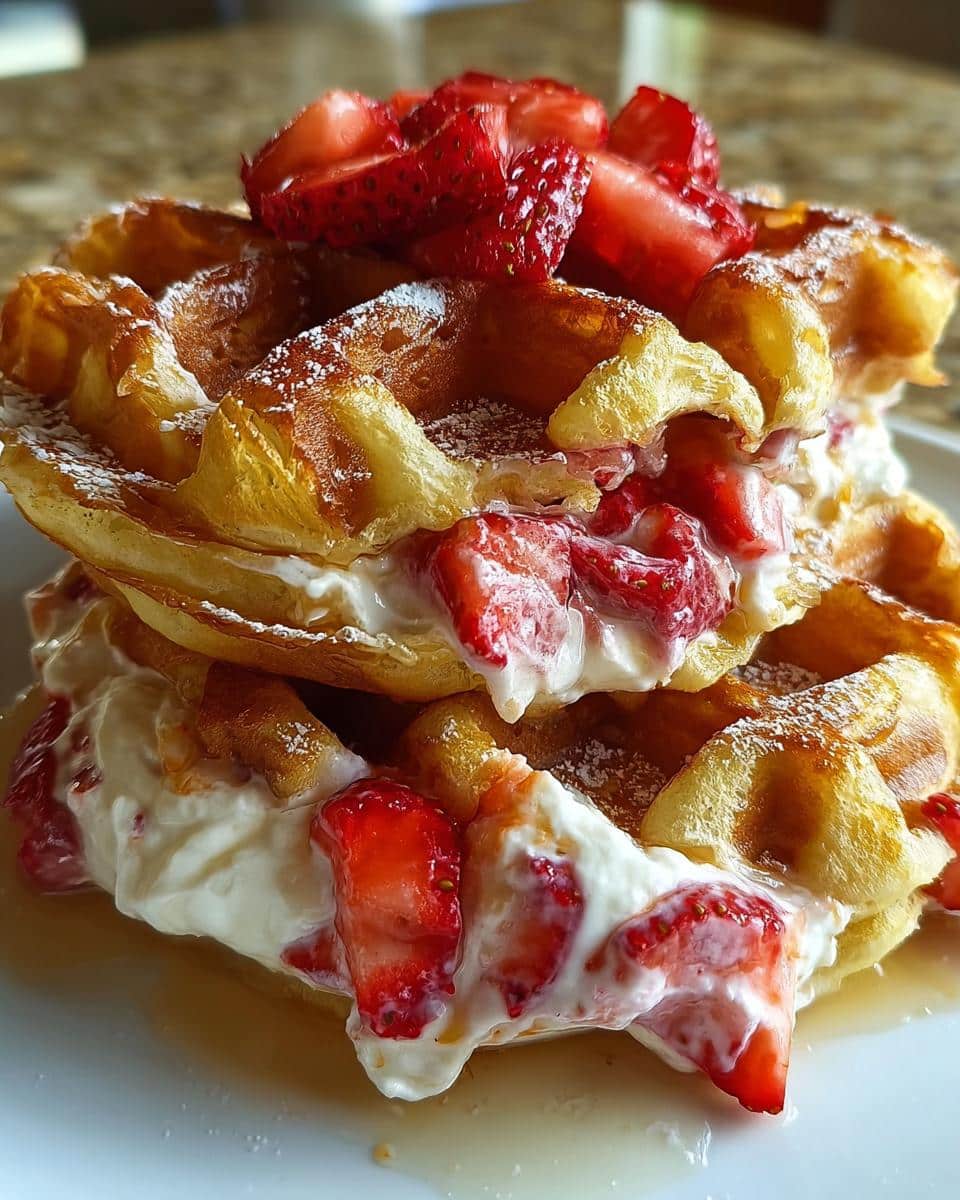
You know, every time I whip up a batch of Strawberry Cheesecake Stuffed Waffles, I can’t help but smile. It takes me back to lazy Sunday mornings at my grandma’s house, where the smell of fresh waffles would fill the air, mingling with laughter and the sound of syrup being poured. Those moments were like a warm hug, and I just knew I had to recreate that feeling in my own kitchen. These waffles are not just breakfast; they’re a delightful way to start the day, especially when the sun is shining and the birds are chirping. They’re perfect for brunch with friends or a cozy family breakfast, bringing a touch of sweetness and nostalgia to the table.

What I love most about these Strawberry Cheesecake Stuffed Waffles is how they effortlessly combine the joy of waffles with the creamy indulgence of cheesecake. You get a crispy exterior with a luscious, creamy filling that practically sings of summer. It’s a recipe that’s not only delicious but also incredibly easy to make, and trust me, once you try them, they'll become a staple in your breakfast rotation. So grab your favorite waffle maker, and let’s dive into making these scrumptious treats!
Why You’ll Love "Strawberry Cheesecake Stuffed Waffles"
- Quick and easy to whip up, perfect for busy mornings.
- Minimal ingredients make shopping a breeze.
- Family-friendly and loved by kids and adults alike!
- Freezer-friendly: make a big batch and reheat for later.
- Flexible recipe—great for brunch gatherings or sweet breakfast treats.
- Deliciously indulgent yet can be made lighter with simple swaps.
Ingredients You’ll Need
- 2 cups all-purpose flour
- 2 tablespoons sugar
- 1 tablespoon baking powder
- ½ teaspoon salt
- 2 large eggs
- 1 ¾ cups milk (whole milk works best for creaminess)
- ½ cup melted butter
- 1 cup cream cheese, softened (look for full-fat for a richer filling)
- ½ cup powdered sugar
- 1 cup fresh strawberries, chopped (frozen strawberries can work in a pinch, but fresh is best for flavor)
Step-by-Step Instructions
Preheat the Waffle Iron
- Start by plugging in your waffle iron and setting it to the appropriate heat level according to the manufacturer's instructions. Most irons will take a few minutes to preheat, so this is a great time to gather your ingredients and get everything ready.
- If your waffle iron has a non-stick surface, you may not need to grease it. However, if you’re unsure or if your iron tends to stick, spray a light coat of cooking spray for good measure.
Prepare the Waffle Batter
- In a large mixing bowl, combine the 2 cups of all-purpose flour, 2 tablespoons of sugar, 1 tablespoon of baking powder, and ½ teaspoon of salt. Give it a good whisk to mix everything evenly.
- In another bowl, whisk together the 2 large eggs, 1 ¾ cups of milk, and ½ cup of melted butter until it’s nice and smooth.
- Gently pour the wet mixture into the dry ingredients. Stir until just combined; don’t worry if there are a few lumps! Overmixing can lead to tough waffles, and we want these to be fluffy and delicious.
Make the Strawberry Cheesecake Filling
- In a separate bowl, beat together 1 cup of softened cream cheese and ½ cup of powdered sugar using a hand mixer or a whisk until it’s silky smooth. This is where the magic happens!
- Once the cream cheese mixture is smooth, fold in 1 cup of chopped fresh strawberries. Be gentle here; you want to keep those lovely strawberry chunks intact for bursts of flavor in every bite.
Cook the Waffles
- Now, it’s time to cook! Pour an appropriate amount of batter into your preheated waffle iron, following the manufacturer’s recommendations. You want enough to cover the bottom but not so much that it spills everywhere.
- Take a spoonful of the creamy strawberry cheesecake filling and place it right in the center of the batter. Don’t be shy; this filling is what makes these waffles special!
- Close the waffle iron and cook until the waffles are golden brown and crispy. The cooking time can vary depending on your waffle iron, so keep an eye on them. A good rule of thumb is about 4 to 6 minutes, but trust your gut—if they look ready, they probably are!
- Carefully open the waffle iron and use a fork to lift out the waffles. Let them cool slightly on a wire rack while you repeat the process with the remaining batter and filling.
Serve and Enjoy
- These waffles are best served warm, so gather your family or friends around the table. You can serve them as is or drizzle with maple syrup or a dusting of powdered sugar for that extra touch of sweetness.
- If you want to elevate the experience, add some additional chopped strawberries on top, maybe a dollop of whipped cream, or even a scoop of vanilla ice cream for a dessert twist!
- Take a moment to savor the joy of cooking, and watch everyone dig in with smiles on their faces. You’ve created something truly special!
Variations
- For a chocolate twist, add cocoa powder to the waffle batter and use chocolate cream cheese.
- Try using different fruits like blueberries or raspberries for the filling.
- Make these gluten-free by substituting all-purpose flour with a 1:1 gluten-free flour blend.
- For a lighter version, use Greek yogurt instead of cream cheese.
- Seasonally, add pumpkin puree and spices for a fall-inspired variation!
Serving and Storage Tips
Serving
- Serve the waffles warm, drizzled with maple syrup or a sprinkle of powdered sugar.
- Add fresh strawberries on top and a dollop of whipped cream for an indulgent touch.
- For a fun twist, consider serving with a scoop of vanilla ice cream for dessert!
Storage
- Store any leftover waffles in an airtight container in the refrigerator for up to 3 days.
- To freeze, place cooled waffles in a single layer on a baking sheet, freeze until solid, then transfer to a freezer bag for up to 2 months.
- Reheat in a toaster or oven until warmed through for the best texture.
Helpful Notes
- If you prefer a lighter filling, swap cream cheese for mascarpone or Greek yogurt.
- For a dairy-free option, use coconut cream and a dairy-free milk alternative.
- Feel free to add spices like cinnamon or vanilla extract to the waffle batter for extra flavor.
- Chill the filling for a thicker consistency if desired.
- Always taste the batter and filling; adjust sweetness to your liking!
Frequently Asked Questions
Can I freeze the waffles?
Absolutely! These waffles freeze beautifully. Just let them cool completely after cooking. Then, place them in a single layer on a baking sheet and freeze until solid. Once frozen, transfer them to a freezer bag or airtight container. They’ll keep well for up to 2 months. When you're ready to enjoy them, just pop them in the toaster or warm them up in the oven until heated through.
What can I use instead of cream cheese?
If you’re not a fan of cream cheese or need a substitute, you can use mascarpone cheese for a similar texture and flavor. Greek yogurt is another great option if you want something lighter and tangy. For a dairy-free alternative, try using coconut cream or a dairy-free cream cheese spread, which will still give you that creamy filling without the dairy.
How do I make these waffles gluten-free?
Making these waffles gluten-free is super easy! Simply swap the all-purpose flour with a 1:1 gluten-free flour blend. Brands like Bob’s Red Mill or King Arthur Flour have great options. Just be sure to check that your baking powder is gluten-free as well. The texture will still be fluffy and delicious, so everyone can enjoy them!
Final Thoughts
There you have it, my friend! Strawberry Cheesecake Stuffed Waffles are not just a breakfast; they’re a joyful experience that brings people together. The combination of crispy waffles and creamy filling is enough to make anyone’s morning feel special. I can’t wait for you to try making them in your own kitchen. Remember, it’s all about having fun and creating those sweet memories with loved ones. So go ahead, whip up a batch, and enjoy the smiles they bring. You’ve got this, and I’m cheering you on from my kitchen!
Print
Strawberry Cheesecake Stuffed Waffles
- Total Time: 35 minutes
- Yield: 4 servings 1x
- Diet: Vegetarian
Description
Delicious waffles filled with creamy strawberry cheesecake.
Ingredients
- 2 cups all-purpose flour
- 2 tablespoons sugar
- 1 tablespoon baking powder
- ½ teaspoon salt
- 2 large eggs
- 1 ¾ cups milk
- ½ cup melted butter
- 1 cup cream cheese, softened
- ½ cup powdered sugar
- 1 cup fresh strawberries, chopped
Instructions
- In a bowl, mix flour, sugar, baking powder, and salt.
- In another bowl, whisk eggs, milk, and melted butter.
- Combine wet and dry ingredients until just mixed.
- In a separate bowl, beat cream cheese and powdered sugar until smooth.
- Fold in chopped strawberries into the cream cheese mixture.
- Preheat the waffle iron and pour batter according to your iron's instructions.
- Add a spoonful of the cream cheese mixture to the center of the batter.
- Close the waffle iron and cook until golden brown.
- Repeat until all batter is used.
- Serve warm with additional strawberries if desired.
Notes
- Use fresh strawberries for best flavor.
- Adjust cooking time based on your waffle iron.
- Store leftovers in the refrigerator.
- Prep Time: 15 minutes
- Cook Time: 20 minutes
- Category: Breakfast
- Method: Waffle
- Cuisine: American
Nutrition
- Serving Size: 1 waffle
- Calories: 320
- Sugar: 10g
- Sodium: 400mg
- Fat: 15g
- Saturated Fat: 8g
- Unsaturated Fat: 5g
- Trans Fat: 0g
- Carbohydrates: 40g
- Fiber: 1g
- Protein: 6g
- Cholesterol: 70mg
Keywords: Strawberry Cheesecake Stuffed Waffles, Waffles, Breakfast Recipe, Strawberry Recipe
Leave a Reply