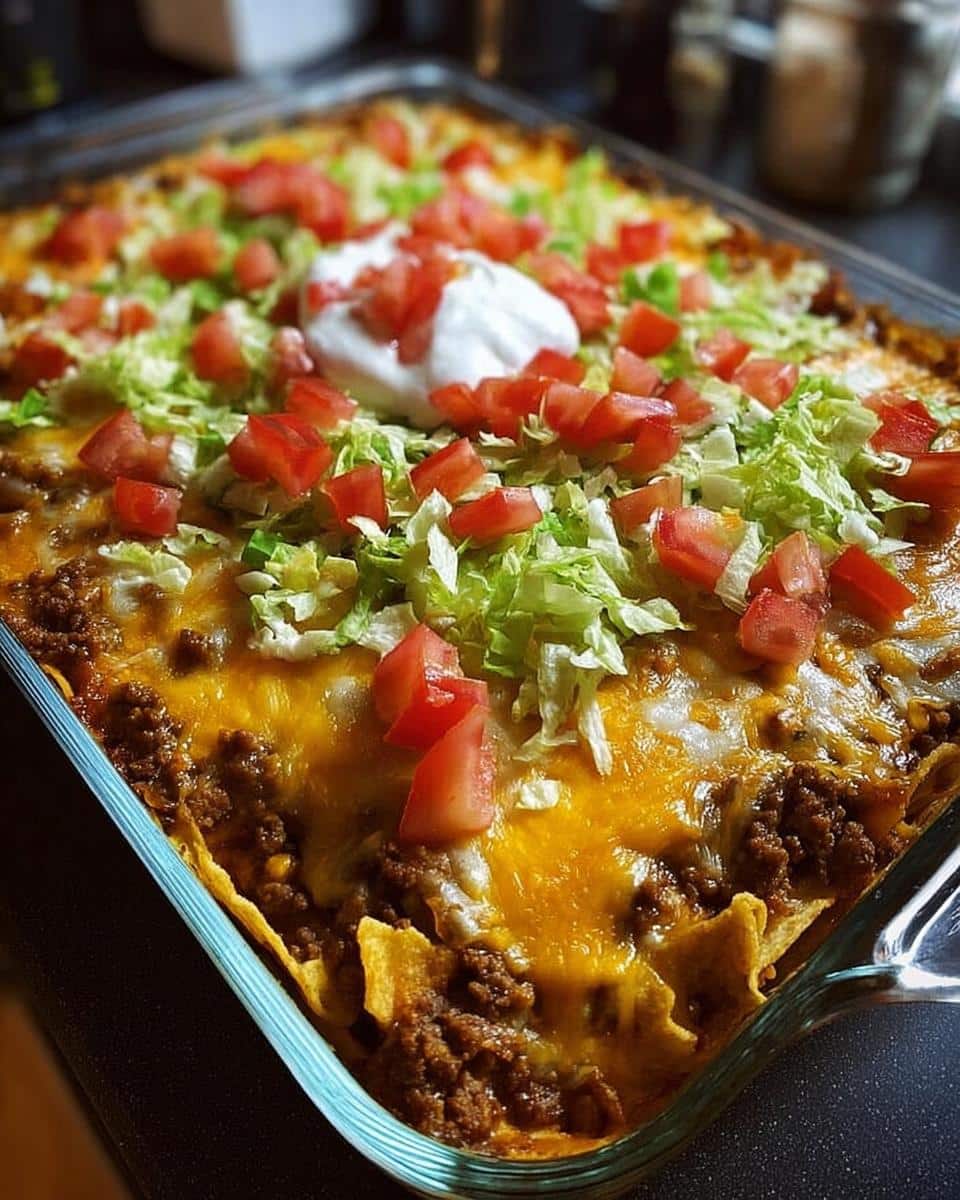
Oh man, let me tell you about the first time I made walking taco casserole! It was one of those nights when I needed dinner to be fast, filling, and a total crowd-pleaser—and this dish delivered big time. My kids went nuts for it, my husband took seconds (and thirds), and I loved that I didn’t have to stand over the stove for hours. It’s like all the fun of walking tacos—you know, those crunchy, saucy, messy handheld favorites—but in an easy, no-fuss casserole form. Perfect for game day, potlucks, or just a Tuesday when you need a little comfort food magic. Trust me, once you try it, you’ll be hooked.

What I love most is how forgiving it is. Forget perfectly rolled tacos or stuffing individual bags of chips—just layer everything in a dish, bake until bubbly, and pile on your favorite toppings. It’s hearty, customizable, and downright delicious. Plus, that combo of crispy Fritos, savory beef, and melty cheese? Absolute perfection. Whether you’re feeding hungry kids, hosting friends, or just craving something cozy, this walking taco casserole never disappoints.
Why You’ll Love Walking Taco Casserole
Okay, let me count the ways this casserole will become your new best friend in the kitchen. First off, it’s stupid easy—like, "why didn’t I think of this sooner?" easy. You’re basically throwing together a few pantry staples, layering them like a delicious lasagna of joy, and letting the oven do the work. No fancy skills required!
But wait, there’s more:
- Family-approved: Even the pickiest eaters go wild for this. (Seriously, my nephew who "hates everything" asked for seconds.)
- Customizable: Swap toppings, adjust the spice, or sneak in extra veggies—it’s your kitchen, your rules!
- Crowd-pleaser: Perfect for game day, potlucks, or when your in-laws show up unannounced. (We’ve all been there.)
- Leftover magic: Tastes even better the next day—if there’s any left, which, spoiler alert, there won’t be.
- No soggy chips: Unlike regular walking tacos, the Fritos stay gloriously crunchy under all that cheesy goodness.
Basically, it’s the dinner version of a high-five: quick, satisfying, and guaranteed to make everyone happy. What’s not to love?
Ingredients You’ll Need for Walking Taco Casserole
Alright, let’s get down to business! Here’s everything you’ll need to make this glorious mess of deliciousness. Don’t stress—most of this is probably already in your pantry or fridge. And hey, no judgment if you eyeball some of it. Cooking should be fun, not a chemistry experiment!
Meat & Base Ingredients
- 1 ½ pounds lean ground beef (or turkey if you’re feeling fancy—just drain the fat well!)
- ⅓ large onion, finely chopped (about ½ cup if you’re measuring—but who has time for that?)
- 1 small can (4 oz) diced green chilies (these add a nice kick without setting your mouth on fire)
- 1 can (15 oz) red enchilada sauce (mild or hot—your call! I like the medium for a happy medium, pun intended.)
- 2 oz cream cheese (this is the secret weapon—makes everything creamy and dreamy)
- 1 bag (9.25 oz) Fritos corn chips (go for the original for that classic crunch)
- 2 cups shredded cheese (I use a Mexican blend, but cheddar or Monterey Jack work too—cheese is cheese, people!)
Toppings & Extras
- ¾ cup shredded lettuce (for that fresh crunch—iceberg holds up best)
- ½ cup diced fresh tomato (or just hack up a couple of Roma tomatoes—seeds and all, no need to be fancy)
- 16 oz salsa (use your favorite—chunky, mild, spicy, whatever floats your boat)
- 8 oz sour cream (or Greek yogurt if you’re being ~healthy~, but let’s be real, sour cream is the way to go)
See? Nothing crazy here. And if you’re missing something, don’t panic—I’ve got substitution ideas coming up later. Now, let’s get cooking!
Step-by-Step Walking Taco Casserole Instructions
Alright, let’s turn these ingredients into cheesy, crunchy magic! Don’t worry—this is so easy, you could do it half-asleep (though maybe don’t test that theory). Here’s exactly how to layer up perfection:
Prep the Meat Mixture
- Preheat your oven to 350°F (175°C). Trust me, you don’t want to realize you forgot this step halfway through. (Ask me how I know.)
- Grab a large skillet —nonstick or cast iron works great—and crank it to medium heat. Toss in the ground beef and chopped onion. Break up the meat with a spatula as it cooks until it’s browned and no pink remains, about 5-7 minutes.
- Drain the fat unless you’re into greasy casseroles (no judgment, but… maybe a little judgment). Just tilt the skillet and spoon it out, or use one of those fancy fat-separator colanders if you’re feeling extra.
- Stir in the green chilies, enchilada sauce, and cream cheese. Keep stirring until the cream cheese melts into saucy oblivion and everything’s cozy and combined. This is where the flavor party starts! Take a sneaky taste—you’ll want to.
Layer the Casserole
- Grab a 9x13-inch baking dish. No need to grease it—the Fritos will handle that for you.
- Crush half the bag of Fritos lightly (just open the bag and give it a few squeezes—very therapeutic) and spread them evenly over the bottom. This is your crunchy foundation.
- Pour half the meat mixture over the Fritos and spread it out like you’re frosting a very meaty cake.
- Sprinkle half the shredded cheese on top. Go ahead, be generous—this is no time for cheese rationing.
- Repeat! Another layer of crushed Fritos, the rest of the meat, and the remaining cheese. Now it’s ready for the oven.
Bake & Add Toppings
- Pop it in the oven and bake for 15-20 minutes, until the cheese is melted and bubbly like a tiny dairy volcano. If you’re into golden-brown edges (and who isn’t?), broil for the last 1-2 minutes—just watch it like a hawk!
- Let it cool for 5 minutes before adding toppings. I know, waiting is hard, but you don’t want molten cheese burns.
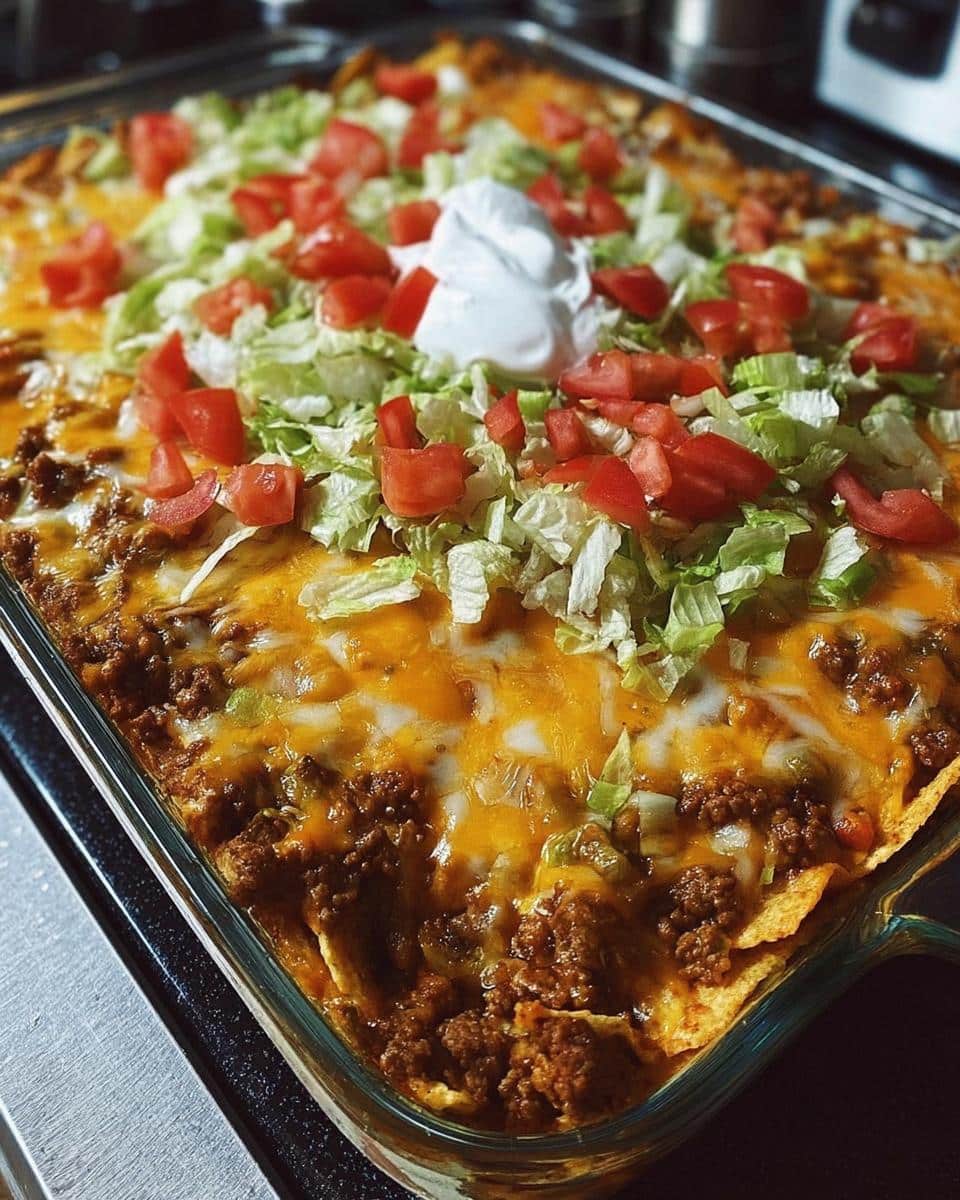
- Pile on the lettuce, tomato, salsa, and sour cream like you’re building a flavor skyscraper. The more, the messier, the better!
That’s it! Dig in while the Fritos are still crisp and the cheese is gloriously gooey. Pro tip: Have napkins ready—this is gloriously messy business.
Walking Taco Casserole Variations
Okay, here’s where things get really fun—because this casserole is basically a blank canvas for your taco-loving creativity. Don’t like beef? No problem. Want to crank up the heat? Go for it! Here are my favorite ways to mix it up:
Protein Swaps
Ground beef is classic, but hey, variety is the spice of life:
- Ground turkey or chicken: Lighter but just as tasty—just add an extra pinch of taco seasoning to amp up the flavor.
- Black beans or lentils: For a vegetarian twist, swap in a can of drained beans or cooked lentils. Bonus: extra fiber!
- Shredded rotisserie chicken: Skip browning altogether—just stir shredded chicken into the sauce mixture. Easy-peasy.
Spice Level Adjustments
Whether you’re feeding tiny taste buds or fire-breathing chili heads, you can tweak the heat:
- Mild: Skip the green chilies entirely, use mild enchilada sauce, and top with cool sour cream.
- Medium: Stick with the recipe as written—it’s got a little kick but won’t blow your socks off.
- Hot: Add diced jalapeños (fresh or canned) to the meat mixture, use hot enchilada sauce, and garnish with sliced serranos. Maybe keep milk handy.
See? Endless possibilities. Now go make it your own!
Serving and Storage Tips for Walking Taco Casserole
Best Ways to Serve
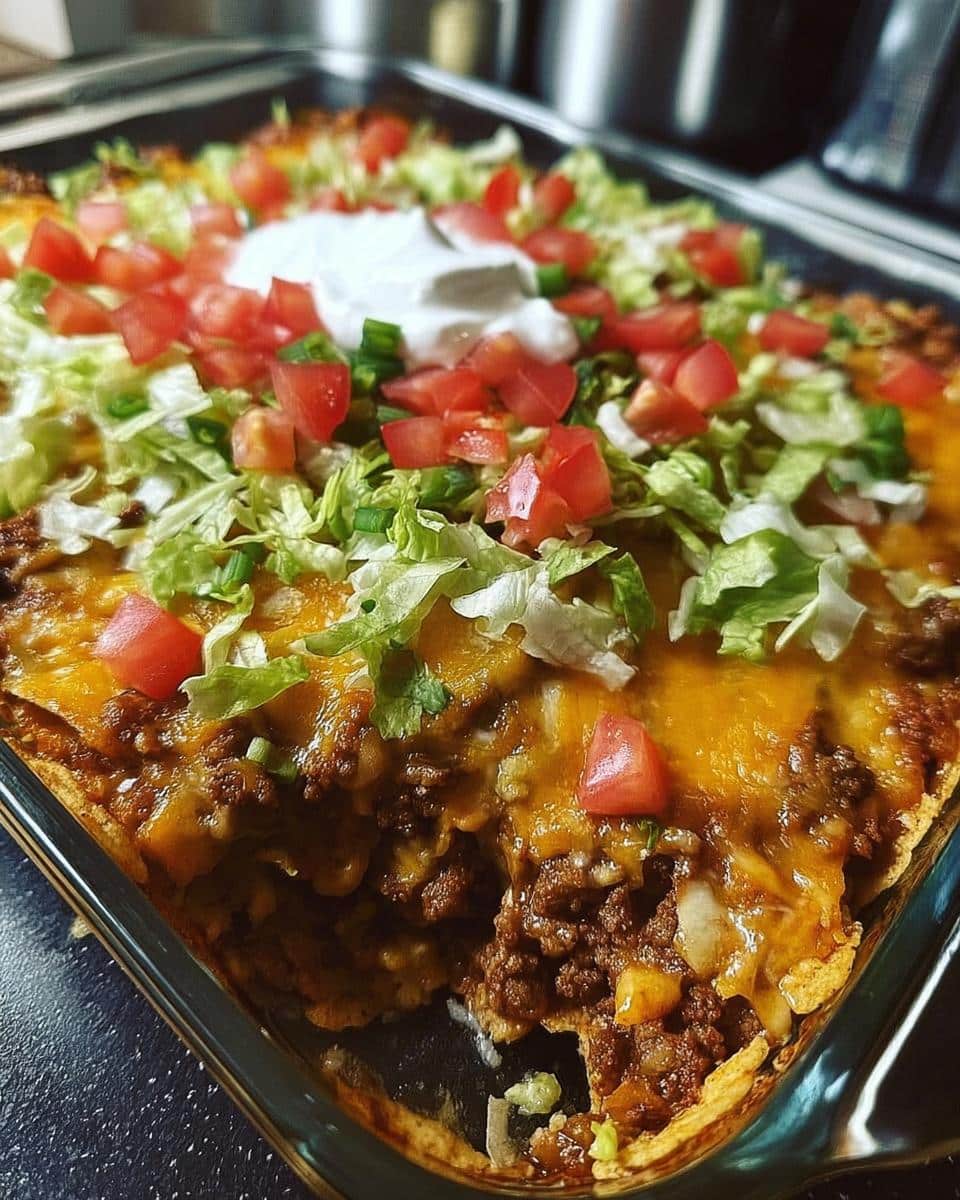
Here’s the golden rule: serve this bad boy right away. Those Fritos are at their peak crunchiness when they’re fresh from the oven, before the toppings have a chance to soften them into submission. Pile everything on while the cheese is still bubbling—lettuce, tomatoes, salsa, sour cream, maybe even some sliced avocado if you’re feeling extra. I like to set out all the toppings and let everyone build their own little masterpiece. It’s like a taco bar, but without the hassle of assembling a million individual tacos. Genius, right? If you want to round out the meal, keep it simple with a side of Mexican rice or a quick corn salad. But honestly, this casserole is so hearty, it’s basically a meal in itself.
Storing Leftovers
Okay, so maybe you’ve got leftovers (unlikely, but I believe in miracles). Here’s the deal: store the casserole and toppings separately. Scoop any uneaten portion into an airtight container—just the Fritos, meat, and cheese layers—and stash it in the fridge for up to 3 days. The toppings (lettuce, tomato, etc.) should go in their own containers to avoid sogginess. When you’re ready to reheat, just microwave a portion (or pop it back in the oven at 350°F for 10-15 minutes), then add fresh toppings. Pro tip: The Fritos won’t be as crispy, but a quick sprinkle of fresh chips on top before serving helps bring back that crunch. And no, this doesn’t freeze well—trust me, I’ve tried. The chips turn into sad little mush pucks. Some things just weren’t meant for the freezer!
Helpful Notes for Perfect Walking Taco Casserole
Ingredient Substitutions
Ran out of something? No worries—this casserole is super flexible! If Fritos aren’t your thing (or you just forgot to grab them), crushed tortilla chips work just fine. For a gluten-free option, make sure your enchilada sauce and chips are certified GF. Not a dairy fan? Swap the cheese for a vegan shred and use dairy-free sour cream. And hey, if you’re not into cream cheese, a dollop of plain Greek yogurt does the trick in a pinch. See? Cooking is all about improvising.
Nutritional Tweaks
Want to lighten things up a bit? Easy! Use extra-lean ground beef (or turkey) to cut down on grease. Reduced-fat cheese melts just as nicely—I promise no one will notice. And if you’re watching carbs, try swapping half the Fritos for cauliflower rice (sauté it with the meat mixture). It won’t be quite as crunchy, but it’ll still taste amazing. Remember, the best recipes are the ones you tweak to fit your life!
Frequently Asked Questions About Walking Taco Casserole
Can I Make This Ahead?
Absolutely! Prep the meat mixture (brown the beef, stir in the sauce and cream cheese) up to 2 days ahead—just keep it in the fridge. When you're ready to eat, layer with fresh Fritos and cheese, then bake. Easy-peasy! Just don’t assemble the whole casserole beforehand—those chips will lose their crunch.
Can I Freeze It?
Sort of! Freeze just the baked meat-and-cheese layers (without toppings) for up to a month. Thaw overnight in the fridge, reheat in the oven at 350°F until bubbly, then add fresh toppings. But fair warning: the Fritos won’t be as crispy. Still tasty, though!
What If I Don’t Have Fritos?
No stress! Tortilla chips work great—just crush them lightly. For a fun twist, try Doritos (nacho cheese flavor is wild here) or even pork rinds for a keto version. Crunch is key!
Final Thoughts on Walking Taco Casserole
At the end of the day, this casserole is everything I want in a meal: easy, packed with flavor, and guaranteed to make everyone happy. Whether it’s a busy weeknight or a game-day feast, it never fails to hit the spot. So go ahead—layer it up, dig in, and enjoy the messy, cheesy, crunchy magic!
Print
Easy Walking Taco Casserole Everyone Loves
- Total Time: 35 minutes
- Yield: 6 servings 1x
- Diet: Low Lactose
Description
A hearty and flavorful casserole that combines the crunch of Fritos with seasoned ground beef, cheese, and fresh toppings.
Ingredients
- 1 ½ pounds Ground Beef
- ⅓ large Onion, chopped
- 1 can (small) Green Chilies
- 1 can (15 ounces) Enchilada Sauce
- 2 ounces Cream Cheese
- 1 bag Fritos Corn Chips
- 1 bag Shredded Cheese
- ¾ cup Lettuce, shredded
- ½ cup Tomato, fresh, diced
- 16 ounces Salsa
- 8 ounces Sour Cream
Instructions
- Preheat your oven to 350°F (175°C).
- Brown the ground beef with chopped onion in a skillet. Drain excess fat.
- Stir in green chilies, enchilada sauce, and cream cheese until well combined.
- Spread half the Fritos in a baking dish. Top with half the meat mixture and half the shredded cheese.
- Repeat layers with remaining Fritos, meat, and cheese.
- Bake for 15-20 minutes until cheese is melted and bubbly.
- Top with shredded lettuce, diced tomato, salsa, and sour cream before serving.
Notes
- Use lean ground beef for less grease.
- Adjust the amount of green chilies for more or less heat.
- Serve immediately to keep Fritos crunchy.
- Prep Time: 15 minutes
- Cook Time: 20 minutes
- Category: Casserole
- Method: Baked
- Cuisine: Mexican-American
Nutrition
- Serving Size: 1 serving
- Calories: 420
- Sugar: 5g
- Sodium: 850mg
- Fat: 24g
- Saturated Fat: 10g
- Unsaturated Fat: 12g
- Trans Fat: 1g
- Carbohydrates: 32g
- Fiber: 3g
- Protein: 22g
- Cholesterol: 65mg
Keywords: walking taco, casserole, Mexican, easy dinner


Leave a Reply