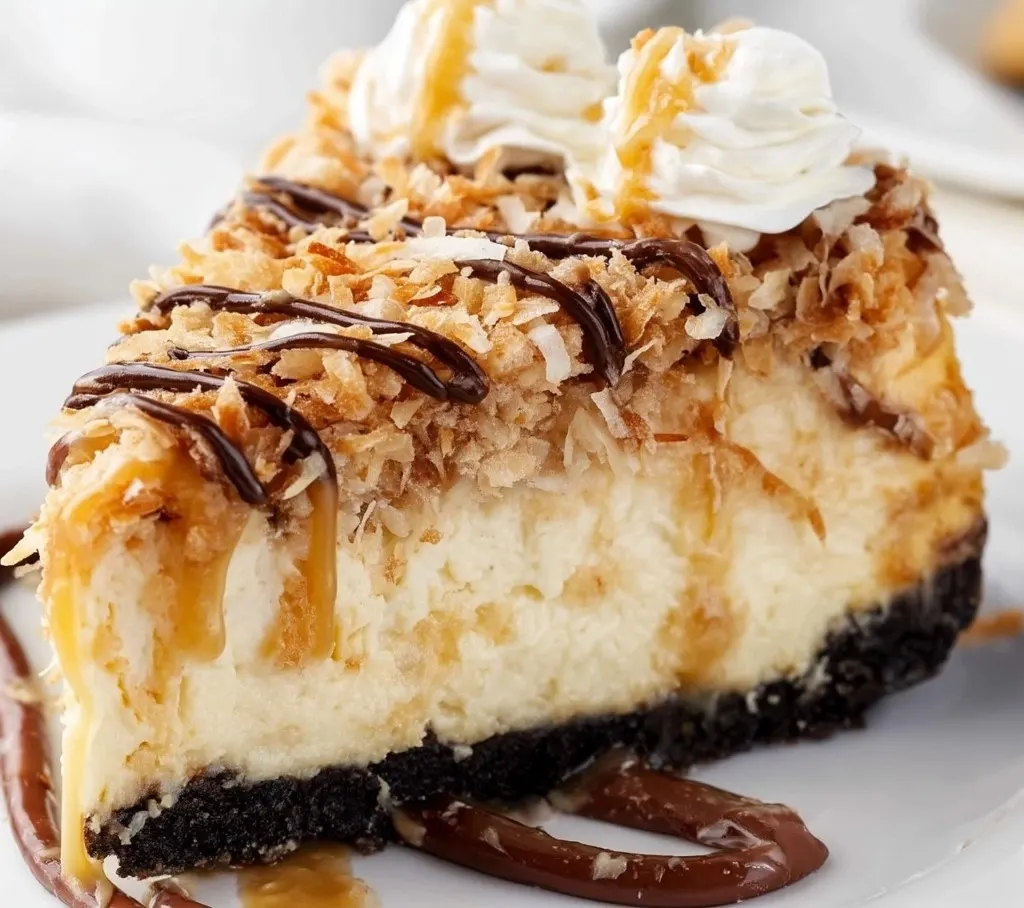
Every year, when Girl Scout cookie season rolls around, I find myself eagerly anticipating the arrival of Samoas. Their delightful combination of toasted coconut, caramel, and chocolate is simply irresistible. One year, I decided to take these flavors and transform them into a cheesecake for a family gathering. The result was a show-stopping dessert that quickly became a favorite.

This Samoa Cheesecake is perfect for special occasions or whenever you want to indulge in a decadent dessert. With its layers of flavor and beautiful presentation, it's sure to impress your guests and satisfy your sweet tooth.
Why You’ll Love Samoa Cheesecake
- Decadent Flavor Combination: The rich chocolate crust, creamy cheesecake filling, and sweet caramel-coconut topping create a harmonious blend of flavors.
- Impressive Presentation: Drizzled with chocolate and caramel sauces and topped with whipped cream and cookies, this cheesecake is as beautiful as it is delicious.
- Perfect for Special Occasions: Whether it's a birthday, holiday, or dinner party, this dessert is sure to be a hit.
- Make-Ahead Friendly: Prepare it a day in advance to allow the flavors to meld and the cheesecake to set properly.
- Customizable: Easily adapt the recipe to suit dietary preferences or ingredient availability.
Ingredients You’ll Need
Chocolate Crust Layer:
- 2½ cups chocolate sandwich cookie crumbs (about 26 original OREO cookies, finely ground)
- 6 tablespoons unsalted butter, melted and cooled
- ½ teaspoon salt
Cheesecake Layer:
- 32 oz cream cheese (4 blocks), softened to room temperature
- 1½ cups granulated sugar
- 1 tablespoon vanilla extract
- 4 large eggs, room temperature
- ½ cup sour cream
- 3 tablespoons heavy cream
- 4–6 cups boiling water (for the water bath)
Samoa Cookie Topping:
- 2¼ cups sweetened shredded coconut
- 1 cup salted caramel sauce (Mrs. Richardson’s or similar), plus more for garnish
Garnish:
- Chocolate dessert sauce (Ghirardelli or similar)
- Caramel dessert sauce (Mrs. Richardson’s or Ghirardelli)
- Whipped topping
- Samoa or Coconut Dream cookies (for decoration)
Step-by-Step Instructions
- Prepare the Crust:
- Preheat your oven to 350°F (175°C).
- In a medium bowl, combine the chocolate cookie crumbs, melted butter, and salt. Mix until the crumbs are evenly coated.
- Press the mixture firmly into the bottom of a 9-inch springform pan. Use the bottom of a glass or measuring cup to ensure an even layer.
- Bake the crust for 10 minutes. Remove from the oven and let it cool while you prepare the filling.
- Make the Cheesecake Filling:
- Reduce the oven temperature to 325°F (163°C).
- In a large mixing bowl, beat the softened cream cheese until smooth and creamy.
- Add the granulated sugar and vanilla extract, and continue beating until well combined.
- Add the eggs one at a time, mixing on low speed after each addition until just incorporated.
- Mix in the sour cream and heavy cream until the batter is smooth.
- Bake the Cheesecake:
- Pour the cheesecake batter over the cooled crust in the springform pan.
- Place the springform pan into a larger roasting pan. Carefully pour boiling water into the roasting pan until it reaches halfway up the sides of the springform pan, creating a water bath.
- Bake for 1 hour and 40–45 minutes, or until the center is just set and the top is lightly golden.
- Turn off the oven and crack the door open slightly. Let the cheesecake cool in the oven for 1 hour.
- Remove the cheesecake from the water bath and refrigerate for at least 8 hours or overnight.
- Prepare the Samoa Topping:
- In a dry skillet over medium heat, toast the shredded coconut, stirring frequently, until golden brown and fragrant. This should take about 4–6 minutes. Be careful not to burn it.
- Allow the toasted coconut to cool slightly, then mix it with the salted caramel sauce in a bowl until well combined.
- Assemble the Cheesecake:
- Once the cheesecake has chilled, spread the coconut-caramel mixture evenly over the top.
- Drizzle chocolate and caramel dessert sauces over the topping in a decorative pattern.
- Pipe whipped topping around the edges and garnish with Samoa or Coconut Dream cookies.
Serving and Storage Tips
- Serving: For clean slices, dip a sharp knife in hot water and wipe it dry between cuts. Serve chilled for the best texture and flavor.
- Storage: Store the cheesecake covered in the refrigerator for up to 4 days.
- Freezing: You can freeze the cheesecake without the topping. Wrap it tightly in plastic wrap and aluminum foil, and freeze for up to 2 months. Thaw in the refrigerator overnight and add the topping before serving.
Helpful Notes
- Ingredient Substitutions:
- If you don't have chocolate sandwich cookies, use chocolate graham crackers with a bit more butter.
- Greek yogurt can be used instead of sour cream in a pinch.
- Allergy-Friendly Adjustments:
- Use gluten-free cookies for the crust.
- Substitute dairy-free cream cheese, sour cream, and whipped topping for a lactose-free version.
- Optional Add-ins:
- Add a layer of mini chocolate chips or chopped Samoa cookies between the crust and filling for extra texture.
Frequently Asked Questions
- Can I freeze this cheesecake?
Yes! Freeze it without the topping, wrapped well. Thaw in the fridge and add toppings before serving. - What if I don’t have a springform pan?
You can use a deep-dish pie pan or cake pan lined with parchment, but unmolding may be trickier. - Can I use homemade caramel sauce?
Absolutely! Homemade caramel works beautifully and lets you control the sweetness and consistency. - How do I prevent cracks in my cheesecake?
Use a water bath, don’t overmix the batter, and let the cheesecake cool slowly in the oven. - What if I don’t like coconut?
You can omit the topping or replace it with a layer of chocolate ganache or chopped nuts.
Final Thoughts
This Samoa Cheesecake is a true labor of love that rewards you with every decadent bite. Rich, creamy, and topped with that irresistible caramel-coconut combination, it's sure to become a favorite in your dessert repertoire. Whether you're baking for a special event or simply treating yourself, this cheesecake delivers all the wow-factor you could hope for.
If you try this recipe, I’d love to hear how it turned out! Leave a comment, share a photo, or tag me on social media so we can all swoon over your gorgeous creation.
Leave a Reply