If you’re a true chocoholic, brace yourself: these Death by Chocolate No-Bake Cheesecake Bars are an indulgent dream come true. With a crunchy chocolate cookie crust, a rich and creamy chocolate cheesecake center, and a silky ganache topping, this dessert is layered with pure chocolate bliss. And the best part? No oven required.

I first made these bars for a game night with friends, and they vanished within minutes. They’re not only delicious but also stunning on a dessert platter. Whether you’re hosting a party or simply need a chocolate fix, this easy, no-bake treat is guaranteed to satisfy.
Why You’ll Love Death by Chocolate Cheesecake Bars
- No-Bake Wonder: Keep your kitchen cool while enjoying a decadent dessert.
- Triple Chocolate Layers: Crust, cheesecake, and ganache.
- Great for Entertaining: Make ahead and chill until ready to serve.
- Rich Yet Light: The whipped cream keeps the filling fluffy.
- Customizable: Add your favorite chocolate toppings.
- Freezer-Friendly: Make now, enjoy later.
Ingredients You’ll Need
For the Chocolate Cookie Crust:
- 24 chocolate sandwich cookies (Oreos or similar) – Finely crushed.
- 5 tablespoons unsalted butter, melted – Binds the crumbs.
For the Chocolate Cheesecake Layer:
- 8 oz (226g) cream cheese, softened – Base for the creamy filling.
- ½ cup powdered sugar – Adds sweetness.
- 1 teaspoon vanilla extract – Enhances the chocolate.
- 1¼ cups semi-sweet chocolate chips, melted and cooled slightly – Rich chocolate flavor.
- 1 cup heavy whipping cream, cold – Whipped and folded in for airy texture.
For the Chocolate Ganache Topping:
- ¾ cup semi-sweet chocolate chips
- ⅓ cup heavy whipping cream – Makes a glossy, rich topping.
Optional Toppings:
- Mini chocolate chips
- Chocolate curls
- Whipped cream
- Crushed Oreos
Step-by-Step Instructions
Step 1: Prepare the Crust
- Line an 8x8 or 9x9-inch square baking pan with parchment paper.
- In a food processor, pulse the cookies until finely crushed.
- Mix with melted butter until the texture resembles wet sand.
- Press firmly into the bottom of the pan to form an even crust.
- Chill in the fridge while you prepare the filling.
Step 2: Make the Cheesecake Layer
- In a large bowl, beat the softened cream cheese until smooth.
- Add powdered sugar and vanilla extract, mixing until fully combined.
- Stir in the melted, slightly cooled chocolate chips.
- In a separate bowl, whip the cold heavy cream until stiff peaks form.
- Gently fold the whipped cream into the chocolate cream cheese mixture until smooth and fluffy.
- Spread the mixture evenly over the chilled crust.
- Return to the fridge for at least 1 hour.
Step 3: Make the Ganache Topping
- Heat the cream in a small saucepan or microwave until just simmering.
- Pour over the chocolate chips in a bowl and let sit for 1 minute.
- Stir until smooth and glossy.
- Let the ganache cool for 10 minutes, then pour over the cheesecake layer.
- Smooth with a spatula and refrigerate for another 1–2 hours, or until fully set.
Step 4: Garnish and Serve
- Before serving, add desired toppings like mini chocolate chips, curls, or whipped cream.
- Slice into bars using a hot knife for clean edges.
- Serve chilled and enjoy every indulgent bite.
Serving and Storage Tips
Serve these bars straight from the fridge for the best texture and flavor. They are perfect for parties, special occasions, or whenever you're craving a chocolate dessert.
Store leftovers in an airtight container in the refrigerator for up to 5 days.
To freeze, wrap individual bars in plastic wrap and store in a freezer-safe container for up to 1 month. Thaw in the fridge before serving.
Helpful Notes
- Crust Tip: Press the crust firmly to prevent crumbling when sliced.
- Whip it Right: Beat cream to stiff peaks for the perfect cheesecake texture.
- Chocolate Quality: Use high-quality chips for the best flavor.
- Serving Tip: Run a knife under hot water and wipe clean between cuts.
- Make Ahead: Prepare a day in advance for easy entertaining.
Frequently Asked Questions
1. Can I use milk or dark chocolate instead of semi-sweet?
Absolutely! Adjust sweetness as needed.
2. What if I don’t have a food processor?
Place cookies in a zip-top bag and crush with a rolling pin.
3. Can I use whipped topping instead of whipping cream?
Yes, about 2 cups of whipped topping can be folded in.
4. How do I know when it’s set?
The layers should feel firm to the touch and hold their shape when sliced.
5. Can I double the recipe?
Yes! Use a 9x13-inch pan for larger batches.
Final Thoughts
These Death by Chocolate No-Bake Cheesecake Bars are the ultimate dessert for chocolate lovers. Easy to make and incredibly rich, they deliver maximum indulgence with minimal effort. Whether you're treating yourself or feeding a crowd, these bars promise to impress.
Make a batch today and prepare for rave reviews. And if you post your chocolate masterpiece online, don’t forget to tag me—I’d love to see your creations!
Print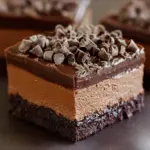
Death by Chocolate No-Bake Cheesecake Bars
- Total Time: 4 hours 25 minutes
- Yield: 12 bars 1x
Ingredients
For the Chocolate Cookie Crust:
- 24 chocolate sandwich cookies (Oreos or similar)
- 5 tablespoons unsalted butter (melted)
For the Chocolate Cheesecake Layer:
- 8 oz 226g cream cheese, softened
- ½ cup powdered sugar
- 1 teaspoon vanilla extract
- 1¼ cups semi-sweet chocolate chips (melted and cooled slightly)
- 1 cup heavy whipping cream (cold)
For the Chocolate Ganache Topping:
- ¾ cup semi-sweet chocolate chips
- ⅓ cup heavy whipping cream
Optional Toppings:
- Mini chocolate chips
- Chocolate curls
- Whipped cream
- Crushed Oreos
Instructions
Step 1: Prepare the Crust
- Line an 8x8 or 9x9-inch square baking pan with parchment paper.
- In a food processor, pulse the cookies until finely crushed.
- Mix with melted butter until the texture resembles wet sand.
- Press firmly into the bottom of the pan to form an even crust.
- Chill in the fridge while you prepare the filling.
Step 2: Make the Cheesecake Layer
- In a large bowl, beat the softened cream cheese until smooth.
- Add powdered sugar and vanilla extract, mixing until fully combined.
- Stir in the melted, slightly cooled chocolate chips.
- In a separate bowl, whip the cold heavy cream until stiff peaks form.
- Gently fold the whipped cream into the chocolate cream cheese mixture until smooth and fluffy.
- Spread the mixture evenly over the chilled crust.
- Return to the fridge for at least 1 hour.
Step 3: Make the Ganache Topping
- Heat the cream in a small saucepan or microwave until just simmering.
- Pour over the chocolate chips in a bowl and let sit for 1 minute.
- Stir until smooth and glossy.
- Let the ganache cool for 10 minutes, then pour over the cheesecake layer.
- Smooth with a spatula and refrigerate for another 1–2 hours, or until fully set.
Step 4: Garnish and Serve
- Before serving, add desired toppings like mini chocolate chips, curls, or whipped cream.
- Slice into bars using a hot knife for clean edges.
- Serve chilled and enjoy every indulgent bite.
Notes
-
Crust Tip: Press the crust firmly to prevent crumbling when sliced.
-
Whip it Right: Beat cream to stiff peaks for the perfect cheesecake texture.
-
Chocolate Quality: Use high-quality chips for the best flavor.
-
Serving Tip: Run a knife under hot water and wipe clean between cuts.
-
Make Ahead: Prepare a day in advance for easy entertaining.
- Prep Time: 25 minutes
Nutrition
- Calories: 430


Leave a Reply