I’ll never forget the first time I made this Green & Red Christmas Jelly. It was years ago, back when my niece was little and absolutely obsessed with anything colorful and jiggly. I wanted to make something festive, but I also didn’t want to spend hours in the kitchen—because, let’s be honest, December is already chaotic enough. That’s how this layered beauty came to be. It’s bright, it’s wobbly, and it’s so easy even my niece could help make it (though let’s just say we had a few extra jelly fingerprints on the bowl). Perfect for the holidays, and even better because there’s no oven required!

Trust me, this dessert is a showstopper. The red and green layers scream Christmas, and the creamy middle gives it that extra something special. Plus, you probably have most of the ingredients in your pantry already. If you’ve got 20 minutes and a little patience for chilling between layers, you’re golden. Let’s make some holiday magic!
Why You’ll Love Green & Red Christmas Jelly
Okay, let me count the ways I adore this dessert—and why you will too:
- It looks like a holiday party in a dish. Those bright red and green layers? Instant festive vibes. No decorations needed—this is the decoration.
- Seriously, it’s foolproof. No baking, no fancy techniques. If you can stir and wait (okay, the waiting is the hard part), you’ve got this.
- Kids lose their minds over it. The jiggle! The colors! I’ve seen grown adults poke it just as much as the little ones.
- Make-ahead magic. Whip it up the day before, and you’ve got one less thing to stress about on the big day.
- Customizable for any holiday. Swap the colors for Halloween (orange and black, anyone?) or go pastel for Easter.
It’s the dessert that’s equal parts fun to make and even more fun to eat. What’s not to love?
Ingredients You’ll Need
First things first—let’s gather everything. I swear, half the battle in cooking is just getting your ingredients lined up before you start. Here’s what you’ll need, broken down by layer so you don’t miss a thing. (And yes, the jelly packets are non-negotiable—this is where the magic happens!)
For the Biscuit Base
- 250g Arnott’s Marie or Nice biscuits, crushed – Don’t skip the crushing! I use a rolling pin, but a food processor works too if you’re fancy. Just don’t turn them into dust—little bits add texture.
- 125g unsalted butter, melted – Salted butter works in a pinch, but unsalted lets you control the flavor. And melted means melted, not softened. Microwave it for 30 seconds if you’re impatient like me.
For the Creamy Middle Layer
- 1 × 395g can sweetened condensed milk – The sticky, glorious stuff. Don’t sub evaporated milk—it’s not the same!
- 1 cup boiling water – Straight from the kettle, please. No lukewarm compromises.
- ½ cup lemon juice – Fresh or bottled, I won’t judge. It cuts the sweetness perfectly.
- 3 teaspoon gelatine – This is your glue. If you’re using sheets, check the packet for equivalent amounts.
- ¼ cup cold water – For blooming the gelatine. Tap water is fine—no need for ice cubes.
For the Jelly Layers
- 1 packet (85g) red jelly crystals – Raspberry or strawberry, your pick. The brighter, the better!
- 1 packet (85g) green jelly crystals – Lime is classic, but apple or kiwi could be fun too.
- 2 cups boiling water (1 cup per jelly packet) – Yes, you’ll split it. Patience, grasshopper.
- 2 cups cold water (1 cup per jelly packet) – Same deal. Keep ‘em separate!
See? Nothing crazy. Now, let's get layering!
Step-by-Step Instructions
Alright, let’s dive in! This is where the fun really starts. Just follow these steps, and you’ll have a wobbly, festive masterpiece in no time. Don’t rush the chilling—trust me, it’s worth the wait.
Preparing the Biscuit Base
- Crush those biscuits. Toss them in a zip-top bag and go at them with a rolling pin (great for stress relief) or pulse them in a food processor until you’ve got fine crumbs with a little texture. No big chunks!
- Mix with melted butter. Dump the crumbs into a bowl, pour in the butter, and stir until it looks like wet sand. If it’s too dry, add another tablespoon of melted butter. Too wet? A sprinkle more crumbs.
- Press it down. Grab a 20cm square dish (clear glass is best for showing off those layers!) and firmly press the mixture into the bottom. Use the back of a spoon to really compact it—this is your foundation, so make it sturdy. Pop it in the fridge while you work on the next layer.
Making the Creamy Layer
- Bloom the gelatine. Sprinkle the gelatine over the ¼ cup cold water in a small bowl. Let it sit for 5 minutes—it’ll turn into a weird, spongy blob. That’s good! That means it’s working.
- Dissolve the gelatine. Pour the 1 cup boiling water over the gelatine mixture and whisk until it’s completely dissolved. No lumps allowed! If you’re paranoid (like me), strain it through a fine sieve to be safe.
- Combine everything. In a separate bowl, whisk together the condensed milk and lemon juice. Slowly pour in the gelatine mixture while whisking. It’ll thin out—don’t panic, that’s normal.
- Pour over the base. Pull the biscuit base out of the fridge and pour the creamy mixture over the top. Gently tilt the dish to spread it evenly. Back in the fridge it goes! Let it chill for at least 1 hour, or until it’s set but still slightly jiggly in the center.
Adding the Jelly Layers
- Start with the red jelly. Empty one packet of red jelly crystals into a heatproof jug. Add 1 cup boiling water and stir until fully dissolved—about 2 minutes. Stir in 1 cup cold water. Let it cool on the counter for 15–20 minutes. If you pour it while too hot, it’ll melt the creamy layer, and we don’t want that!
- First jelly layer. Once the red jelly is lukewarm (test a drop on your wrist—no heat!), gently pour it over the set creamy layer. Tilt the dish to spread it evenly. Chill for 1–1.5 hours, or until completely firm. No shortcuts here!
- Repeat with green jelly. Same drill: dissolve the green jelly packet with 1 cup boiling water, stir in 1 cup cold water, and let it cool. Pour over the red layer once it’s set, then chill the whole thing for at least 2 hours, or overnight if you’re planning ahead.
And there you have it! A tri-layered holiday wonder. Now, the hardest part: waiting until it’s fully set before slicing. (But if you sneak a spoonful from the corner, I won’t tell.)
Variations
Okay, so the classic red and green combo is a Christmas staple, but don’t let that stop you from getting creative! Here’s how to mix things up for different themes, diets, or just because you’re feeling extra:
- Winter Wonderland: Swap the red and green for blue and white jelly—think icy peppermint and vanilla flavors. Bonus points if you sprinkle edible glitter between the layers for a frosty effect.
- Gluten-Free: Use gluten-free biscuits (I love Schär’s digestives) for the base, and double-check your jelly packets to make sure they’re GF too. Same deliciousness, no tummy troubles.
- Tropical Twist: Replace the lemon juice with passionfruit pulp and use mango (yellow) and kiwi (green) jelly for a summery vibe. Perfect for a Southern Hemisphere Christmas!
- Boozy Adult Version: Add a tablespoon of vodka or raspberry liqueur to the red jelly mix—just reduce the cold water by the same amount so it still sets properly. (Keep this one away from the kids!)
- Nutty Crunch: Stir ½ cup finely chopped toasted almonds or hazelnuts into the biscuit base for extra texture. Trust me, it’s a game-changer.
The beauty of this dessert? It’s basically a blank canvas. Go wild with colors, flavors, or even shapes—use a holiday-themed mold instead of a dish for individual portions. Just remember: patience between layers is key, no matter how you customize it!
Serving and Storage Tips
Alright, you've waited patiently (or maybe not so patiently) for those layers to set—now let's talk about showing off your masterpiece and keeping it fresh!
- Presentation is everything. That clear glass dish wasn't just a suggestion—it lets everyone admire those perfect layers before they even take a bite. If you used a fancy mold, even better!
- Slice it like a pro. Dip a sharp knife in hot water and wipe it dry between cuts for clean edges. No jagged jelly tears here!
- Serve chilled. This dessert holds its shape best straight from the fridge. If it's sitting out at a party for more than 30 minutes, pop it back in the fridge between servings.
- Storage smarts: Cover tightly with plastic wrap or transfer slices to an airtight container. It'll keep beautifully in the fridge for up to 3 days—though let's be real, it'll probably disappear faster than that.
- Freezing? Not ideal. The jelly layers get weepy when thawed. Stick to fridge storage for best texture.
- Garnish game: Right before serving, top with whipped cream rosettes and a sprinkle of crushed candy canes for extra holiday flair. Or keep it simple with fresh mint leaves.
Pro tip: If you're transporting this to a party, set the dish on a folded kitchen towel in your cooler bag to prevent sliding. Nothing worse than showing up with a Christmas jelly landslide!
Helpful Notes
Okay, before you dash off to make this holiday showstopper, here are all my little tips and tricks to ensure jelly perfection. I've made every mistake possible so you don't have to!
- Jelly flavors are flexible. As long as you keep the red and green colors, feel free to mix up the flavors. Cherry instead of raspberry? Go for it. Just avoid pineapple or kiwi flavors in the creamy layer—they can prevent the gelatine from setting properly.
- The cooling step is crucial. If your jelly layers aren't setting properly, you probably poured them while too warm. Wait until they're lukewarm (about body temperature when you test a drop on your wrist).
- Use full-fat condensed milk. The light version makes the creamy layer weep. Save the dieting for January!
- Speed up chilling? Pop the dish in the freezer for 15-20 minutes between layers if you're short on time—just don't forget about it!
- Nutrition note: This is holiday decadence, folks. Each serving has about 320 calories, with the sweetness coming from the condensed milk and jelly. You could use sugar-free jelly crystals if needed, but the texture might be slightly different.
- No gelatine? Vegetarian friends can use agar-agar powder instead—use about 1 ½ teaspoon dissolved in the boiling water, and let it cool slightly before mixing with the other ingredients.
Remember, the first time might not be perfect—my early attempts looked more like abstract art than neat layers! But even the "messy" versions taste incredible. The key is to have fun with it!
Frequently Asked Questions
I've gotten so many questions about this dessert over the years—here are the ones that pop up most often, along with my tried-and-true answers!
- Can I make this ahead of time?
Absolutely! In fact, I recommend it. This dessert needs at least 4 hours to set properly, but overnight is even better. Just cover it tightly with plastic wrap once all the layers are set. - Why did my jelly layers mix together?
You probably poured the jelly while it was still too warm, or didn't let the previous layer set completely. Patience is key—wait until each layer is firm to the touch before adding the next one. - Can I use sugar-free jelly crystals?
You can, but the texture might be slightly softer. The sugar in regular jelly helps it set firmer. If you do use sugar-free, maybe add an extra ½ teaspoon of gelatine to the jelly mixture just to be safe.
Still stuck? Don't worry—even my "failures" still tasted amazing. That's the beauty of this wobbly wonder!
Final Thoughts
There you have it—your ticket to the easiest, most festive dessert on the holiday table! This Green & Red Christmas Jelly is all about bringing joy with minimal fuss. Whether you're hosting a crowd or just want something fun to make with the kids, it never fails to impress. So grab those jelly packets and get layering—your future self (and your guests) will thank you. Happy holidays, and happy jiggling!
Print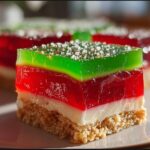
Festive Green & Red Christmas Jelly
- Total Time: 4 hours 20 minutes (including chilling)
- Yield: 8 servings 1x
- Diet: Vegetarian
Description
A festive Christmas jelly dessert with layers of biscuit base, creamy middle, and red and green jelly.
Ingredients
- 250 g Arnott's Marie or Nice biscuits, crushed
- 125 g unsalted butter, melted
- 1 × 395 g can sweetened condensed milk
- 1 cup boiling water
- ½ cup lemon juice
- 3 tsp gelatine
- ¼ cup cold water
- 1 packet (85 g) red jelly crystals (raspberry or strawberry flavour)
- 1 packet (85 g) green jelly crystals (lime flavour)
- 2 cups boiling water (1 cup per jelly packet)
- 2 cups cold water (1 cup per jelly packet)
Instructions
- Crush the biscuits and mix with melted butter. Press into a dish to form the base.
- Dissolve gelatine in cold water, then add boiling water, condensed milk, and lemon juice. Pour over the biscuit base.
- Refrigerate until the creamy layer sets.
- Prepare red jelly with 1 cup boiling water and 1 cup cold water. Let it cool slightly, then pour over the creamy layer.
- Refrigerate until the red jelly sets.
- Prepare green jelly with 1 cup boiling water and 1 cup cold water. Let it cool slightly, then pour over the red jelly layer.
- Refrigerate until fully set before serving.
Notes
- Use a clear dish for a festive look.
- Chill each layer completely before adding the next.
- Adjust jelly flavours as desired.
- Prep Time: 20 minutes
- Cook Time: 0 minutes
- Category: Dessert
- Method: No-Bake
- Cuisine: International
Nutrition
- Serving Size: 1 slice
- Calories: 320
- Sugar: 25 g
- Sodium: 150 mg
- Fat: 12 g
- Saturated Fat: 7 g
- Unsaturated Fat: 4 g
- Trans Fat: 0 g
- Carbohydrates: 45 g
- Fiber: 1 g
- Protein: 5 g
- Cholesterol: 30 mg
Keywords: Christmas jelly, festive dessert, no-bake dessert
Leave a Reply