There’s nothing quite like the warm, cozy flavor of maple in a homemade cookie. These Maple Cookies with Maple Icing are the perfect treat for fall, but honestly, they’re delicious any time of year. With their soft, buttery texture and rich maple flavor, these cookies taste like a comforting hug in every bite. The maple icing adds a glossy, sweet finish that melts in your mouth and elevates them to bakery-level deliciousness.

I first baked these cookies for a holiday cookie exchange, and they were an instant hit. Since then, they’ve become a staple in our cookie jar. Whether you're serving them with coffee, tucking them into lunchboxes, or gifting them to a friend, these cookies bring a little extra joy wherever they go.
Why You’ll Love Maple Cookies with Maple Icing
- Full of Maple Flavor: Real maple syrup in both the cookie and the icing.
- Soft and Chewy: Perfect texture that stays tender.
- Simple Ingredients: Pantry staples with a gourmet taste.
- Perfect for Gifting: Elegant yet easy to make in big batches.
- Great for Fall: Warm, cozy flavors ideal for autumn (and beyond).
- Optional Garnish: Chopped pecans add a lovely crunch and visual appeal.
Ingredients You’ll Need
For the Cookies:
- ½ cup butter, softened – Adds richness and helps create a soft texture.
- 1 cup brown sugar – For deep, caramel-like sweetness.
- ¼ cup maple syrup – Use pure maple syrup for best flavor.
- 1 large egg – Binds the dough and adds moisture.
- 1 teaspoon vanilla extract – Enhances the maple and sugar flavors.
- 2½ cups all-purpose flour – Gives the cookies structure.
- 1 teaspoon baking soda – Helps the cookies rise.
- ¼ teaspoon ground cinnamon – Adds a subtle warm spice.
For the Maple Icing:
- 1½ cups powdered sugar – The base for a smooth glaze.
- 3 tablespoons maple syrup – Adds sweetness and maple flavor.
- 1–2 tablespoons milk – Adjust for desired consistency.
Optional Garnish:
- Roasted chopped pecans – Adds texture and nutty richness.
Step-by-Step Instructions
Step 1: Make the Cookie Dough
- In a large mixing bowl, cream the butter and brown sugar until light and fluffy.
- Add the maple syrup, egg, and vanilla extract. Mix until well combined.
- In a separate bowl, whisk together the flour, baking soda, and cinnamon.
- Gradually add the dry ingredients to the wet mixture, mixing just until a dough forms.
- Cover and chill the dough for at least 30 minutes for easier handling.
Step 2: Bake the Cookies
- Preheat the oven to 350°F (175°C). Line a baking sheet with parchment paper.
- Scoop dough by the tablespoon and roll into balls. Place 2 inches apart on the baking sheet.
- Flatten each slightly with the bottom of a glass or your hand.
- Bake for 8–10 minutes, or until the edges are just golden.
- Let cool on the sheet for 5 minutes before transferring to a wire rack.
Step 3: Make the Maple Icing
- In a small bowl, whisk together the powdered sugar and maple syrup.
- Add milk a little at a time until the icing is smooth and pourable but thick enough to hold its shape.
Step 4: Ice and Garnish
- Once the cookies are completely cool, spoon or drizzle the icing over each one.
- If using, sprinkle with chopped pecans before the icing sets.
- Let the icing dry completely before stacking or storing.
Serving and Storage Tips
Serve these cookies at room temperature with a mug of coffee or tea for a cozy treat. They're perfect on a dessert platter or wrapped in cellophane bags for gifts.
Store in an airtight container at room temperature for up to 5 days. If stacking, place parchment paper between layers to prevent sticking. You can also freeze the cookies (unfrosted) for up to 2 months.
Let cookies come to room temperature before icing if previously frozen.
Helpful Notes
- Chill Time: Don't skip chilling the dough—it prevents spreading and enhances flavor.
- Use Real Maple Syrup: Imitation syrup won’t deliver the same flavor.
- Flavor Boost: Add a pinch of nutmeg or a splash of maple extract for extra depth.
- Kid-Friendly: Let little hands help with drizzling icing and adding pecans.
- Double the Batch: These freeze well, so make extras to have on hand.
Frequently Asked Questions
1. Can I use maple extract instead of maple syrup?
Maple syrup is best for both flavor and moisture, but you can add a drop of extract to intensify the taste.
2. Can I make these gluten-free?
Yes! Use a 1:1 gluten-free flour blend. The texture may vary slightly.
3. What kind of maple syrup should I use?
Pure maple syrup, preferably Grade A dark amber for bold flavor.
4. Can I skip the icing?
Absolutely. The cookies are delicious on their own or with a dusting of powdered sugar.
5. How do I make the icing set faster?
Place the cookies in the fridge for 15 minutes after icing.
Final Thoughts
These Maple Cookies with Maple Icing are the ultimate fall treat, though they're delightful year-round. They're easy to make, deeply flavorful, and perfect for sharing. Whether you enjoy them plain, drizzled with icing, or garnished with pecans, they’ll quickly become a favorite.
Bake a batch today and bring a little maple magic into your kitchen. Don’t forget to share your cookie creations and tag me—I’d love to see your sweet success!
Print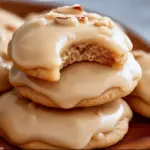
Maple Cookies With Maple Icing
- Total Time: 27 minutes
- Yield: 24 cookies 1x
Ingredients
For the Cookies:
- ½ cup butter (softened)
- 1 cup brown sugar
- ¼ cup maple syrup
- 1 large egg
- 1 teaspoon vanilla extract
- 2½ cups all-purpose flour
- 1 teaspoon baking soda
- ¼ teaspoon ground cinnamon
For the Maple Icing:
- 1½ cups powdered sugar
- 3 tablespoons maple syrup
- 1 –2 tablespoons milk (as needed for consistency)
Optional Garnish:
- Roasted chopped pecans
Instructions
Step 1: Make the Cookie Dough
- In a large mixing bowl, cream the butter and brown sugar until light and fluffy.
- Add the maple syrup, egg, and vanilla extract. Mix until well combined.
- In a separate bowl, whisk together the flour, baking soda, and cinnamon.
- Gradually add the dry ingredients to the wet mixture, mixing just until a dough forms.
- Cover and chill the dough for at least 30 minutes for easier handling.
Step 2: Bake the Cookies
- Preheat the oven to 350°F (175°C). Line a baking sheet with parchment paper.
- Scoop dough by the tablespoon and roll into balls. Place 2 inches apart on the baking sheet.
- Flatten each slightly with the bottom of a glass or your hand.
- Bake for 8–10 minutes, or until the edges are just golden.
- Let cool on the sheet for 5 minutes before transferring to a wire rack.
Step 3: Make the Maple Icing
- In a small bowl, whisk together the powdered sugar and maple syrup.
- Add milk a little at a time until the icing is smooth and pourable but thick enough to hold its shape.
Step 4: Ice and Garnish
- Once the cookies are completely cool, spoon or drizzle the icing over each one.
- If using, sprinkle with chopped pecans before the icing sets.
- Let the icing dry completely before stacking or storing.
Notes
-
Chill Time: Don't skip chilling the dough—it prevents spreading and enhances flavor.
-
Use Real Maple Syrup: Imitation syrup won’t deliver the same flavor.
-
Flavor Boost: Add a pinch of nutmeg or a splash of maple extract for extra depth.
-
Kid-Friendly: Let little hands help with drizzling icing and adding pecans.
-
Double the Batch: These freeze well, so make extras to have on hand.
- Prep Time: 15 minutes
Nutrition
- Calories: 210


Leave a Reply