Oh, do I have a treat for you—vanilla pecan pralines! These little bites of heaven take me straight back to my grandma’s kitchen, where the smell of caramelized sugar and toasted pecans filled the air every holiday season. I still remember sneaking a warm praline off the cooling rack when she wasn’t looking (sorry, Grandma!), and that first buttery, nutty bite was pure magic.

Now, I make these pralines for every special occasion—or honestly, just because I’m craving something sweet and nostalgic. They’re incredibly easy to whip up, with just a handful of ingredients, and they always disappear fast. Whether you’re gifting them, serving them at a party, or keeping them all to yourself (no judgment here), vanilla pecan pralines are the perfect little indulgence. Trust me, once you try them, you’ll be hooked.
Why You’ll Love Vanilla Pecan Pralines
Okay, let me count the ways these little gems will steal your heart (and probably your willpower). First off, they’re the kind of dessert that makes you look like a kitchen wizard with minimal effort—seriously, if you can stir a pot, you’ve got this. But beyond being easy, here’s what makes them downright addictive:
- Quick and Simple Preparation: No fancy equipment, no marathon baking sessions. One saucepan, a few pantry staples, and about 25 minutes stand between you and praline bliss. Even if you’re a “I-burn-toast” kind of cook, this recipe is forgiving. Just keep stirring that sugar like it’s your job, and you’re golden—literally.
- Irresistible Flavor Combination: Imagine sweet vanilla chocolate melting into buttery pecans, with that marshmallow creme adding a hint of cloud-like fluff. It’s like a hug for your taste buds—warm, cozy, and impossible to resist. The balance is just *chef’s kiss*: not too sugary, not too nutty, just perfect.
- Perfect for Any Occasion: Holiday cookie plate? Done. Last-minute hostess gift? Wrap them in a cute box and boom—instant hero. Midnight snack? No one’s judging. These pralines are like the little black dress of desserts: effortlessly versatile and always a hit.
Oh, and pro tip: double the batch. Trust me, you’ll want extras for “quality testing” before sharing. Not that I’ve ever eaten three in a row while “packaging them nicely” or anything…
Ingredients You’ll Need for Vanilla Pecan Pralines
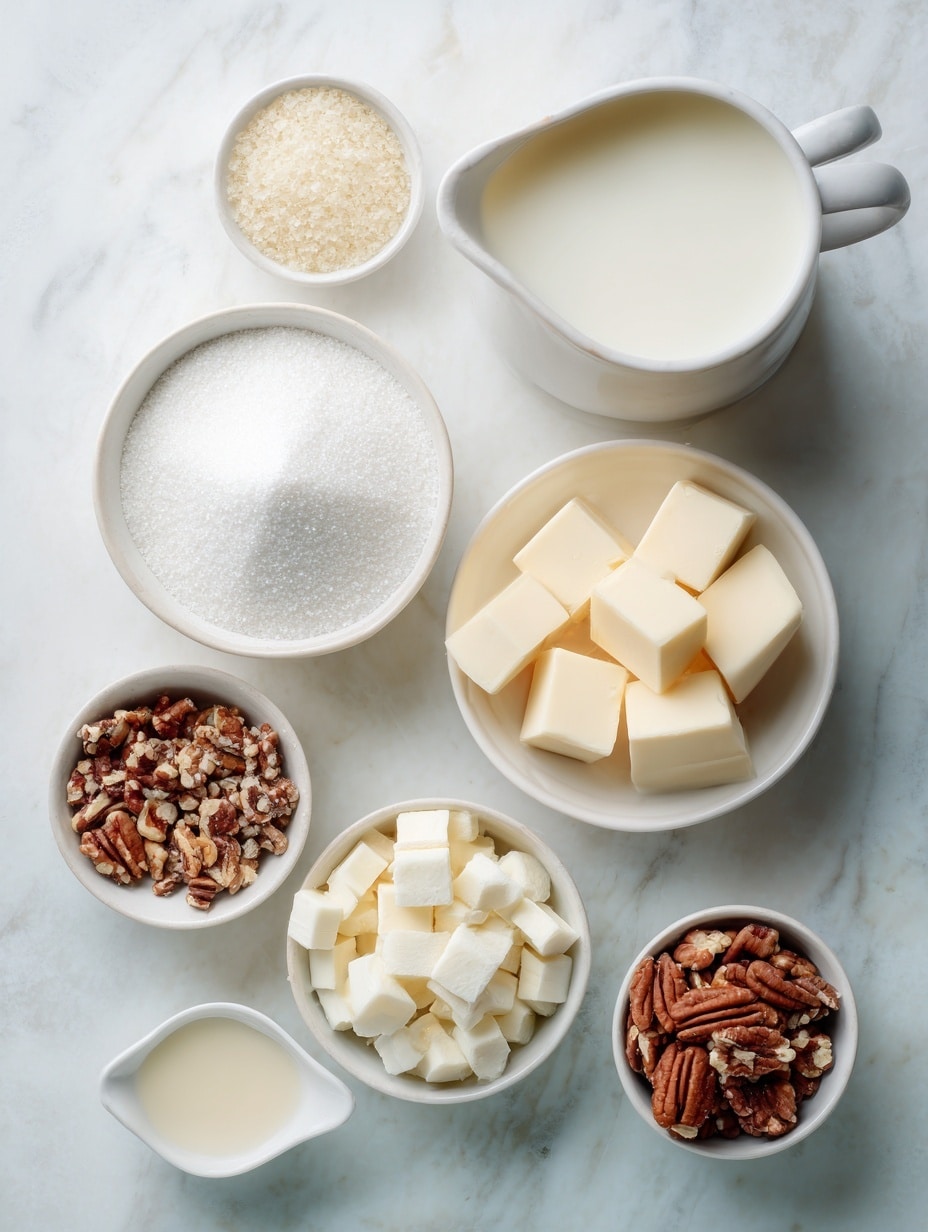
Alright, let’s gather our goodies! This recipe is all about simple ingredients doing big, delicious things. Here’s what you’ll need—and a few little tips to make sure your pralines turn out *just* right:
Sugar and Dairy
- 2.5 cups granulated sugar – Plain old white sugar is perfect here. No need for fancy substitutes—this is where that classic praline sweetness comes from.
- 7 oz evaporated milk – Not sweetened condensed! Evaporated milk gives richness without making things too cloying. I usually grab the small can off the shelf—no measuring needed.
- ¼ cup butter, cubed – Unsalted is best since we’re controlling the flavor. Cube it cold so it melts evenly into the syrup. Pro tip: If you only have salted butter, just skip adding any extra salt later.
Flavor Enhancers
- 11 oz vanilla chocolate chips – These are the secret weapon! They melt into the pralines for a creamy vanilla-chocolate vibe. If your store doesn’t carry them, white chocolate chips + ½ teaspoon extra vanilla extract work too.
- 1 teaspoon vanilla extract – Splurge on the good stuff here—it makes a difference. The real deal adds depth to that vanilla flavor.
- 4 oz marshmallow creme – This keeps the texture dreamy. Look for the jar near the baking supplies. No need to measure—just scoop out half of a standard 7 oz jar.
Nutty Crunch
- 2 cups chopped pecans – Freshness is key! Stale pecans taste flat. I like to chop mine roughly—some big pieces for crunch, some small for even distribution. Toast them lightly first if you’re feeling fancy (350°F for 5 minutes), but it’s not mandatory.
That’s it! See? Nothing weird or hard-to-find. Now let’s turn these into magic…
Step-by-Step Vanilla Pecan Pralines Instructions
Okay, let’s get cooking! Don’t let the candy-making part scare you—this is easier than it sounds. Just follow these steps, and you’ll have pralines that’ll make your kitchen smell like a Southern bakery. Promise.
Preparing the Syrup Base
- Combine sugar, evaporated milk, and butter in a medium saucepan (a heavy-bottomed one works best to prevent scorching). Turn the heat to medium and start stirring—like, really stirring. You’re gonna feel like your arm might fall off, but trust me, it’s worth it. Keep going until the sugar dissolves completely (about 5 minutes). No gritty bits left!
- Bring it to a boil—now here’s where you gotta watch closely. Once it starts bubbling, set a timer for exactly 3 minutes. Keep stirring occasionally to prevent sticking. The mixture will thicken slightly and turn a pale golden color. Careful—it’s hot! (I may or may not have learned this the hard way with a rogue sugar splatter.)
Incorporating the Flavors
- Remove the pan from heat and immediately stir in the vanilla chocolate chips. They’ll melt like a dream—just keep stirring until everything’s smooth and glossy. Then add the vanilla extract, pecans, and marshmallow creme. Stir fast! The marshmallow creme might resist at first, but it’ll give in after about 30 seconds of persuasion. You’re aiming for a thick, gooey mixture where everything’s evenly mixed.
Shaping and Cooling
- Drop spoonfuls onto wax paper—I use a regular tablespoon, but a small cookie scoop works great if you’ve got one. Work quickly here; the mixture sets fast! If it starts hardening in the pan, just pop it back on low heat for 10 seconds to loosen it up. Don’t stress about perfect shapes—rustic pralines have charm!
- Let them cool completely, about 20 minutes. They’ll firm up as they sit. Try not to sneak one early (okay, maybe just one). The waiting is the hardest part, but that first bite of a fully set praline? Pure heaven.
And that’s it! See? No candy thermometer, no fancy techniques—just stirring, patience, and a whole lot of deliciousness. Now, let’s talk about how to make these your own…
Vanilla Pecan Pralines Variations
One of the best things about pralines? They're like a blank canvas for flavor experiments. Once you've mastered the classic version, try these fun twists to shake things up. I’ve tested them all, and let me tell you—they’re dangerous in the best way.
Dark Chocolate Twist
If you’re a dark chocolate fan (hello, fellow bittersweet lovers!), swap the vanilla chips for an equal amount of dark chocolate chips. The deep cocoa flavor pairs *amazingly* with the caramelized sugar and pecans—it’s like a sophisticated cousin of the original. I like using 60-70% cacao for balance, but go darker if you dare. Just don’t blame me when you eat the whole batch in one sitting.
Spiced Version
For a cozy, holiday-ready twist, add ½ teaspoon of cinnamon and a pinch of nutmeg to the sugar mixture when you first start cooking it. The warmth of the spices plays so nicely with the vanilla and nuts. Bonus: your kitchen will smell like Christmas morning. If you're feeling extra, a tiny dash of cayenne pepper adds a sneaky little kick—trust me, it works!
Other ideas? Toast your pecans with a sprinkle of sea salt before stirring them in, or swap half the pecans for shredded coconut for a tropical vibe. The point is, don’t be afraid to play around. Pralines are forgiving—as long as you’ve got that sweet, nutty base, you really can’t go wrong.
Serving and Storage Tips for Vanilla Pecan Pralines
Okay, you’ve made these little beauties—now let’s talk about how to show them off (and keep them fresh for as long as possible, which, let’s be real, won’t be long). Here’s how to serve and store them like a pro.
Serving Suggestions
These pralines are stars all on their own, but if you want to level up your presentation, try serving them with a strong cup of coffee or black tea. The bitterness balances the sweetness perfectly—it’s my favorite afternoon pick-me-up. For dessert, crumble one over vanilla ice cream (yes, it’s extra, but oh-so-worth it) or use them as a fancy topping for a cheesecake. And if you’re feeling fancy at a party, stack them on a pretty plate with some fresh pecans scattered around. Instant elegance!
Storage Guidelines
Pralines are happiest in an airtight container at room temperature. Layer them between sheets of wax paper so they don’t stick together, and they’ll stay fresh for up to 2 weeks (if they last that long!). Avoid the fridge—it can make them weepy and sticky. If you *must* stash some away, freeze them in a single layer first, then transfer to a freezer bag. They’ll keep for 3 months, but honestly? They’re best eaten within a few days, when the texture is still dreamy. Just saying.
Helpful Notes for Perfect Vanilla Pecan Pralines
Before you dive into praline-making heaven, here are a few insider tips I’ve learned—sometimes the hard way—to make sure your batch turns out flawless every time. Because honestly, life’s too short for grainy pralines or sad, stale nuts.
Avoiding Grainy Texture
Nothing ruins a praline faster than that unpleasant gritty sugar texture. The key? Stir like your dessert depends on it (because it does). When you’re melting the sugar with the milk and butter, don’t stop stirring until every single crystal is dissolved—I usually count to 100 stirs just to be sure. And if you see sugar clinging to the sides of the pan, use a wet pastry brush to wash it down. Also, resist the urge to crank up the heat to speed things up; medium heat is your friend here. Slow and steady makes for silky-smooth pralines.
Freshness Matters
Pecans can go rancid fast, and stale nuts will make your pralines taste… off. Give yours a quick sniff before using—they should smell sweet and buttery, not at all bitter. If you’re not sure, toast a small handful in a dry skillet first. Fresh pecans will smell heavenly; stale ones will taste like regret. Also, chop them right before mixing to keep their oils from oxidizing. (Yes, I’m weirdly passionate about pecans. You’ll thank me later.)
One last thing: if your pralines are too soft after cooling, you probably didn’t boil the syrup long enough. Next time, give it an extra 30 seconds. Too hard? Pull them off the heat 30 seconds earlier. Candy-making is part science, part art—but with these tips, you’ll nail it.
Frequently Asked Questions About Vanilla Pecan Pralines
Got questions? I’ve got answers! Here are some of the most common things people ask me about making these pralines. Whether you’re a first-timer or a seasoned pro, these tips will help you nail it every time.
Can I Use Regular Chocolate Chips?
Absolutely, but keep in mind that regular chocolate chips (like semi-sweet or milk chocolate) will change the flavor profile. Vanilla chocolate chips give these pralines their signature creamy, vanilla-forward taste, so swapping them out will make them more chocolatey. If you’re okay with that, go for it! Just note that the texture might be slightly different since vanilla chips are a bit softer when melted. Pro tip: If you do use regular chocolate chips, add an extra ½ teaspoon of vanilla extract to keep that vanilla vibe alive.
How Long Do They Last?
Stored properly in an airtight container at room temperature, these pralines will stay fresh for up to 2 weeks. Layer them between sheets of wax paper to prevent sticking. If you want to keep them longer, you can freeze them—just place them in a single layer on a baking sheet to freeze first, then transfer to a freezer bag. They’ll last in the freezer for about 3 months. But let’s be real, they’ll probably disappear long before then. I’ve never managed to keep a batch around for more than a few days!
Other burning questions? Let me know—I’m always here to help you make the best pralines ever!
Final Thoughts on Vanilla Pecan Pralines
There you have it—my not-so-secret recipe for the most irresistible vanilla pecan pralines! Whether you're making them for a special occasion or just because (no reason needed, really), these little bites of joy are guaranteed to bring smiles. I swear, nothing beats the moment when someone takes their first bite and their eyes light up—that’s when you know you’ve nailed it.
Don’t let the candy-making part intimidate you. Sure, there’s a little stirring involved, but it’s totally worth it. And hey, even if your first batch isn’t picture-perfect (mine sure weren’t!), they’ll still taste amazing. Cooking is all about the adventure, right? So grab that saucepan, rally your sweet tooth, and get ready to fall in love with these pralines. Trust me, your future self—and anyone lucky enough to snag one—will thank you. Happy cooking, and even happier snacking!
Print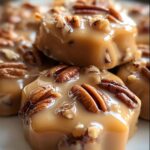
Delicious Vanilla Pecan Pralines Recipe
- Total Time: 25 minutes
- Yield: 24 pralines 1x
- Diet: Vegetarian
Description
A sweet and nutty dessert featuring vanilla chocolate chips and pecans.
Ingredients
- 2.5 cups granulated sugar
- 7 oz evaporated milk
- 0.25 cup butter (cubed)
- 11 oz vanilla chocolate chips
- 1 teaspoon vanilla extract
- 2 cups chopped pecans
- 4 oz marshmallow creme
Instructions
- Combine sugar, evaporated milk, and butter in a saucepan.
- Cook over medium heat, stirring constantly until sugar dissolves.
- Bring to a boil and cook for 3 minutes.
- Remove from heat and stir in vanilla chocolate chips, vanilla extract, pecans, and marshmallow creme.
- Drop by spoonfuls onto wax paper and let cool.
Notes
- Store in an airtight container.
- Use fresh pecans for best flavor.
- Prep Time: 10 minutes
- Cook Time: 15 minutes
- Category: Dessert
- Method: Stovetop
- Cuisine: American
Nutrition
- Serving Size: 1 praline
- Calories: 180
- Sugar: 20g
- Sodium: 25mg
- Fat: 9g
- Saturated Fat: 3g
- Unsaturated Fat: 5g
- Trans Fat: 0g
- Carbohydrates: 25g
- Fiber: 1g
- Protein: 2g
- Cholesterol: 10mg
Keywords: vanilla pecan pralines, dessert, candy


Leave a Reply