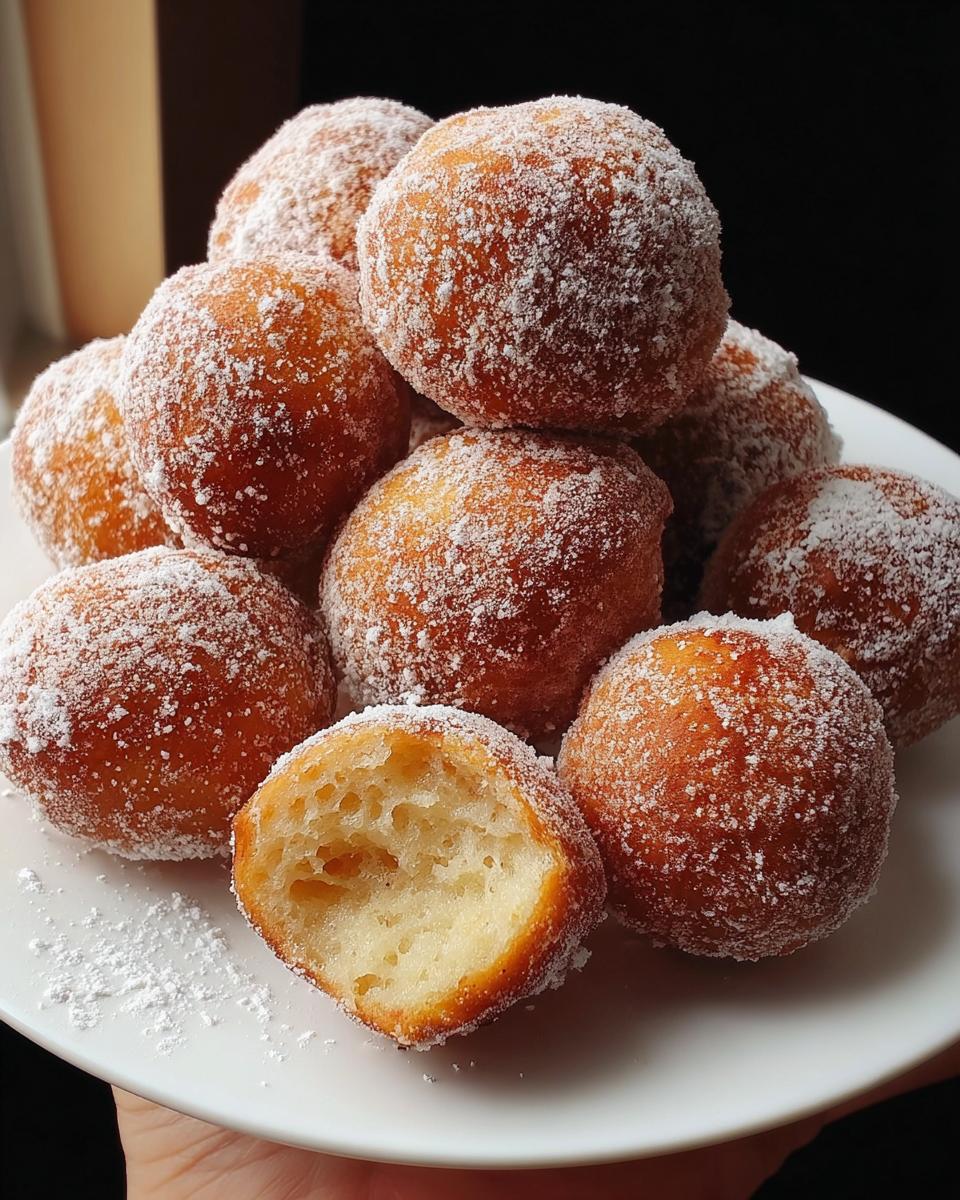
I still remember the first time I made milky donut balls—my kitchen smelled like a cozy bakery, and I couldn't resist sneaking one (or three) straight from the frying pan. There's something magical about biting into those warm, pillowy balls dusted with sugar and cocoa powder. They're like little bites of happiness, perfect for when you need a quick pick-me-up or want to surprise the kids with a homemade treat.
What I love most is how easy they are to whip up. No fancy equipment, no waiting around for hours—just simple ingredients you probably already have. The milk powder gives them that extra creamy sweetness, and the dough puffs up so beautifully when fried. Trust me, once you try these, you'll be making them on repeat. They're the kind of dessert that disappears fast—especially if you've got a crowd of hungry little hands (or just a serious sweet tooth, like me).
Why You’ll Love Milky Donut Balls
Okay, let me gush for a sec—these little guys are seriously addictive. I’ve made them so many times, and here’s why they’ve become my go-to sweet treat (and probably will be yours too):
Perfectly Fluffy and Milky
That first bite? Pure magic. The milk powder makes them extra tender, almost melt-in-your-mouth soft, with this cozy, creamy sweetness that’s just *chef’s kiss*. And when you dust them with sugar and cocoa? Instant nostalgia—like a hug from your childhood.
Quick and Easy to Make
No fancy mixer, no overnight waits. Just mix, knead, let the dough rise (mine usually gets impatient and does a quick 45-minute power nap), then fry. The whole thing takes less time than scrolling through Netflix trying to pick a movie.
Kid-Friendly Treat
Bite-sized = less mess (theoretically). My nieces go nuts for these—they love rolling the dough into little balls almost as much as eating them. Pro tip: Let them do the sugar dusting. It’s adorable and keeps tiny hands busy for a whole 3 minutes.
- Weekend project? Done. These are foolproof enough for lazy Sundays but special enough to feel like a treat.
- Leftovers? Ha. Good luck having any, but if you do, they’re surprisingly good with coffee the next morning.
- Party trick: Serve them warm in a big bowl—watch them vanish before you say “donut.”
Ingredients You’ll Need for Milky Donut Balls
Grab your mixing bowl—this is the easy part! Everything here is pantry-friendly, and I’ve got little notes to make sure your donut balls turn out just right. Pro tip: Measure the milk powder first so you don’t end up elbow-deep in flour and realize you’re short (been there).
Dough Ingredients
- ⅔ cup lukewarm milk – Not hot! You’ll kill the yeast. Think baby-bottle warm (test a drop on your wrist—if it’s comfy, you’re good).
- 1 teaspoon yeast – Instant or active dry works. If your yeast’s been in the fridge since last Christmas, maybe grab fresh—your dough will thank you.
- 2 tablespoon milk powder – The secret weapon! It amps up that creamy flavor. I use full-fat, but any kind works.
- 3 tablespoon sugar – Adjust to taste. I sometimes sneak in an extra tablespoon when I’m feeling wild.
- 3 tablespoon butter – Melted and slightly cooled. Salted or unsalted—your call (I’m team salted for life).
- 1 ½ cups all-purpose flour – Spoon it into the cup and level it off. No heavy-handed scooping!
- Pinch of salt – Balances the sweetness. If you used salted butter, just a tiny pinch.
Dusting Ingredients
This is where the magic happens. Mix these in a shallow bowl while the donuts fry—it’s like setting up a DIY glitter station, but tastier.
- 1 tablespoon milk powder – Trust me, it’s worth doubling down on the milky vibe.
- 1 tablespoon sugar – Granulated or caster sugar both work. For extra crunch, try blending it quick in a spice grinder.
- 1 teaspoon cocoa powder – Optional but glorious. Dutch-processed is dreamy here, but any cocoa works in a pinch.
See? No weird unicorn ingredients. Now let’s make some dough!
Step-by-Step Instructions for Milky Donut Balls
Okay, let’s get to the fun part—making these little clouds of joy! Don’t stress if your dough isn’t perfect—mine never is, and they still turn out amazing. Just follow these steps, and you’ll be snacking on warm donut balls before you know it.
Preparing the Dough
- Wake up the yeast: In a big bowl, mix that lukewarm milk (remember—wrist-test warm!), yeast, and sugar. Give it a quick stir and let it sit for 5 minutes. You’ll see it get frothy—that’s your yeast saying “hello!” If nothing happens, your yeast might be snoozing (or worse, dead). Time for a fresh packet.
- Bring in the good stuff: Add the milk powder, melted butter (not piping hot—we don’t want scrambled eggs here), flour, and that pinch of salt. Stir with a wooden spoon until it comes together into a shaggy mess. Then get your hands in there—knead for about 3-4 minutes until it’s smooth and slightly sticky. Too dry? Add a teaspoon of milk. Too wet? Sprinkle in a bit more flour. Trust your gut!
- Let it rise: Cover the bowl with a damp towel (or plastic wrap if you’re lazy like me) and tuck it somewhere warm. Mine loves hanging out near the oven. Let it double in size—about 1 hour, but if your kitchen’s chilly, it might take longer. No rush!
Shaping and Frying
- Ball time: Punch down the dough (so satisfying) and turn it onto a lightly floured surface. Divide it into 12 little pieces—I use a tablespoon to scoop roughly equal amounts. Roll each between your palms into smooth balls. They’ll look small now, but they’ll puff up like magic in the oil.
- Fry ’em up: Heat about 2 inches of neutral oil (vegetable or canola) in a deep pan over medium heat. Test the temp by dropping in a tiny dough scrap—if it sizzles gently and floats up, you’re golden (literally). Too hot? Turn it down so they don’t burn outside while staying raw inside. Too cool? They’ll soak up oil like sponges. Fry 3-4 balls at a time, turning occasionally, until they’re deep golden brown—about 2 minutes per batch. Drain on paper towels—they’ll be dangerously hot, so resist the urge to taste-test immediately (I never do).
Dusting and Serving
- Sugar shower: While they’re still warm (but cool enough to handle), roll each donut ball in your milk powder-sugar-cocoa mix. I like to do a light coat first, then double-dip for extra sweetness. Pro tip: Toss them in a bowl with the dusting mix and give it a gentle shake—less mess than rolling by hand.
- Serve ASAP: These are best eaten warm, preferably within 10 minutes of frying (as if they’ll last that long). Pile them high on a plate with extra dusting mix on the side for dipping. Watch them disappear—you might need to hide one for yourself!
See? Told you it was easy. Now go forth and fry with confidence—you’ve got this!
Milky Donut Balls Variations
Once you've mastered the basic milky donut balls (which, let's be real, takes about one try), it's time to get playful! These little guys are like blank canvases—perfect for experimenting with flavors. Here are my favorite twists that'll make you feel like a donut wizard:
Chocolate-Coated Option
For when you *really* need a chocolate fix. After frying and draining the donut balls, dip them halfway into melted chocolate (dark, milk, or white—no judgment here). Let them set on a wire rack for that fancy bakery look. Bonus: Sprinkle crushed nuts or rainbow sprinkles on top before the chocolate hardens. Kids go nuts for this version (pun absolutely intended).
Spiced Sugar Dusting
Swap out the plain sugar dusting for something cozier. Mix 1 tablespoon sugar with:
- Cinnamon: Classic and foolproof—½ teaspoon cinnamon + sugar = instant churro vibes.
- Cardamom: A tiny pinch (it's strong!) makes them taste like fancy bakery treats.
- Pumpkin spice: For autumn mode—just stir in ¼ teaspoon of your favorite blend.
Other wild ideas:
- Matcha madness: Replace cocoa powder with matcha powder in the dusting mix—so pretty and slightly earthy.
- Citrus zest: Add grated orange or lemon zest to the dough for a bright kick.
- Stuffed surprise: Flatten each dough ball slightly, tuck in a chocolate chip or jam dollop, then reseal before frying.
The best part? No wrong answers. Taste-testing "failures" is still a win!
Serving and Storage Tips for Milky Donut Balls
Let’s be real—these donut balls rarely last long enough to need storage tips. But just in case you’ve got superhero-level self-control (or made a double batch), here’s how to keep them happy:
Serving: Pile them high on a plate while they’re still warm—that’s when they’re at their absolute best. The sugar dusting melts slightly, creating this dreamy, crackly-sweet crust. I like to serve them with extra dusting mix in little bowls for dipping (because more sugar is always the answer). For a fun twist, thread them onto skewers with fresh berries for a donut-kebab situation.
Storage: If by some miracle you have leftovers, tuck them into an airtight container at room temp for up to 1 day. They’ll lose some fluffiness but still taste great. Day two? Pop ‘em in the microwave for 10 seconds—just enough to revive that warm, doughy magic. Freezing? Not ideal, but if you must, freeze unfrosted balls on a tray first, then bag them. Reheat in a 350°F oven for 5 minutes and dust fresh.
Pro tip: Hide a few in your snack drawer. You’ll thank yourself later.
Helpful Notes for Perfect Milky Donut Balls
Alright, let’s talk pro tips—the little things that take these from “good” to “where-have-you-been-all-my-life” status. I’ve made every mistake so you don’t have to:
- Yeast check: If your dough doesn’t rise, chances are your yeast is older than your last phone. Fresh yeast = happy, puffy donuts. Test it in warm water with a pinch of sugar—if it doesn’t foam within 5 minutes, toss it.
- Oil temp is everything: Too hot = burnt outsides, doughy insides. Too cool = greasy donuts. Aim for 350°F if you’ve got a thermometer, or use the breadcrumb test—a tiny piece should sizzle and float immediately.
- Size matters: Keep the balls small (about 1-inch diameter). Bigger ones won’t cook evenly, and let’s be honest—mini food is just more fun.
- Sugar flexibility: Not a sweets fan? Reduce sugar in the dough by half. Want extra decadence? Roll the fried balls in melted butter before dusting (you’re welcome).
Remember: Lopsided donut balls taste just as good as perfect ones. Embrace the chaos!
Frequently Asked Questions About Milky Donut Balls
Got questions? I’ve got answers (and probably asked these same ones the first time I made these!). Here’s the scoop on keeping your donut ball game strong:
Can I Bake Instead of Fry?
You *can*, but—fair warning—they won’t be quite the same. Baking gives them a more bready, less crispy texture. If you’re committed to the oven life: Preheat to 350°F, arrange balls on a lined baking sheet, and bake for 12-15 minutes until golden. Brush with melted butter right after baking, then dust. They’ll still taste good, but let’s call them "donut-adjacent" for honesty’s sake.
How to Keep Them Soft?
The enemy here is air! Store cooled leftovers (if any!) in an airtight container with a slice of bread—the bread absorbs moisture to keep them from drying out. They’ll last 1 day at room temp or 2 days in the fridge (though the fridge makes them a tad denser). To revive, microwave for 10 seconds or warm in a 300°F oven for 5 minutes.
Other burning questions:
- No milk powder? Use an extra tablespoon of flour, but you’ll miss that creamy depth.
- Can I prep dough ahead? Yes! After the first rise, punch it down, cover tightly, and fridge overnight. Let it sit at room temp 30 minutes before shaping.
- Why are mine dense? Over-kneading or old yeast are the usual suspects. Be gentle, and check that expiration date!
Final Thoughts on Milky Donut Balls
If there's one recipe that never fails to make my kitchen feel like a little corner of happiness, it's these milky donut balls. They're the kind of treat that turns an ordinary afternoon into something special—whether you're sneaking them fresh from the pan with sticky fingers or watching your kid's face light up at the first bite. Simple, yes, but sometimes the simplest things taste the best.
What I love most is how forgiving they are. Mess up the dough shape? They'll still taste incredible. Burn one batch? (We've all been there.) The next one will be perfect. That's the magic of home cooking—it doesn't have to be flawless to be wonderful. So grab that flour, heat up that oil, and get ready for the easiest, coziest little bites of joy. You'll wonder why you didn't make them sooner!
Print
Fluffy Milky Donut Balls
- Total Time: 25 mins
- Yield: 12 donut balls 1x
- Diet: Vegetarian
Description
Fluffy, milky donut balls dusted with sugar and cocoa powder for a sweet treat.
Ingredients
- ⅔ cup lukewarm milk
- 1 tsp yeast
- 2 tbsp milk powder
- 3 tbsp sugar
- 3 tbsp butter
- 1 ½ cups all-purpose flour
- Salt to taste
- 1 tbsp milk powder (for dusting)
- 1 tbsp sugar (for dusting)
- 1 tsp cocoa powder (for dusting)
Instructions
- Mix lukewarm milk, yeast, and sugar in a bowl. Let it sit for 5 minutes.
- Add milk powder, butter, flour, and salt. Knead into a soft dough.
- Cover and let the dough rise for 1 hour.
- Divide the dough into small balls.
- Fry the balls in oil until golden brown.
- Dust with milk powder, sugar, and cocoa powder.
- Serve warm.
Notes
- Use fresh yeast for best results.
- Adjust sugar to taste.
- Fry on medium heat to avoid burning.
- Prep Time: 15 mins
- Cook Time: 10 mins
- Category: Dessert
- Method: Frying
- Cuisine: International
Nutrition
- Serving Size: 1 donut ball
- Calories: 120
- Sugar: 8g
- Sodium: 50mg
- Fat: 5g
- Saturated Fat: 3g
- Unsaturated Fat: 2g
- Trans Fat: 0g
- Carbohydrates: 16g
- Fiber: 0.5g
- Protein: 2g
- Cholesterol: 10mg
Keywords: milky donut balls, sweet snack, homemade donuts

Leave a Reply